Developer Guide
- Acknowledgements
- Setting up, getting started
- Design
- Implementation of Home Commands
- Implementation of Course Commands
- Implementation of other notable features
- Documentation, logging, testing, configurations, dev-ops
- Appendix: Requirements
- Appendix: Instructions for manual testing
- Appendix: Effort
- Appendix: Planned Enhancements
Acknowledgements
Setting up, getting started
Refer to the guide Setting up and getting started.
Design
.puml files used to create diagrams in this document can be found in the diagrams folder. Refer to the PlantUML Tutorial at se-edu/guides to learn how to create and edit diagrams.
Architecture
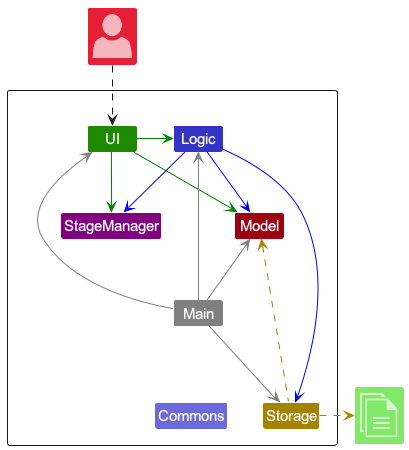
The Architecture Diagram given above explains the high-level design of the App. Given below is a quick overview of main components and how they interact with each other.
Main components of the architecture
Main has two classes called Main
and MainApp
- At app launch: Initializes the components in the correct sequence, and connects them up with each other.
- At shut down: Shuts down the components and invokes cleanup methods where necessary.
Commons represents a collection of classes used by multiple other components.
The rest of the App consists of five components.
-
UI: The UI of the App. -
Logic: The command executor. -
Model: Holds the data of the App in memory. -
Storage: Reads data from, and writes data to, the hard disk. -
StageManager: Keeps track of the App’s current stage.
How the architecture components interact with each other
The Sequence Diagram below shows how the components interact with each other for the scenario where the user issues the command delete 1.
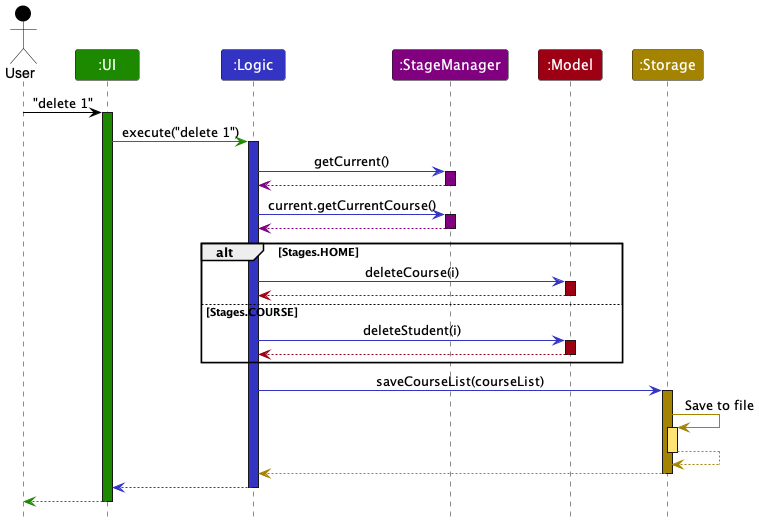
StageManager (shown in the diagram above) is accessible by the Logic component for checking and updating the app’s current stage.
Each of the other four main components (also shown in the diagram above),
- defines its API in an
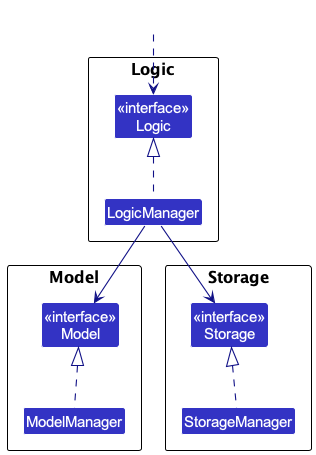
interfacewith the same name as the Component. - implements its functionality using a concrete
{Component Name}Managerclass which follows the corresponding APIinterfacementioned in the previous point.
For example, the Logic component defines its API in the Logic.java interface and implements its functionality using the LogicManager.java class which follows the Logic interface.
Other components interact with a given component through its interface rather than the concrete class (reason: to prevent outside component’s being coupled to the implementation of a component), as illustrated in the (partial) class diagram below.
The sections below give more details of each component.
UI component
The API of this component is specified in Ui.java
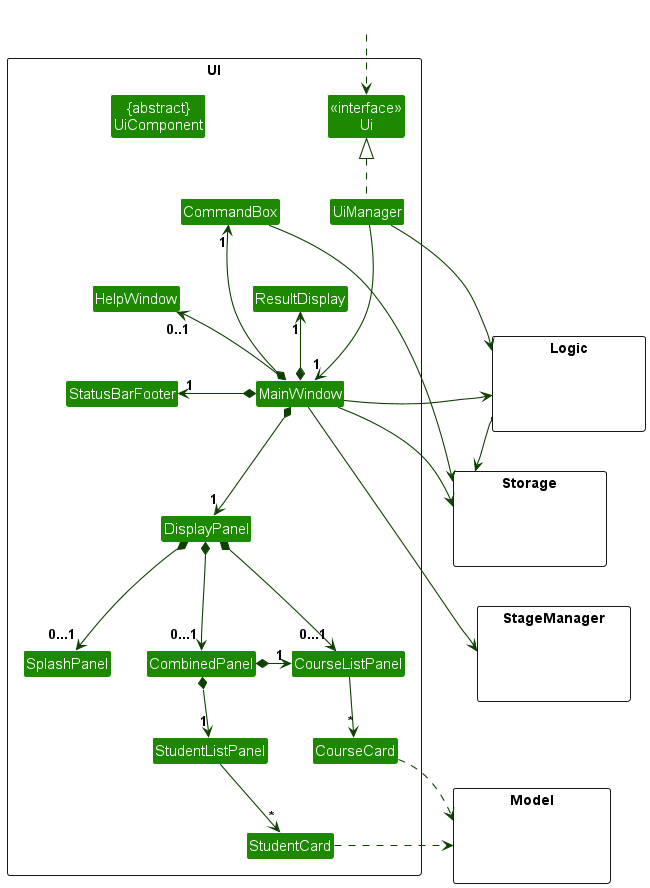
The UI consists of a MainWindow that is made up of parts e.g.CommandBox, ResultDisplay, CourseListPanel, CombinedPanel, StatusBarFooter etc.
All these, including the MainWindow, inherit from the abstract UiComponent class which captures the commonalities between classes that represent parts of the visible GUI.
The MainWindow includes a DisplayPanel, which has three different states it can toggle between
- The
SplashPanelfor the opening splash window - The
CombinedPanelthat displays the student list and a course list sidebar - The
CoursePanelthat displays the course list (this is otherwise known as thehomescreen)
The UI component uses the JavaFx UI framework.
The layout of these UI components are defined in matching .fxml files that are in the src/main/resources/view folder.
For example, the layout of the MainWindow is specified in MainWindow.fxml
The UI component,
- executes user commands using the
Logiccomponent. - listens for changes to
Modeldata so that theUIcan be updated with the modified data. - keeps a reference to the
Logiccomponent, because theUIrelies on theLogicto execute the commands. - keeps a reference to the
StageManagerto update theUIwith its corresponding display panel. - depends on some classes in the
Modelcomponent, as it displaysCourseandStudentobjects residing in theModel. - depends on some classes in the
Storagecomponent, as it updates to and retrieves user inputs from theStorage.
The typical flow of a user’s interaction with the UI is as follows.
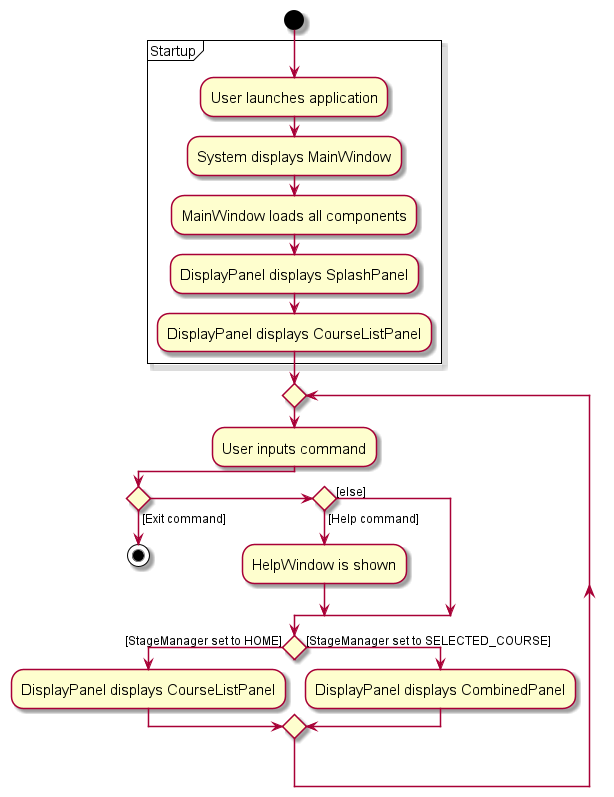
During startup, the MainWindow will be displayed and all components loaded into it, with a splash screen showing before entering the course list display.
For user commands, there are two unique commands which cause separate actions to be performed:
-
exit, which immediately closes the application. -
help, which displays the help window pop-up.
After each command (assuming the application is not closed), the UI will check with the StageManager to see which stage it is set to,
(either StageManager.HOME or StageManager.SELECTED_COURSE) and displays the corresponding panel
(CourseListPanel for HOME and CombinedPanel for SELECTED_COURSE).
This action flow will loop until the user decides to exit the application. During the application’s runtime, the user may also exit the application through the MainWindow’s top panel buttons (File -> Exit) or the red ‘x’ button on the top right of the application screen.
Logic component
API : Logic.java
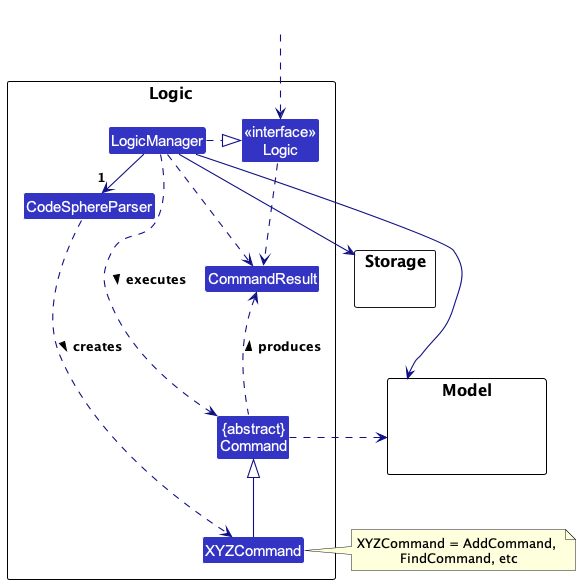
Here’s a (partial) class diagram of the Logic component:
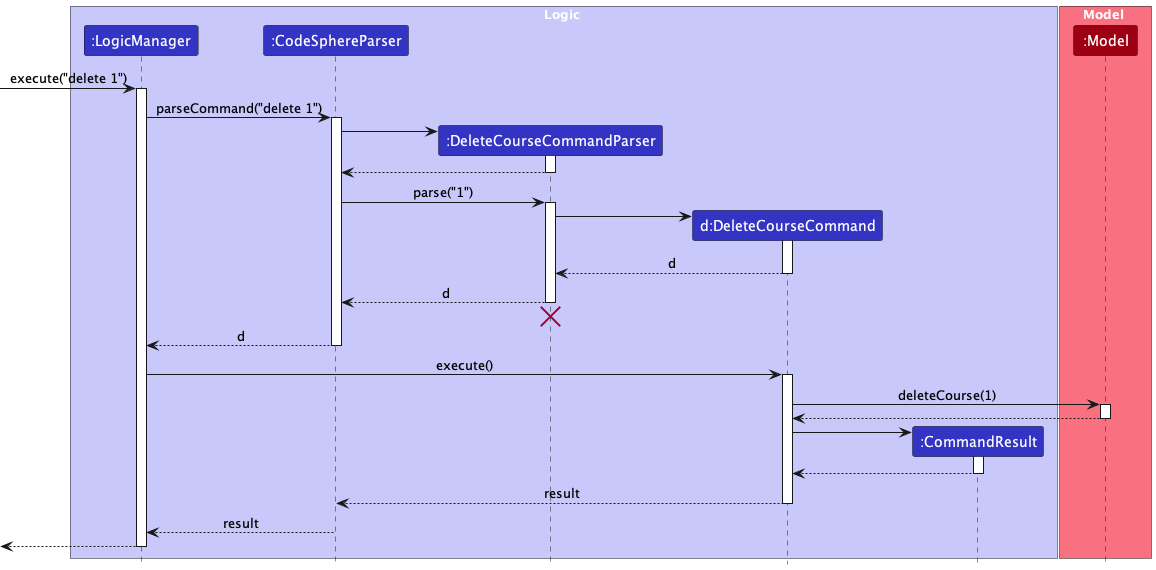
The sequence diagram bellow ilustrates the interactions within the Logic componenet, using execute("delete 1") API call as an example.
How the Logic component works:
- When
Logicis called upon to execute a command, it uses theCodeSphereParserobject to parse the user command. This in turns creates a parser that matches the command (e.g.,DeleteCourseCommandParser) which will parse the relevant arguments in the user input. - This results in a
Commandobject (more precisely, an object of one of its subclasses e.g.,AddCommand) which is executed by theLogicManager. - The command can communicate with the
Modelwhen it is executed (e.g. to add an item). - The result of the command execution is encapsulated as a
CommandResultobject which is returned fromLogic.
DeleteCourseCommandParser should end at the destroy marker (X) but due to a limitation of PlantUML, the lifeline reaches the end of diagram.
Here are the other classes in Logic (omitted from the class diagram above) that are used for parsing a user command:
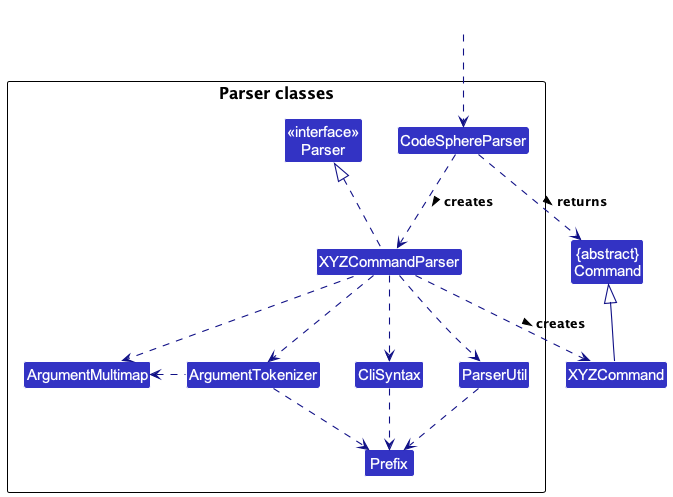
How the parsing works:
- When called upon to parse a user command, the
CodeSphereParserclass creates anXYZCommandParser(XYZis a placeholder for the specific command name e.g.,AddCommandParser) which uses the other classes shown above to parse the user command and create aXYZCommandobject (e.g.,AddCommand) which theCodeSphereParserreturns back as aCommandobject. - All
XYZCommandParserclasses (e.g.,AddCommandParser,DeleteCommandParser, …) inherit from theParserinterface so that they can be treated similarly where possible e.g, during testing. - All
XYZCommandParserclasses throw a ParseException if there are any errors with the arguments.
Model component
API : Model.java
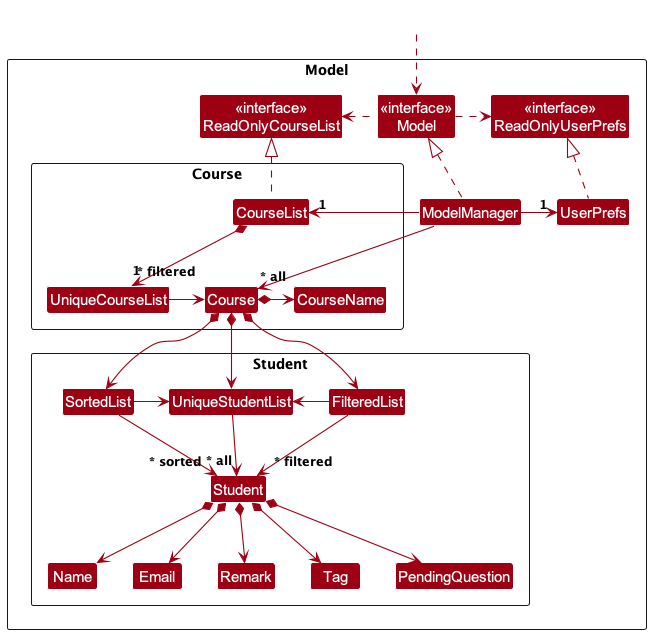
The Model component,
- stores the app data i.e., all
CourseandStudentobjects (which are contained in aUniqueCourseListandUniqueStudentListobjects respectively). - stores the currently ‘selected’
Courseobjects (e.g., results of a search query) as a separate filtered list which is exposed to outsiders as an unmodifiableObservableList<Course>that can be ‘observed’ e.g. the UI can be bound to this list so that the UI automatically updates when the data in the list change. - stores the currently ‘selected course’s’
Studentobjects (e.g., results of a search query) as a separate filtered list which is exposed to outsiders as an unmodifiableObservableList<Student>that can be ‘observed’ e.g. the UI can be bound to this list so that the UI automatically updates when the data in the list change. - stores a
UserPrefobject that represents the user’s preferences. This is exposed to the outside as aReadOnlyUserPrefobjects. - does not depend on any of the other three components (as the
Modelrepresents data entities of the domain, they should make sense on their own).
Storage component
API : Storage.java
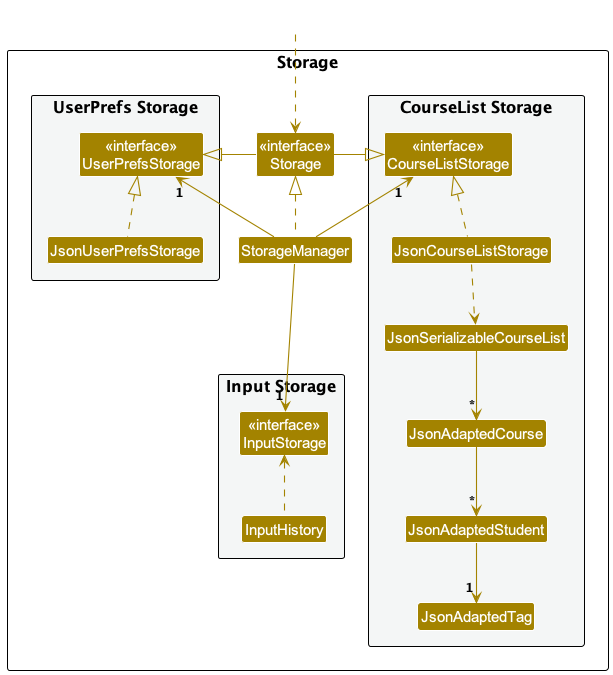
The Storage component,
- can save both CourseList data and user preference data in json format, and read them back into corresponding objects.
- can save user inputs and retrieve them in the future
- inherits from both
CourseListStorageandUserPrefStorage, which means it can be treated as either one (if only the functionality of only one is needed). - depends on some classes in the
Modelcomponent (because theStoragecomponent’s job is to save/retrieve objects that belong to theModel)
The Storage component builds upon the AB-3 Storage component by adding an InputStorage, which encapsulates the concept of storing user inputs. These user inputs are stored in chronological order and are accessed through the StorageManager. All user inputs will be stored in the InputStorage, and will also contain the data whether the input was accepted as a valid command or not. Handling of this input validity will be done by the UI component.
Common classes
Classes used by multiple components are in the seedu.codesphere.commons package.
Implementation of Home Commands
This section describes some noteworthy details on how certain features on the Home Page are implemented.
Add a course
About the add course feature
The add command on the home page allows users to add a course/class that they teach as a TA. For example,
a user can use add CS2103T to add the course CS2103T onto the home page for their management.
Implementation Details
The add command here is supported by the AddCourseCommand and AddCourseCommandParser. Users are able to add a
non-duplicate course to the existing course list.
Parsing user input
- The user inputs
addand provides ac/COURSENAMEthat they teach. - The
CodeSphereParserthen does preliminary processing to the user input and creates a newAddCourseCommandParser. - The
AddCourseCommandParserparses the user input and checks if the prefixc/is present and there is only one such prefix present. If not, aParseExceptionis thrown. -
AddCourseCommandParserwill then callParserUtil#parseCourseName()to verify if the inputCOURSENAMEis valid. If invalid, aParseExceptionis thrown. - An
AddCourseCommandwill then be created with the respective input.
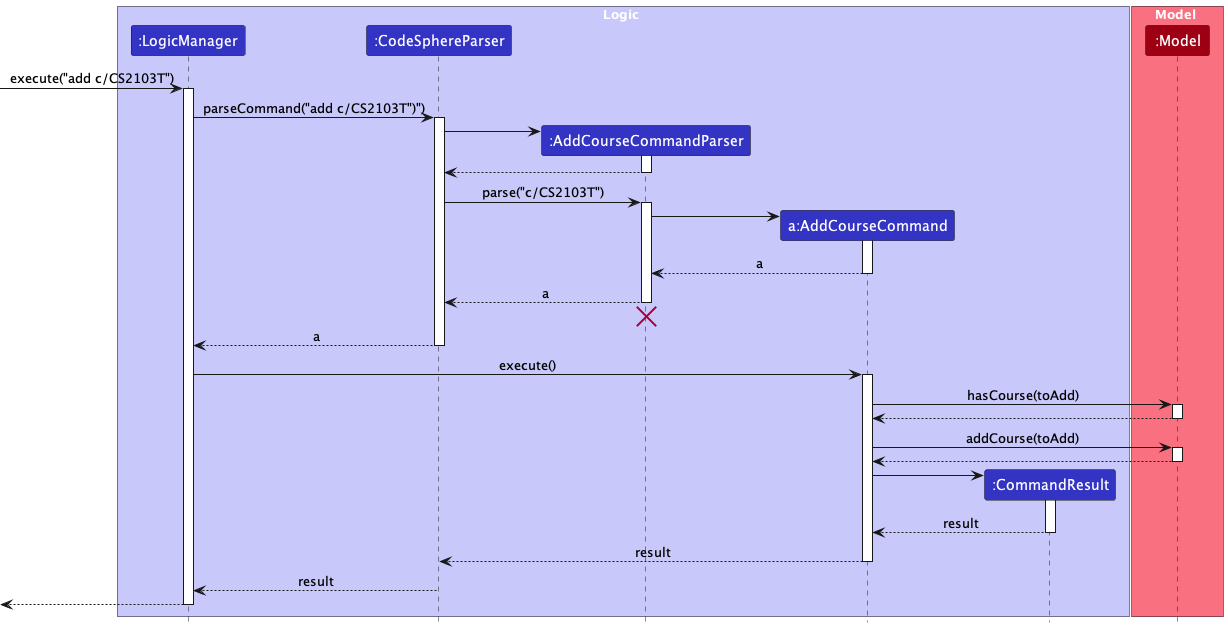
Command Execution
- The
LogicManagerexecutes theAddCourseCommand. - The
AddCourseCommandcallsModel#hasCourse()to check for duplicate courses. If duplicate present, aCommandExceptionis thrown. -
Model#addCourse()will then be called to add the input course to the course list.
Displaying of result
- Lastly, the
AddCourseCommandcreates aCommandResultwith a success message and return it to theLogicManagerto complete the command execution. The GUI will also be updated accordingly as it calls thefilteredCourseListwhich was updated during the execution of the command.
The following sequence diagram shows how the add mechanism in the home page works:
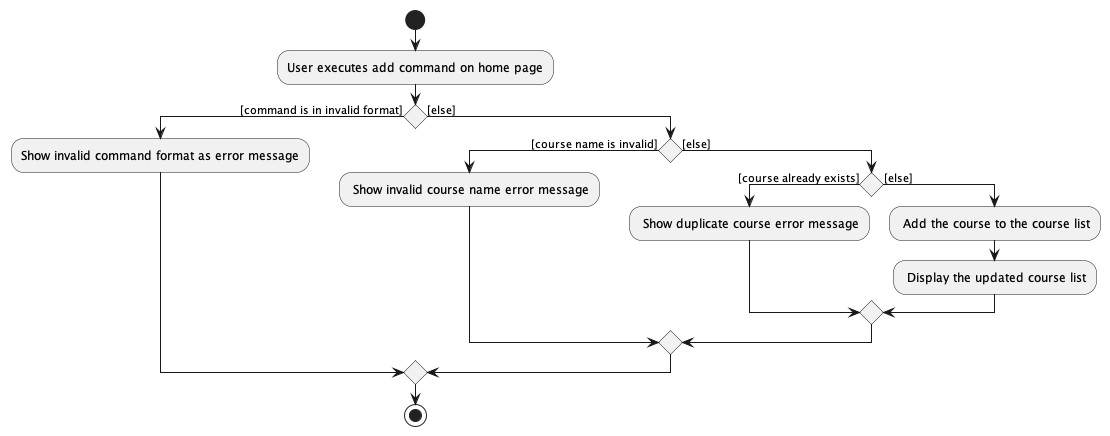
The following activity diagram summaries what happens when a user executes the add command:
Edit a course
About the edit course feature
The edit command on the home page allows users to edit the course name a course/class that they teach as a TA. For example,
a user can use edit 1 c/CS2103T to edit the course at the first index of the displayed list to have course name CS2103T.
Implementation Details
The add command here is supported by the EditCourseCommand and EditCourseCommandParser. Users are able to edit
a course as long as the new course name is not a duplicate in the existing course list.
Parsing user input
- The user inputs
editand provides theINDEXof the course to edit, and thec/NEW_COURSENAMEof the existing course. - The
CodeSphereParserthen does preliminary processing to the user input and creates a newEditCourseCommandParser. - The
EditCourseCommandParesrparses the user input and checks if the inputINDEXis valid by callingParserUtil#parseIndex(). -
EditCourseCommandParesrthen checks if the prefixc/is present and there is only one such prefix present. If not, aParseExceptionwill be thrown. -
EditCourseCommandParserwill then callParserUtil#parseCourseNameto verify if the inputNEW_COURSENAMEis valid. If invalid, aParseExceptionwill be thrown. - An
EditCourseDescriptoris then created with theNEW_COURSENAME. - A check will be done to see if there was a change in the course name.
- An
EditCourseCommandis created with the index andEditCourseDescriptor.
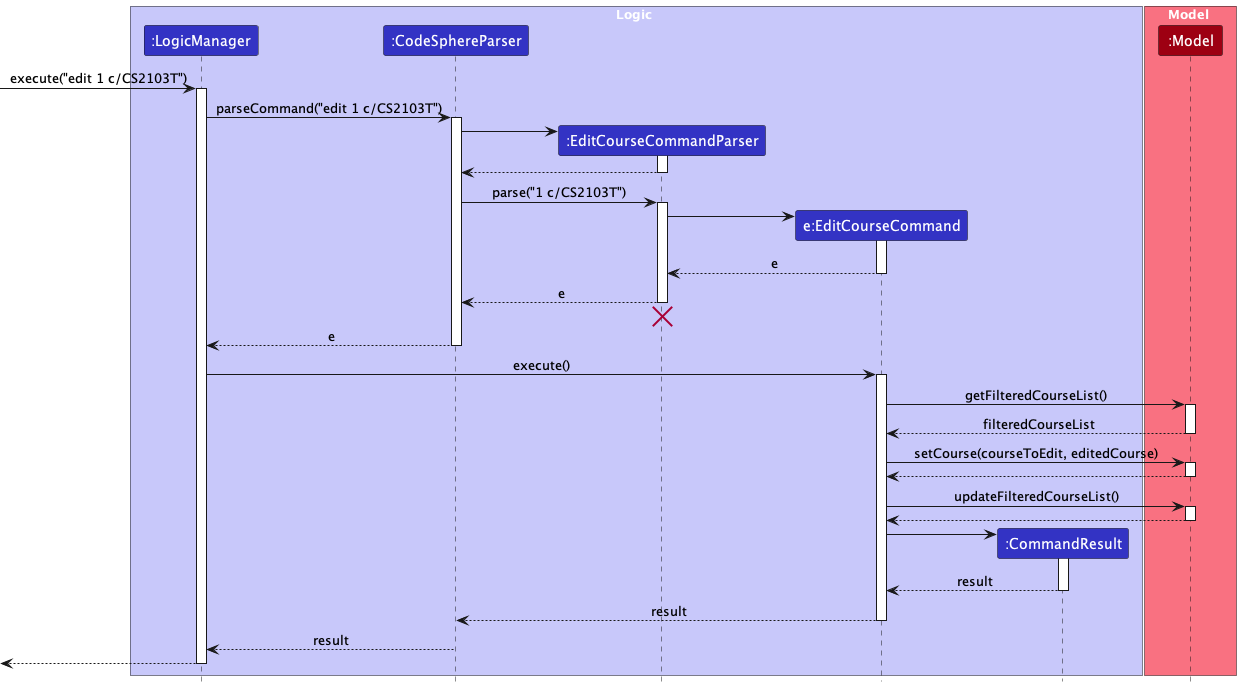
Command Execution
- The
LogicManagerexecutes theEditCourseCommand. - The
EditCourseCommandcreates aneditedCoursewith the new course name. -
EditCourseCommandthen callsModel#hasCourse()to check for duplicate courses. If duplicate present, aCommandExceptionis thrown. -
Model#setCourse()is called to replace the target course witheditedCourse. -
Model#updateFilteredCourseList()is called to update the filtered list.
Displaying of result
- Lastly, the
EditCourseCommandcreates aCommandResultwith a success message and return it to theLogicManagerto complete the command execution. The GUI will also be updated accordingly as it calls thefilteredCourseListwhich was updated during the execution of the command.
The following sequence diagram shows how the edit mechanism in the home page works:
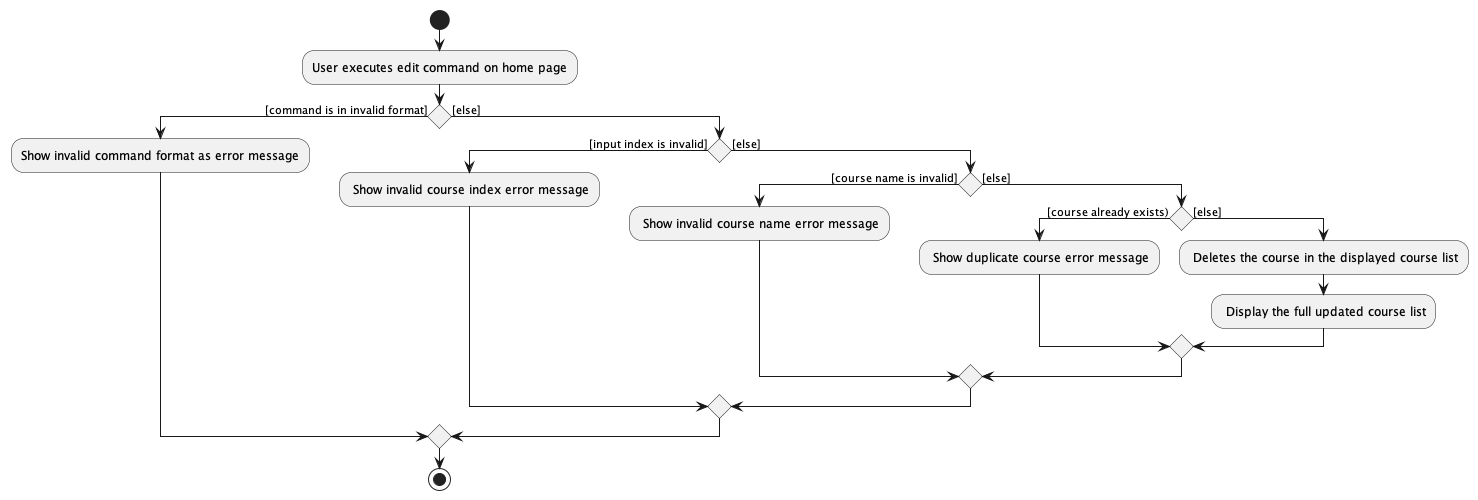
The following activity diagram summarises what happens when a user executes the edit command:
Delete a course
About the delete course feature
The delete command on the home page allows users to delete an existing course in the displayed course list. For example,
a user can use delete 1 to delete the course at the first index of the displayed list.
Implementation Details
The delete command here is supported by the DeleteCourseCommand and DeleteCourseCommandParser. Users are able to delete
a course as long as the index is valid.
Parsing user input
- The user inputs
deleteand provides theINDEXof the existing course to delete. - The
CodeSphereParserthen does preliminary processing to the user input and creates a newDeleteCourseCommandParser. - The
DeleteCourseCommandParserparses the user input and checks if the inputINDEXis valid by callingParserUtil#parseIndex(). If invalid, aParseExceptionis thrown. - A
DeleteCourseCommandis then created with the respective index.
Command Execution
- The
LogicManagerexecutes theDeleteCourseCommand. - The
DeleteCourseCommandcallsModel#getFilteredCourseList()to get an unmodifiable view of the filtered course list to determine the course to delete based on the input INDEX. -
Model#deleteCourse()will then be called to delete the target course from the displayed course list. -
Model#resetFilteredCourseList()will then be called to update the filtered course list.
Displaying of result
- Lastly, the
DeleteCourseCommandcreates aCommandResultwith a success message and return it to theLogicManagerto complete the command execution. The GUI will also be updated accordingly as it calls thefilteredCourseListwhich was updated during the execution of the command.
The following sequence diagram shows how the delete mechanism in the home page works:
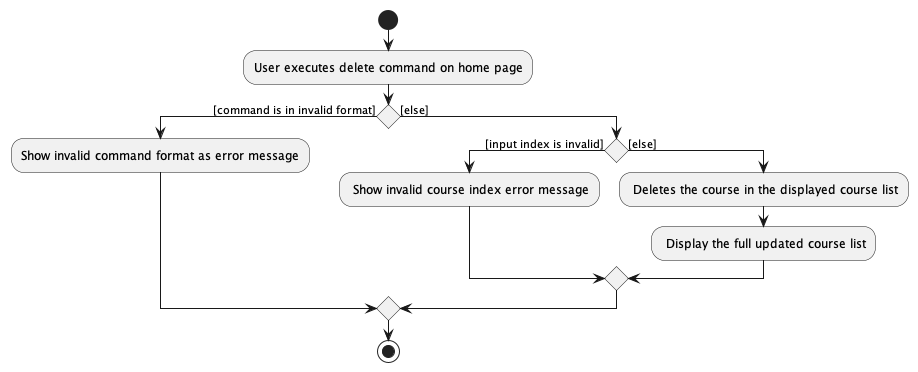
The following activity diagram summarises what happens when a user executes the delete command:
Implementation of Course Commands
Sort student list for a selected course feature
About the sort student list for a selected course feature
The sort student list feature allows users to sort the student list for a selected course in the order specified as the SORT_CRITERIA, which can either be NAME or TAG.
Implementation details
The sort mechanism is facilitated mainly by the SortCommand, SortCommandParser and SortCriteria.
Parsing user input
- The user inputs the
sortcommand and specifies the sort criteria after the sort command prefix, in the format ofsort s/SORT_CRITERIA(eg.sort s/tagor `sort s/name). - The
CodeSphereParserthen does preliminary processing to the user input and creates a newSortCommandParser. - The
SortCommandParserthen parses the user input and first checks whether the sort prefix/sis present. It also checks that there are no prefix duplicates. At this stage, if the sort prefix is not present or if the input contains multiple sort prefixes,ParseExceptionwould be thrown. - Next,
ParsetUtil#parseSortCriteria()is called to check the validity of the inputSORT_CRITERIAinput. At this stage,ParseExceptionwould be thrown if theSORT_CRITERIAspecified is invalid. - The
SortCommandParserthen creates theSortCommandbased on the processed inputs.
Command execution
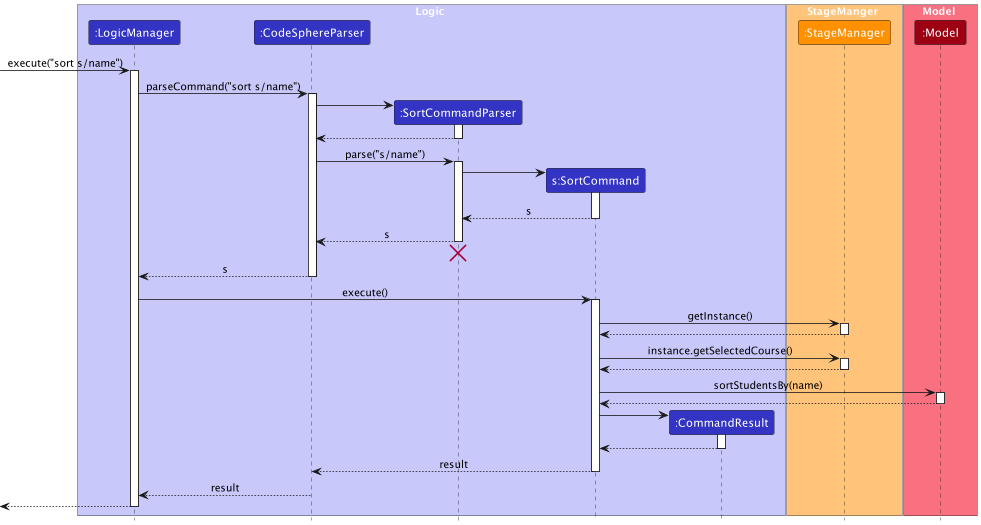
- The
LogicManagerexecutes theSortCommand. - The
SortCommandobject’sexecute()method is called.SortCommandfirst gets the singleton instance ofStageManagerthroughStageManager#getInstance(), then gets the current selectedCourseobject throughStageManager#getSelectedCourse(). - Finally,
SortCommandcallsCourse#sortStudentsBy()to sort the student list based on theSORT_CRITERIAspecified, and updates the displayed student list accordingly.
Displaying of result
-
SortCommandcreates aCommandResultwith a success message and returns it to theLogicManagerto complete the command execution. - The GUI is updated following the changes in the student list and the display of the student list is updated accordingly.
Below is a sequence diagram that shows how the sort mechanism works:
The following activity diagram summaries what happens when a user executes the sort command:
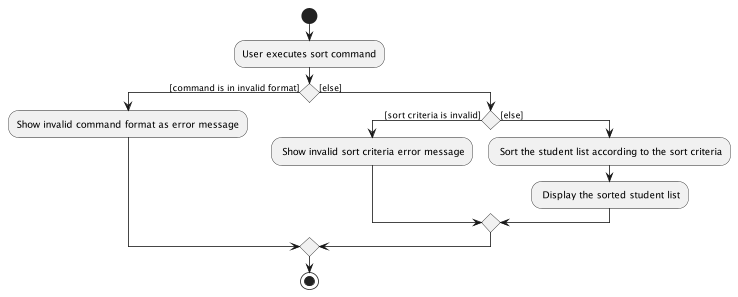
Design considerations
Aspect: Command syntax
-
Alternative 1 (current choice):
sort s/SORT_CRITERIA.- Pros: Simple command with minimal fields, where only a single sort prefix is needed.
-
Cons: Users do not have a choice for sorting by ascending or descending order. When the
SORT_CRITERIAisNAME, student names are displayed in ascending order, with names starting with ‘A’ at the top of the list. ForTAG, students with performance tagGOODare at the top of the list.
-
Alternative 2:
sort s/SORT_CRITERIA o/SORT_ORDER.- Pros: Provides users with more options which allows for greater flexibility.
-
Cons: Users are required to use a second
SORT_ORDERprefix/oin addition to theSORT_CRITERIAprefixs/, which can slow down the use of the command.
-
Alternative 3:
sort s/SORT_CRITERIA [o/desc], where[o/desc]is optional.-
Pros: Retains the flexibility provided by Alternative 2, but also the conciseness of Alternative 1 should they wish to leave the
SORT_ORDERempty. -
Cons: Users who are not aware of the optional
[o/desc]field may not use it.
-
Pros: Retains the flexibility provided by Alternative 2, but also the conciseness of Alternative 1 should they wish to leave the
Aspect: Which fields should be considered as a valid sort criteria
-
Alternative 1 (current choice):
NAMEandTAGare the only two valid criteria.-
Pros: Users can easily remember the valid criteria as there are only two options.
NAMEandTAGare also the two criteria that are likely to be the most useful criteria to sort students by. - Cons: Users do not have the choice to sort by other criteria.
-
Pros: Users can easily remember the valid criteria as there are only two options.
-
Alternative 2: All student fields are considered to be a valid.
- Pros: Users have the ability to sort by any field.
-
Cons: Allowing sorting by the other student fields add very little value to the users. Sorting by
NAMEcan be useful for administrative purposes, while sorting byTAGcan be useful in helping the user identify the group of weaker students. However, it is unlikely that users will need to see the student list sorted byEMAIL,PENDING_QUESTIONorREMARKfields.
Add a pending question to a student from a selected course
About the adding a pending question feature
The pq command allows the user to add a pending question to a student based on the index input from the user.
For example, a user could add a pending question such as Tutorial 1 Question 10 to the second student from the list by using pq 2 pq/Tutorial 1 Question 10.
It’s important to note that adding a pending question to a student is not cumulative. In other words, adding another pending question to a student with an existing pending question will replace the old pending question with the new one.
Implementation Details
The pq command here is supported by the PendingQuestionCommand and PendingQuestionCommandParser. Users are able to add
a pending question to a student as long as the index provided is valid.
Parsing user input
- The user inputs the
pqcommand, provides the index of the targeted student, and follows it by the pending question using the prefixpq. - The
CodeSphereParserthen does preliminary processing to the user input and creates a newPendingQuestionCommandParser. - The
PendingQuestionCommandParserparses the user input and checks whether the input is the correct format. For example, the index must be valid and the input afterpqcannot be empty.
If the conditions are not met, aParseExceptionis thrown.
Command execution
- The
LogicManagerexecutes thePendingQuestionCommand. -
StageManageris used to retrieve the currentCourseby callingStageManager#getCurrentCourse(). - The
PendingQuestionCommandcalls theCourse#getFilteredStudentList()to obtain a list ofStudentbelonging to the course object and identify the targetedStudentfrom the list. - A check for index from the user input will be done.If the index is invalid, a
CommandExceptionwill be thrown. - A new
Studentobject is created by passing in thePendingQuestioninstance to the Student constructor. - Update the newly created Student instance to replace the old Student instance.
Displaying of result
- The
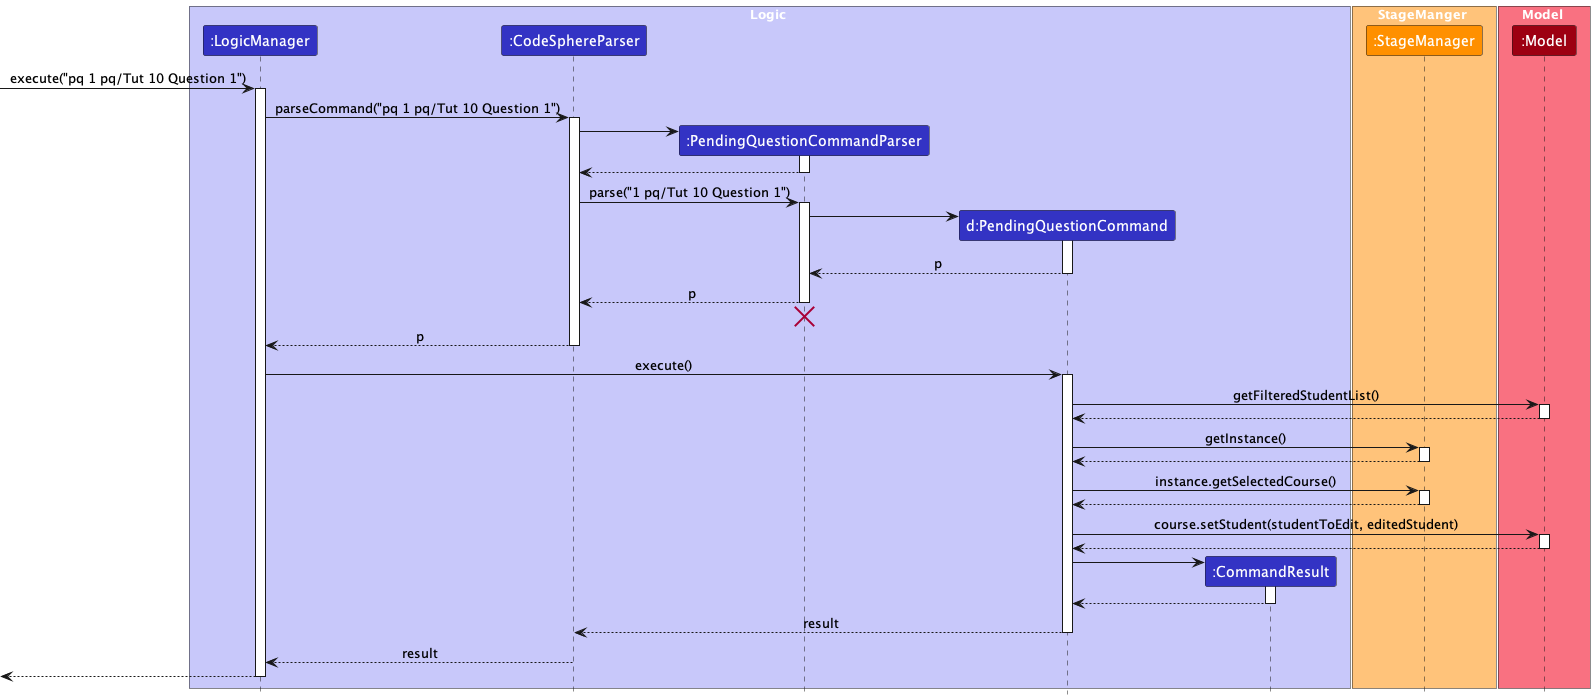
PendingQuestionCommandwill create aCommandResultwith a success message and return it to the LogicManager to complete the command execution. The GUI will also be updated accordingly as it calls thefilteredStudentListwhich was updated during the execution of the command.
The following sequence diagram shows how the pq mechanism works:
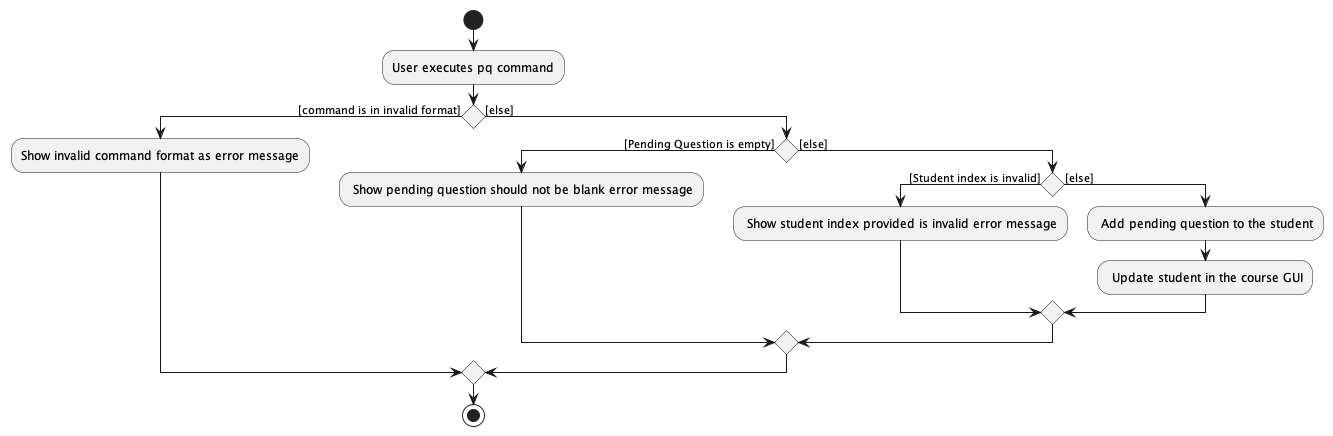
The following activity diagram summarises what happens when a user executes the pq command:
Finding a student from a selected course
About the find feature
The find command allows users to search for relevant students based on details of the specified criteria in their input. For example, a user could use find n/KEYWORDS to find a students names which contain or match that with the keywords.
They can use keywords in NAME, EMAIL, TAG, REMARK to find students with words or phrases containing all of the words mentioned in keywords.
Do note that only 1 criterion can be used at one time.
Implementation Details
The partial class diagram of the find command can be seen. What is important to note here is the use of a Predicate class and the updateFilteredStudentList method which utilises the predicate class.
There are multiple different predicate classes created to accurately filter through the student list. Below, is the example usage scenario and how the find mechanism behaves at each step.
Parsing user input
- The user inputs the
findcommand and provide the input with the attribute of the student contact and its respective prefix (eg.n/NAMEorr/REMARK) in which the user wants to find the student. - The
CodeSphereParserthen does preliminary processing to the user input and creates a newFindCommandParser. - The
FindCommandParserparses the user inputs and checks for whether the input is the correct format. The input needs to contain only 1 prefix and the keywords cannot be empty. If the conditions are not met aParseExceptionis thrown. - If the format is valid, a predicate class matching the prefix is created. For example, for
NAME, the predicate object created isNameContainsKeywordsPredicate. This class takes in the values of the keywords and the object is passed into the newly createdFindCommandobject.
Command execution
- The
LogicManagerexecutes theFindCommand. - The
FindCommandcalls theModel#updateFilteredStudentList()to update the filtered student list based on predicate class. - The
FindCommandthen calls theModel#getFilteredStudentList()#size()to get the size of the student list. The size will correspond to the number of students listed.
Displaying of result
- The
FindCommandwill create aCommandResultwith a success message and return it to theLogicManagerto complete the command execution. The GUI will also be updated accordingly as it calls thefilteredStudentListwhich was updated during the execution of the command.
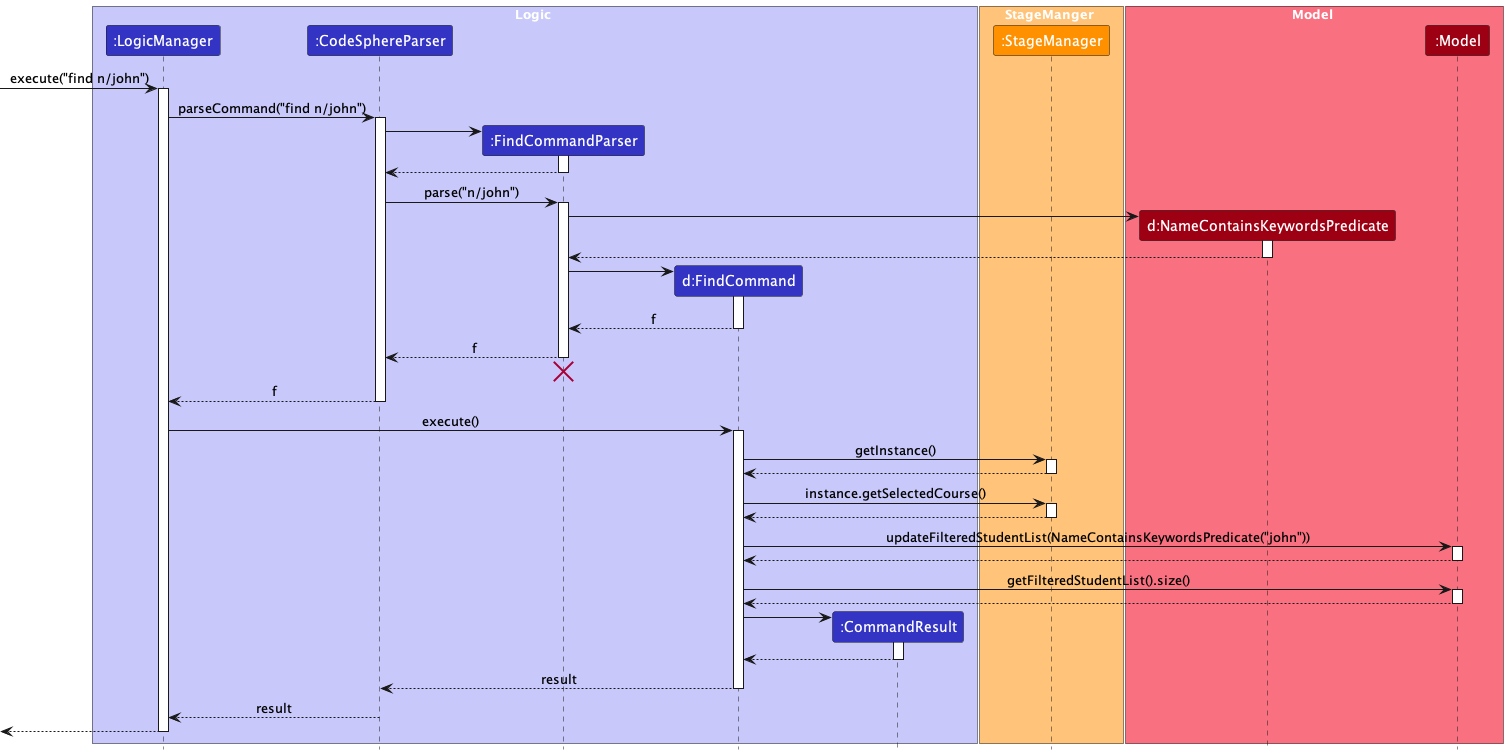
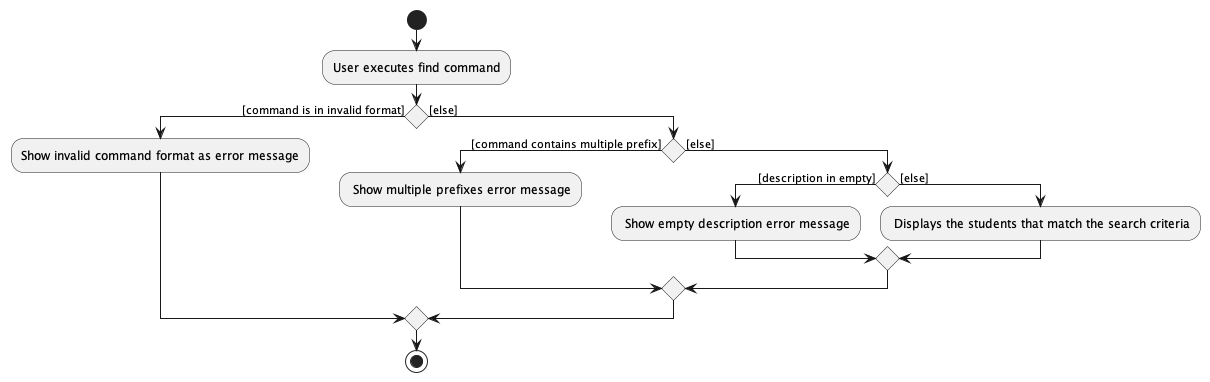
The following sequence diagram shows how the find mechanism works:
The following activity diagram summarizes what happens when a user executes the pq command:
Design considerations
Aspect: How should multiple keywords be considered
-
Alternative 1 (current choice): Whether all keywords are contained in any order in the specified criteria
- Pros: Provides a more specific and refined search.
- Cons: May result in fewer matches if all keywords are not present.
-
Alternative 2: At least 1 keyword is contained
- Pros: Increases the likelihood of finding matches.
- Cons: Might lead to less precise results if only one keyword is present.
Aspect: How should the filtered list be filtered based on the keywords
-
Alternative 1 (current choice): As long as keywords are contained inside
- Pros: More flexible and tolerant to variations in keyword placement.
- Cons: May include irrelevant matches if keywords are part of larger words.
-
Alternative 2: Instead of contains, do a complete word match
- Pros: Provides more precise matching by requiring complete word matches.
- Cons: May exclude relevant matches if keywords are not complete words.
These considerations and alternatives should be weighed based on the specific requirements and expected user experience in your application. You can copy and paste this code into a Markdown editor or file to render the formatted text.
Implementation of other notable features
Input History
About the input history feature
CodeSphere allows all the user’s previously entered text (referred to as ‘input’) to be saved and retrieved at a later date. Retrieval of this input history is through the ‘UP’ and ‘DOWN’ keys on the keyboard.
Handling user input
How the input history handles the user input can be seen from the following activity diagram
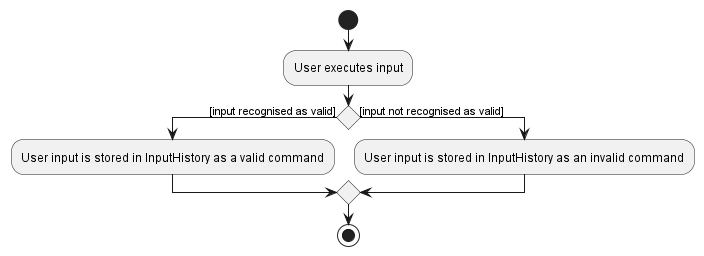
When the user inputs text through the CommandBox, the program will see if the input returns a successful command
or throws an exception (which causes the program to display an error such as ‘Unknown command’); the user input will then be
correspondingly be stored as either a valid or invalid command in InputHistory.
Internal implementation of Input History
InputHistory stores inputs in a data structure that keeps track of the user input as a string,
as well storing the information on whether the input was parsed as a valid command.
InputHistory also contains a pointer that will keep track of which command in the history is being displayed so that
it can display the relevant ‘previous’ and ‘next’ command when required.
Entering any input will cause the pointer in InputHistory to be reset to display the latest command upon the next retrieval.
Handling key presses
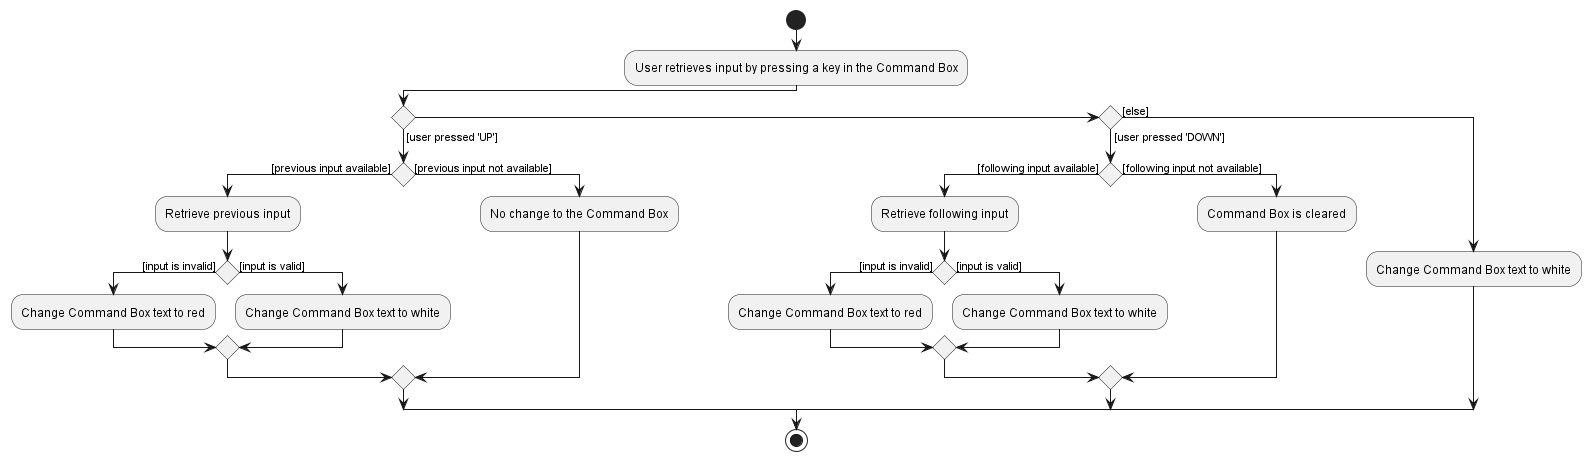
When an ‘UP’ arrow key is registered: The InputHistory will display the command that was entered previously (chronologically).
If the command history is at its earliest command, the earliest command will continue to be displayed.
When an ‘DOWN’ arrow key is registered: The InputHistory will display the command that was entered next (chronologically).
If the command history is at its latest command, the CommandBox will be set to blank.
Displaying of result
When an input is displayed, it will be displayed on the CommandBox and overwrite any text previously typed into it.
If the input is recognised as invalid, the text displayed will be coloured red, or otherwise it will be displayed in the default white colour.
Any other changes to the CommandBox will revert the text to white (i.e. after accessing invalid inputs, making changes to them will not cause the text to remain red).
Design considerations
Aspect: Whether we should store and display all user inputs or just valid commands
- Currently: All user inputs are stored and displayed, whether invalid or valid commands.
-
Alternative 1: Only valid user inputs will be stored. Invalid commands will be ignored by
InputHistory.
Pros and Cons:
-
Currently:
-
Pros:
- Users can easily view and edit any invalid commands previously entered.
-
Cons:
- May result in a larger input history especially if many invalid commands were typed by the user, which impedes the user from easily finding the history of valid command inputs.
-
Pros:
-
Alternative 1:
-
Pros:
- Allows the users to view all valid inputs quickly, which acts as a ‘command log’ to track all their previously entered commands.
-
Cons:
- Users are unable to edit or view previously entered inputs, requiring them to re-type their entire command if they initially inputted it wrongly
-
Pros:
Documentation, logging, testing, configurations, dev-ops
Appendix: Requirements
Product scope
Target user profile:
- wants to be able to manage student information
- wants to be able to keep track of student performance
- prefer desktop apps over other types
- prefers typing to mouse interactions
- is reasonably comfortable using CLI apps
Value proposition: provides an easy way to manage students, allowing for customised support to keep tabs on each student.
User stories
Priorities: High (must have) - * * *, Medium (nice to have) - * *, Low (unlikely to have) - *
| Priority | As a … | I want to … | So that I can … |
|---|---|---|---|
* * * |
user | add a new course | keep track of the courses I teach |
* * * |
user | add a new student to an existing course | keep track of the students in each of the courses I teach |
* * * |
user | edit a course | keep accurate and up-to-date information on each course |
* * * |
user | edit a student’s profile | keep accurate and up-to-date information on each student |
* * * |
user | delete s course | remove a course I am no longer teaching |
* * * |
user | delete a student’s profile | remove a student if the student is no longer in a course |
* * * |
user | assign a performance tag to a student based on how well they are coping | I can easily identify students who may need additional support |
* * |
user | add remarks for a student | keep track of miscallaneous things |
* * |
user | add pending questions for a students | keep track of unanswered queries from students |
* * |
user | search for courses based on the course name | easily find courses I need |
* * |
user | search for students using the specified field | easily find students who belong in the criteria that I am interested in |
* * |
user | sort students by the specified field | view the list of students in the order I require |
* * |
user | view usage instructions | know how to use the app when I am unfamiliar with it |
* |
user | list out all students in a course with unanswered pending questions | efficiently manage and respond to queries |
* |
user | reset the student list to its original order | view the original student list after filtering or sorting |
Use cases
(For all use cases below, the System is the CodeSphere and the Actor is the user, unless specified otherwise)
Use case: UC01 - Add a course
MSS
- User requests to add a new course.
-
CodeSphere creates the course and provides confirmation to the user.
Use case ends.
Extensions
- 1a. The course name is missing.
- 1a1. CodeSphere displays an error message.
Use case resumes at step 1.
- 1a1. CodeSphere displays an error message.
- 1b. The course name has an invalid format.
- 1b1. CodeSphere displays an error message.
Use case resumes at step 1.
- 1b1. CodeSphere displays an error message.
Use case: UC02 - Edit a student’s information
Preconditions: The student has already been added into CodeSphere.
Guarantees: Unchanged fields during the edit will remain the same as before the edit.
MSS
- User requests to edit a student’s information.
- User enters new details for the field(s) that need to be changed.
- CodeSphere updates the student’s information and provides confirmation to the user.
Use case ends.
Extensions
- 1a. The given index of the student is invalid.
- 1a1. CodeSphere displays an error message.
Use case resumes at step 1.
- 1a1. CodeSphere displays an error message.
- 1b. No field to be edited was specified by the user.
- 1b1. CodeSphere displays an error message.
Use case resumes at step 1.
- 1b1. CodeSphere displays an error message.
- 1c. Invalid format for detail(s) entered.
- 1c1. CodeSphere displays an error message.
Use case resumes at step 1.
- 1c1. CodeSphere displays an error message.
Use case: UC03 - Delete a student
Preconditions: The student has already been added into CodeSphere.
MSS
- User requests to delete a student.
- CodeSphere deletes the specified student and no longer display that student in the student list.
Use Case Ends.
Extensions
- 1a. The given index of the student is invalid.
- 1a1. CodeSphere displays an error message.
Use case resumes at step 1.
- 1a1. CodeSphere displays an error message.
Use case: UC04 - Add a pending question for a student
Preconditions: The student has already been added into CodeSphere.
MSS
- User requests to add a pending question to a student.
- CodeSphere adds a pending question to the student.
Use Case Ends.
Extensions
- 1a. The given index of the student is invalid.
- 1a1. CodeSphere displays an error message.
Use case resumes at step 1.
- 1a1. CodeSphere displays an error message.
- 1b. Pending question field is left empty.
- 1b1. CodeSphere displays an error message.
Use case resumes at step 1.
- 1b1. CodeSphere displays an error message.
Use case: UC05 - Sort the student list
MSS
- User requests to sort the student list by tag or by name.
- CodeSphere sorts the students and displays all students in the order specified by the user.
Use Case Ends.
Extensions
- 1a. User enters an invalid sort criteria.
- 1a1. CodeSphere displays an error message.
Use case resumes at step 1.
- 1a1. CodeSphere displays an error message.
- 1b. No sort criteria was specified.
- 1b1. CodeSphere displays an error message.
Use case resumes at step 1.
- 1b1. CodeSphere displays an error message.
Non-Functional Requirements
- Should work on any mainstream OS as long as it has Java
11or above installed. - The application should be able to hold up to 100 courses and 1000 student contacts without a noticeable sluggishness in performance for typical usage.
- The application should be intuitive enough for a beginner who is new to Command Line Interfaces to be able to use easily.
- The application should respond to any commands carried out by the user should become visible within 5 seconds.
- The application should gracefully handle errors, providing informative error messages to users in case of failures.
- Code should be organized into reusable and maintainable modules, making it easier to enhance and extend the application in the future.
- Comprehension documentation should be maintained for developers.
- The application should run smoothly on different operating systems commonly used by the target users.
- A user who can type fast should be able to accomplish tasks faster via a Command Line Interface as compared to a hypothetical Graphical User Interface version of the app.
- The application should not depend on a remote server so that users can use the application at anytime.
- The application is not required to support multiple users on a single device.
Glossary
- Mainstream OS: Windows, Linux, Unix, OS-X
- CLI: Command Line Interface. A way to interact with a computer or software by typing text-based commands, rather than using a mouse and graphical icons.
Appendix: Instructions for manual testing
This is a list of prefixes used for manual testing.
| Prefix | Representation |
|---|---|
c/ |
COURSE_NAME |
n/ |
NAME |
e/ |
EMAIL |
t/ |
TAG |
r/ |
REMARK |
pq/ |
PENDING_QUESTION |
s/ |
SORT |
Given below are instructions to test the app manually.
Launch and shutdown
-
Initial launch.
-
Download the jar file and copy it into an empty folder.
-
Open a command terminal, then
cdinto the folder containing the jar file. -
Use the
java -jar CodeSphere.jarcommand to run the CodeSphere application.
Expected: Shows the GUI with a set of sample courses. The window size may not be optimum.
-
-
Saving window preferences.
-
Resize the window to an optimum size, then move the window to a different location and close the window.
-
Re-launch the app by running the
java -jar CodeSphere.jarcommand again.
Expected: The most recent window size and location is retained.
-
Clearing all data
Command: clear
More information on usages: clear courses command and clear students command
-
Clearing all courses while all courses are being shown.
-
Prerequisites: Ensure the current page is the home page using the
homecommand. List all courses using theresetcommand. -
Test case:
clear
Expected: All courses are cleared from the course list.
-
-
Clearing all students while all students in the selected course are being shown.
-
Prerequisites: Ensure the current page is the course page using the
selectcommand. Filter the student list by a specified field using thefindcommand or sort the student list by a specified sort criteria using thesortcommand. -
Test case:
clear
Expected: All students are cleared from the student list for the selected course.
-
Adding a course
Command: add
More information on usage: add course command
-
Adding a course while all courses are being shown.
-
Prerequisites: Ensure the current page is the home page using the
homecommand. List all courses using theresetcommand. -
Test case:
add c/cs2101
Expected: A course with course nameCS2101is added to list of courses.
The course is added to the last index of the course list. The course card appeared at the last in the list.
The details of the added course is shown in the status message. -
Incorrect add course commands to try:
add,add c/cs,add cs2106 n/John Doe, etc.
Expected: No course added to the course list. Error details shown in the error message.
-
-
Adding a course while the course list is being filtered.
-
Prerequisites: Ensure the current page is the home page using the
homecommand. Filter the courses by course name using thefindcommand. -
Test case: Similar to previous.
Expected: Similar to previous.
-
Deleting a course
Command: delete
More information on usage: delete course command
-
Deleting a course while all courses are being shown.
-
Prerequisites: Ensure the current page is the home page using the
homecommand. List all courses using theresetcommand. -
Test case:
delete 1
Expected: The first course is deleted from the list of courses.
Details of the deleted course is shown in status message.
All student information in the deleted course are also deleted. -
Test case:
delete 0
Expected: No course is deleted. Error details shown in the error message. -
Other incorrect delete course commands to try:
delete,delete x(where x is larger than the course list size), etc.
Expected: Similar to previous.
-
-
Deleting a course while the course list is being filtered.
-
Prerequisites: Ensure the current page is the home page using the
homecommand. Filter the courses by course name using thefindcommand. -
Test case: Similar to previous.
Expected: Similar to previous.
-
Finding courses by course name
Command: find
More information on usage: find course command
-
Finding a course while all courses are being shown.
-
Prerequisites: Ensure the current page is the home page using the
homecommand. List all courses using theresetcommand. -
Test case:
find csorfind CS
Expected: All courses with course name containingCSare shown. -
Test case:
find 20
Expected: All courses with course name containing20are shown. -
Test case:
find cs 20
Expected: All courses with course name containingCSand/or20are shown. -
Test case:
find n/cs
Expected: All courses with course name containingn/csare shown. Note: Thefindcommand in thehomestage does not necessitate any prefixes; therefore, the prefixes used will be interpreted as the search criteria. -
Incorrect find commands to try:
find
Expected: No course filtered. Error details shown in the error message.
-
-
Finding a course while the course list is being filtered.
-
Prerequisites: Ensure the current page is the home page using the
homecommand. Filter the courses by course name using thefindcommand. -
Test case:
find 20
Expected: If the course list was initially filtered withfind sbeforefind 20, all courses with course name containingsand20are shown. -
Incorrect find commands to try:
find,find c/, etc.
Expected: No course filtered.
Error details shown in the error message.
-
Selecting a course
Command: select
More information on usage: select course command
- Selecting a course while all courses are being shown.
-
Prerequisites: Ensure the current page is the home page using the
homecommand. List all courses using theresetcommand. -
Test case:
select 1
Expected: The first course is selected from the list of courses.
The display changed to show 2 columns. The course list is displayed in the left column, while all students in the selected course are displayed in the right column.
Details of the selected course is shown in status message. -
Test case:
delete 0
Expected: No course is selected. Error details shown in the error message. -
Other incorrect select course commands to try:
select,delete x(where x is larger than the course list size), etc.
Expected: Similar to previous.
-
- Selecting a course while the course list is being filtered.
-
Prerequisites: Ensure the current page is the home page using the
homecommand. Filter the courses by course name using thefindcommand. -
Test case: Similar to previous.
Expected: Similar to previous.
-
Adding a student
Command: add
More information on usage: add student command
- Adding a student while all students in the selected course are being shown.
-
Prerequisites: Ensure the current page is the course page using the
selectcommand. List all student using theresetcommand. -
Test case:
add n/John Doe e/e1234567@u.nus.edu t/good
Expected: A student with nameJohn Doewith the entered attributes is added to student list.
The student is added to the last index of the student list. The student card appeared at the last in the student list.
The details of the added student is shown in the status message. -
Test case:
add n/John Doe e/e1111111@u.nus.edu t/good
Expected: A student with nameJohn Doewith the entered attributes is added to student list.
Note that theNAMEof this student is the same as that of test case 2. However, the student contact’sEMAILare different.
The student is added to the last index of the student list. The student card appeared at the last in the student list.
The details of the added student is shown in the status message. -
Incorrect add course commands to try:
add,add c/cs,add n/John Doe,add n/John Doe e/john@gmail.com t/good,add n/John Doe e/e2222222@u.nus.edu t/friend, etc.
Expected: No course added to the course list. Error details shown in the error message.
-
- Adding a student with duplicate/identical
EMAILattributes.-
Prerequisites: There exists a student in student list with
EMAILattributee1234567@u.nus.edu.
Example:n/John Doe e/e1234567@u.nus.edu t/good -
Test case:
add n/John Doe e/e1234567@u.nus.edu t/good
Expected: No student is added to the student list because the student has the sameEMAILas an existing student in the list.
Error details shown in the error message.
-
-
Adding a student while the student list is being filtered or sorted.
-
Prerequisites: Ensure the current page is the course page using the
selectcommand. Filter the student list by a specified field using thefindcommand or sort the student list by a specified sort criteria using thesortcommand. -
Test case: Similar to previous.
Expected: Similar to previous.
But note that the student list is reset to show all students after adding a student successfully.
-
Adding a remark to a student
Command: remark
More information on usage: remark student command
-
Adding a remark to a student while all students in the selected course are being shown.
-
Prerequisites: Ensure the current page is the course page using the
selectcommand. List all student using theresetcommand. -
Test case:
remark 1 r/Needs more help
Expected: The remarkNeeds more helpis added to the first student in the student list.
The details of the first student is shown in the status message. -
Test case:
remark 0 r/Needs more help
Expected: No remark is added.
Error details shown in the status message. -
Test case:
remark 1 r/
Expected: No remark is added.
Error details shown in the status message. -
Other incorrect remark commands to try:
remark,remark x(where x is larger than the list size), etc.
Expected: Similar to previous.
-
-
Adding a remark to a student while the student list is being filtered or sorted.
-
Prerequisites: Ensure the current page is the course page using the
selectcommand. Filter the student list by a specified field using thefindcommand or sort the student list by a specified sort criteria using thesortcommand. -
Test case: Similar to previous.
Expected: Similar to previous.
-
Sorting the student list
Command: sort
More information on usage: sort students command
-
Sorting the student list by the specified sort criteria while all students in the selected course are being shown.
-
Prerequisites: Ensure the current page is the course page using the
selectcommand. List all student using theresetcommand. -
Test case:
sort s/tag
Expected: The student list is arranged according to performance tags, with students tagged asGOODat the top of the list.
NAMEis used as a tiebreaker for students with the sameTAG.EMAILis used as the next tiebreaker for students with the sameTAGand the sameNAME.
Success message shown as the status message. -
Test case:
sort s/name
Expected: The student list is arranged in alphabetical order according to names. Students with names starting with ‘A’ are shown at the top of the list.
EMAILis used as the tiebreaker for students with the sameNAME.
Success message shown as the status message. -
Test case:
sort s/gender
Expected: Student list is not sorted.
Error details shown in the status message. -
Other incorrect remark commands to try:
sort,sort s/, etc.
Expected: Similar to previous.
-
-
Sorting the student list by the specified sort criteria while the student list is already being sorted.
-
Prerequisites: Ensure the current page is the course page using the
selectcommand. Sort the student list by a specified sort criteria using thesortcommand. -
Test case: Similar to previous.
Expected: Similar to previous.
Note that the student list will only be sorted by one sort criteria. The new sort criteria overrides the previous sort criteria.
-
-
Sorting the student list by the specified sort criteria while the student list is already being filtered.
-
Prerequisites: Ensure the current page is the course page using the
selectcommand. Filter the student list by a specified field using thefindcommand. -
Test case: Similar to previous.
Expected: Similar to previous.
Note that sorting and filtering can be stacked. Sorting is done on top of the currently filtered list.
-
Finding students by different criterias
Command: find
More information on usage: find Finding a student
-
Finding a student while all students are being shown.
-
Prerequisites: Ensure the current page is the home page using the
coursecommand. List all students using theresetcommand. -
Test case:
find n/ryorfind n/RY
Expected: All students with name containingryare shown. Casing of letters are ignored. -
Test case:
find r/20
Expected: All students with remark containing20are shown. -
Test case:
find r/cs 20
Expected: All students with remark containing bothcsand20, in any order, are shown. -
Incorrect find commands to try:
find,find n/find n/John r/homework, etc.
Expected: No student filtered. Error details shown in the error message.
-
-
Finding a student while the student list is being filtered.
-
Prerequisites: Ensure the current page is the home page using the
coursecommand. Filter the students using thefindcommand. -
Test case:
find n/Jason
Expected: If the student list was initially filtered withfind r/homeworkbeforefind n/Jason, all students with their remark containinghomeworkand name containingJasonare shown. -
Incorrect find commands to try:
find,find n/find n/John r/homework, etc.
Expected: No student filtered. Error details shown in the error message.
-
Appendix: Effort
Difficulty Level
We found that the difficulty level of the project was slightly more challenging compared to CS2103T’s Individual Project (iP). While the workload was similar to the iP, there was an additional level of team management required (such as division of roles and resolving code conflicts) that made meeting target milestones slightly more challenging.
Furthermore, while AB3 focused on managing a single entity type of Person in an address book,
CodeSphere deals with multiple entity types that are linked to each other, namely Course and Student.
Challenges faced
One challenge we faced early on was a ‘repetitive’ command usage, as the simultaneous handling of two classes
Course and Student meant that a lot of commands were duplicated
(e.g. AddCourse vs AddStudent, EditCourse vs EditStudent ) .
This was eventually resolved through utilising a StageManager
(inspired by the above acknowledged project Waddle),
which handles the logic of which class was currently viewed as ‘active’; the application will now determine the appropriate action to take
for a command (i.e. add will now perform addStudent or addCourse depending on which stage is active).
Effort required
-
Program architecture: CodeSphere built upon the existing project structure of AB3, adding in many additional commands and
structures (
course,pending questions,filters) to support our application. Through constant iterative upgrades and feedback, we managed to build and encapsulate our designs into the application that CodeSphere is today. - UI / UX improvements: While working on improving our application architecture and logic, we also simultaneously made significant improvements to the graphical user interface (GUI), such as intuitive colour coding schemes and logos, as well as the general user experience (UX) such as accessing the user’s input history.
-
Bug Testing and Fixing: During the development of our application, we ensured constant developer testing by
writing and editing test cases for new features / changed implementations of any code that we wrote. Our goal for
unit and integration testing was to aim for >70% code coverage (as we do not test for UI classes).
After development of our application was finished, we also released an early version to be bug tested in Practical Exam’s dry run (PE-D) by external reviewers, and then worked hard to find and fix any issues that were raised during the PE-D. - Documentation: Throughout our entire project, we have been carefully documenting our changes to be able to provide comprehensive and concise documentation for both users (User Guide) and other developers (Developer Guide) that may be viewing our application design. This included providing relevant screenshots, diagrams and various other supporting text / images to guide the reader to better understand the project and answer any questions they may have. We have also ensured that the project website and our individual portfolios have been kept updated.
Appendix: Planned Enhancements
Select from Course Page
While in the course selection page, users are unable to immediately reselect another course by utilising the select command.
While this was originally not intended for our product as the typical workflow for users would be returning to the course page through home and re-selecting from there, we recognise that users may wish to immediately reselect
a course while viewing a separate course.
We plan to make the select command work regardless of which page that the user is currently viewing.
Parsing with / character in edit and find command
The command prefix for edit and find is unable to properly differentiate when a / symbol is used with the character prior to it resembling a prefix character.
For example, edit 1 r/e/b should be interpreted as ‘edit index 1 with the remark e/b’ but is currently taken as ‘edit index 1 with the new email /b’.
Another example is when using the find command for students. find r/homework answer is e/d will result in a duplicate prefix command error.
We plan to change the parser of these commands to prioritize the firstmost prefix. This adjustment will resolve the issue for the find command.
For edit, we intend to introduce more specific prefixes to allow greater versatility for users editing the fields. For instance, we could change e/ to email!/. The likelihood of such a word being used for the other criteria is minimal and would effectively solve the problem.
More specific command errors
Our application is currently unable to recognise invalid prefix commands that are written behind a valid prefix command – instead it produces an ‘invalid format’ error for the valid prefix command.
For example, add c/cs2100 t/good gives the error “Course code should contain a two or three letter prefix, a four digit course code, and an optional one letter suffix”, when it should recognise that “t/” should not be included and produce an appropriate error message.
We plan to make the error message accurately reflect the invalid prefix command, such like (in the example above) displaying “Add course command should not contain the prefix t/”.
UI Colour Scheme
Our application currently follows a similar ‘dark theme’ colour scheme as was set by AB3, as we found it to be the most aesthetically pleasing to view. However, we recognise that different users may want to customise or view the application differently. We would thus like to introduce more colour schemes that may also benefit certain user groups (etc. making our labels dichromatism-friendly).
UI Font Size
Our application currently has a set default font type and sizing, which may not be readable for all users. In the future, we plan to introduce an adjustable font types/sizing so that users can adjust it to meet their own individual needs.
Changing Tag Sets
The tags for a Student in our application are set to GOOD, AVERAGE and POOR, and work as a performance indicator.
However, such tags may be too subjective for users if they wish to categorise their students according to a more objective
tag scheme, but the tags are currently unable to be changed to anything other than these 3 values. We plan to allow users to
define their own tags (as well as corresponding colour schemes), so that tags are customisable according to the user’s unique situation.