User Guide
CodeSphere is a desktop contact management app, optimised for use via a Command Line Interface (CLI) while still having the benefits of a Graphical User Interface (GUI). It is an app targeted at Teaching Assistants (TAs) in the National University of Singapore (NUS) School of Computing (SoC) to help them better manage administration of their students.
We understand that as a TA, you might often find it difficult to keep track of all your students’ progress and administrative matters. And that is why we have developed CodeSphere for you. With CodeSphere, you will have a simple and effect way to manage your students, allowing for customised support to keep tabs on each student.
It doesn’t matter if you are a new or experienced TA, with CodeSphere, you can easily:
- Add a course that you teach.
- Then, add students into that course.
And to find out more about what else CodeSphere can do for you, continue to read the rest of this all-encompassing user guide.
Table of Contents
- User Guide Tips
- Quick Start
- Tutorial for Beginners
-
Features
- Accessing Input History
- Universal Commands
- Home Page Commands
-
Course Page Commands
addAdding a studenteditEditing the details of a studentdeleteDeleting a studentclearClearing all studentsresetResetting the student listsortSorting all studentsfindFinding a studentlistFinding students with pending questionsremarkAdding a remark for a studentpqAdding a pending question for a studentremoveRemoving a remark/pending questionhomeReturning to home page
- Miscellaneous
- FAQ
- Known Issues
- Command summary
- Glossary
User Guide Tips
Finding what you need
- Quick Start helps you set up CodeSphere.
- Tutorial for Beginners walks you through our graphical interface and also guides you on managing a course in CodeSphere.
- Features helps you understand how all the features work.
- FAQ answers the most common questions from our users. If you have questions for us, this section might prove extremely useful.
- Command Summary provides a summarised list of our features for your easy reference.
- Glossary explains some of the more complicated terms we used in the guide.
- Back to Top provides you with a quick shortcut to return to the table of contents.
Understanding symbols and syntax
| Symbol/Syntax | Meaning |
|---|---|
command |
A command or keyword present, |
| Warning or some important information for you to know. | |
| Tips from us! | |
| Information that you should take note of. |
Quick Start
- Ensure you have Java
11or above installed in your computer. If you do not have Java11, follow this installation guide. - Download the latest
codesphere.jarfrom here. - Copy the file to the folder you want to use as the home folder for your CodeSphere application.
- Open your command terminal, then
cdinto the home folder. - Use the
java -jar CodeSphere.jarcommand to run the CodeSphere application. -
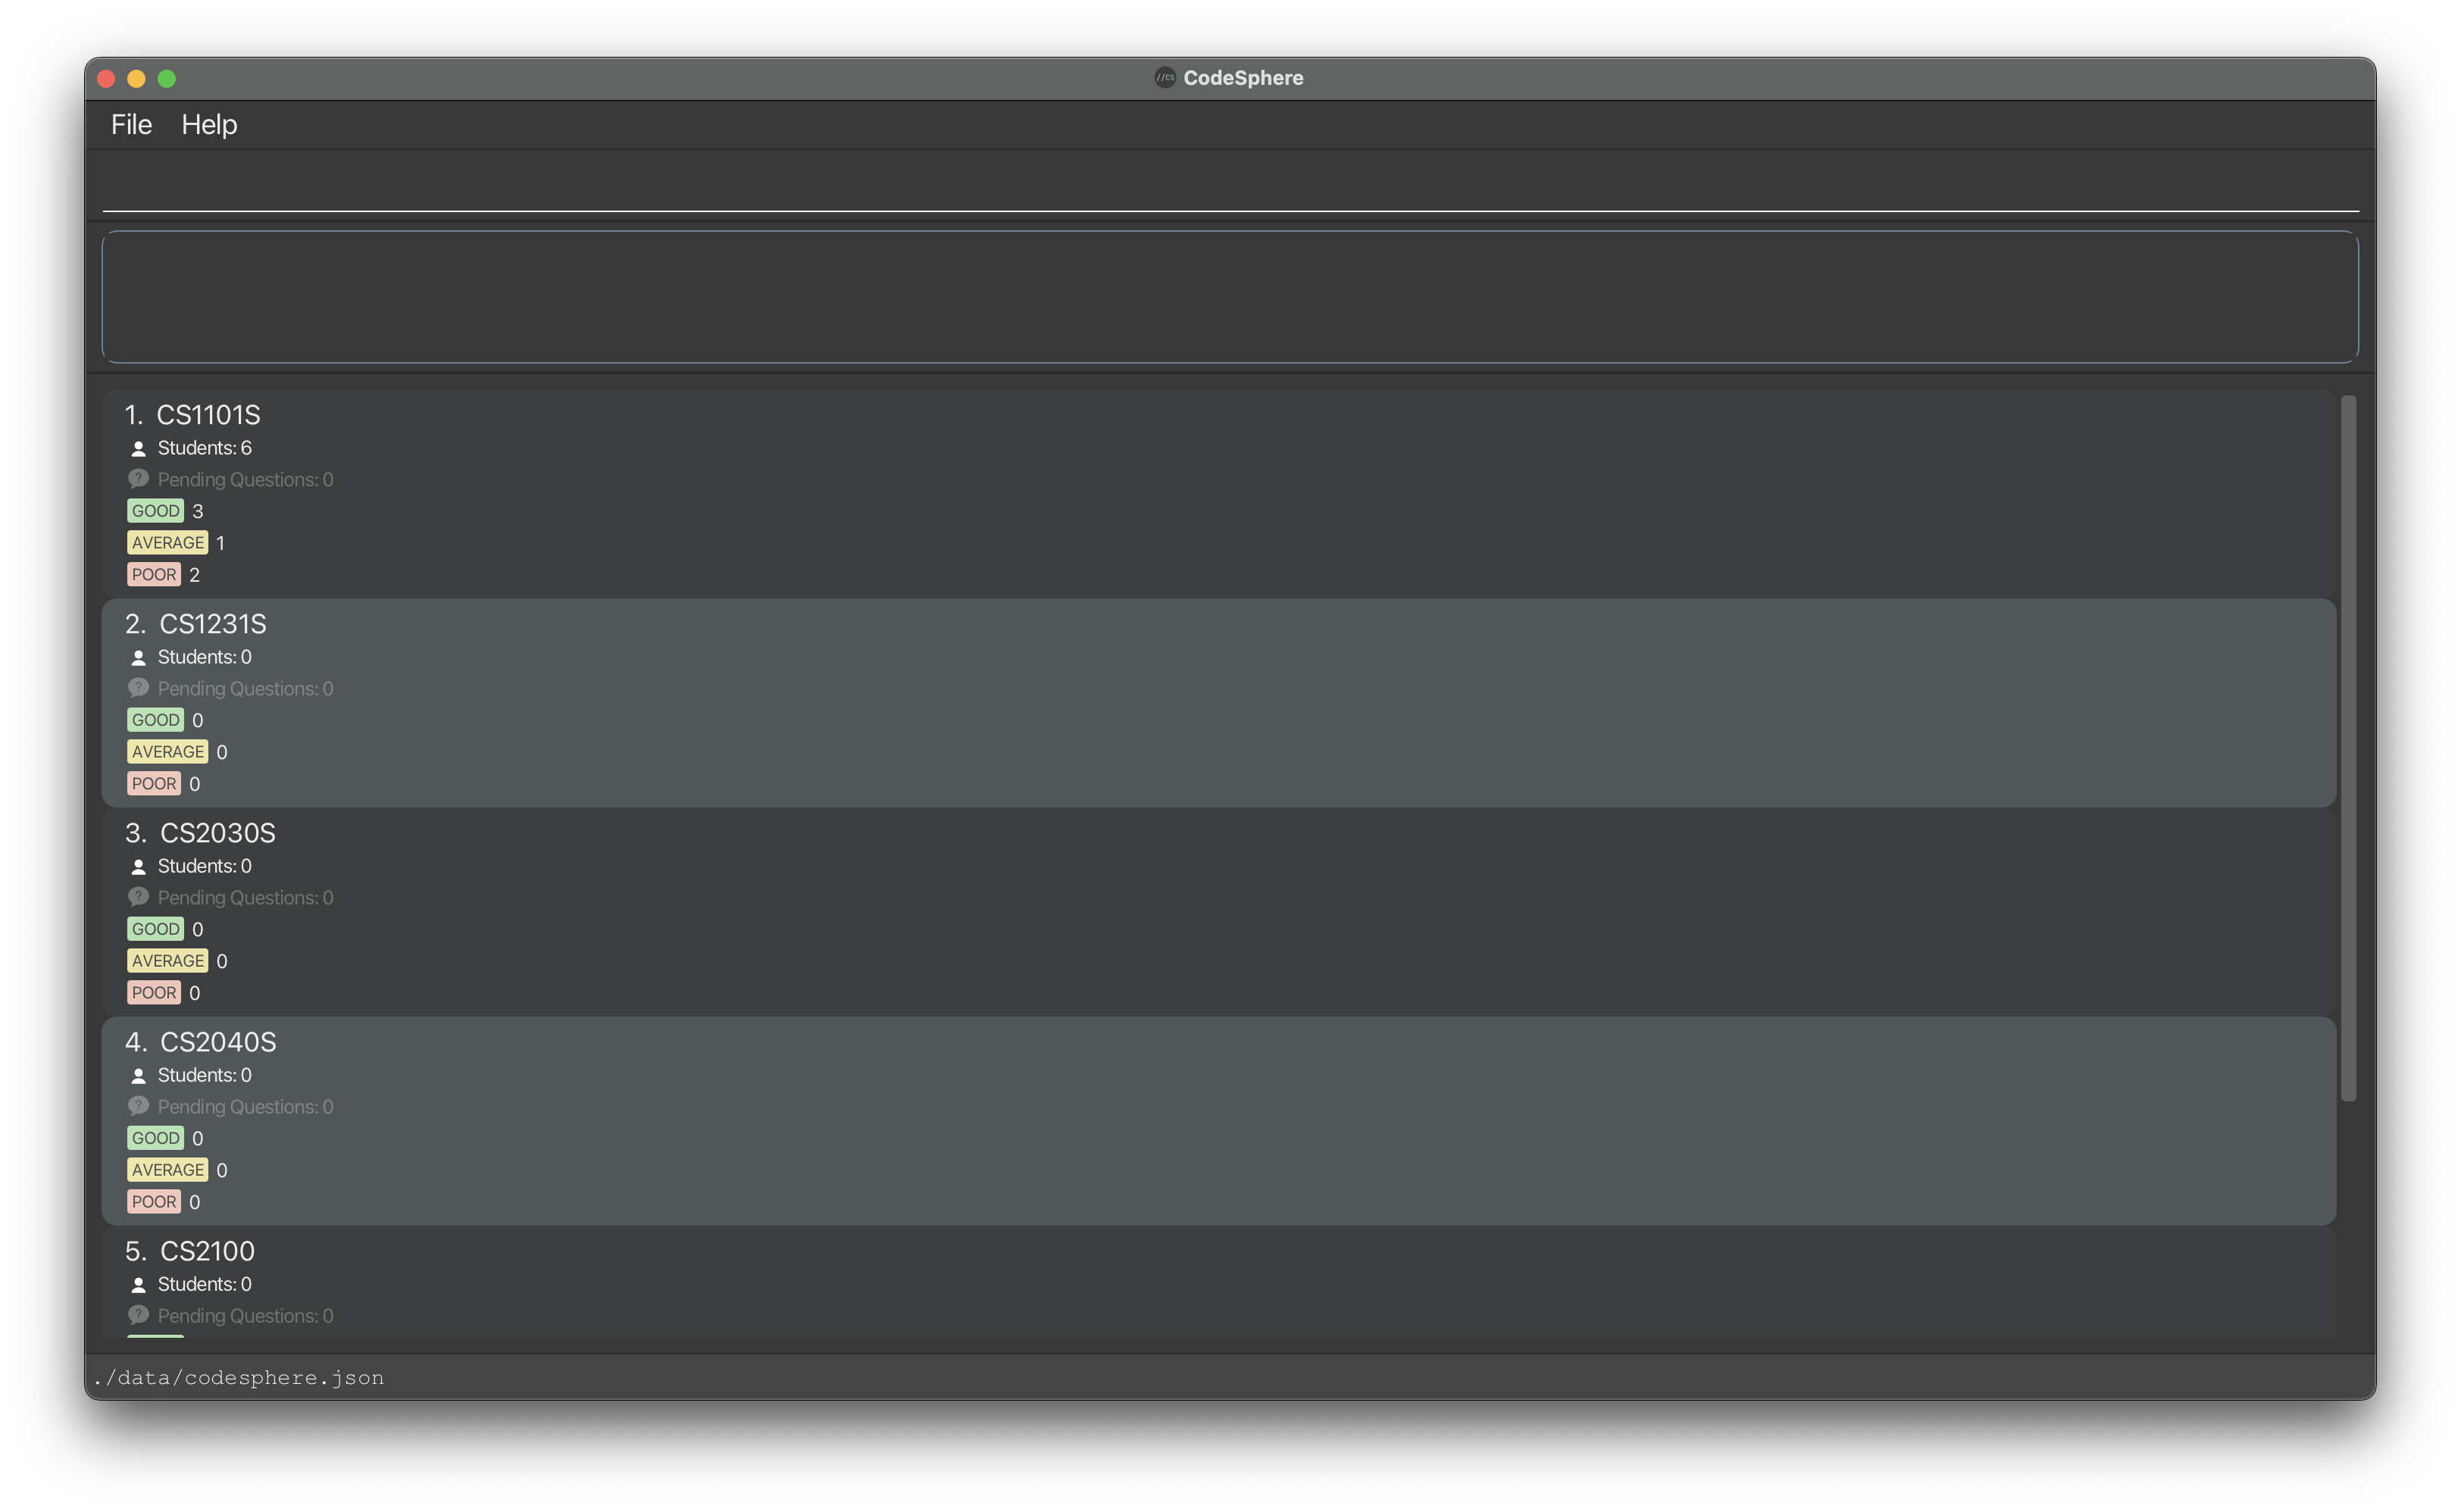
The CodeSphere home page, similar to the GUI displayed below, should appear in a few seconds. Note how the app contains some sample data.
- In the command box, type in a command and press Enter to execute the command. For example, typing
helpthen pressing Enter will show the help window. Below are some other example commands you can try:-
select 1: Selects the first course from the list of courses currently displayed on the home page. The GUI changes to show the list of students in the selected course. -
add c/CS1101S: Adds a course namedCS1101Sto the course list. -
edit 1 c/CS1231S: Updates the course name of the first course displayed with the new course name specified. -
delete 3:- If you are currently on the home page, it deletes the third course shown in the current list.
- If you are currently on the course page, it deletes the third student shown in the current list.
-
exit: Exits the application.
-
For a more detailed walk-through on how to use CodeSphere to start managing your students as a TA, head to Tutorial for Beginners. Else, if you prefer exploring the application on your own, head to Features below for more details on each command.
Tutorial for Beginners
If you are not a beginner, or would like to explore CodeSphere on your own, feel free to skip this tutorial or jump to whichever portion you require.
Tutorial Contents
Let’s explore CodeSphere’s features through the eyes of a teaching assistant.
When you open up the application for the first time, after a brief splash screen of the CodeSphere logo,
you will see CodeSphere’s home page, with 6 pre-populated sample courses.
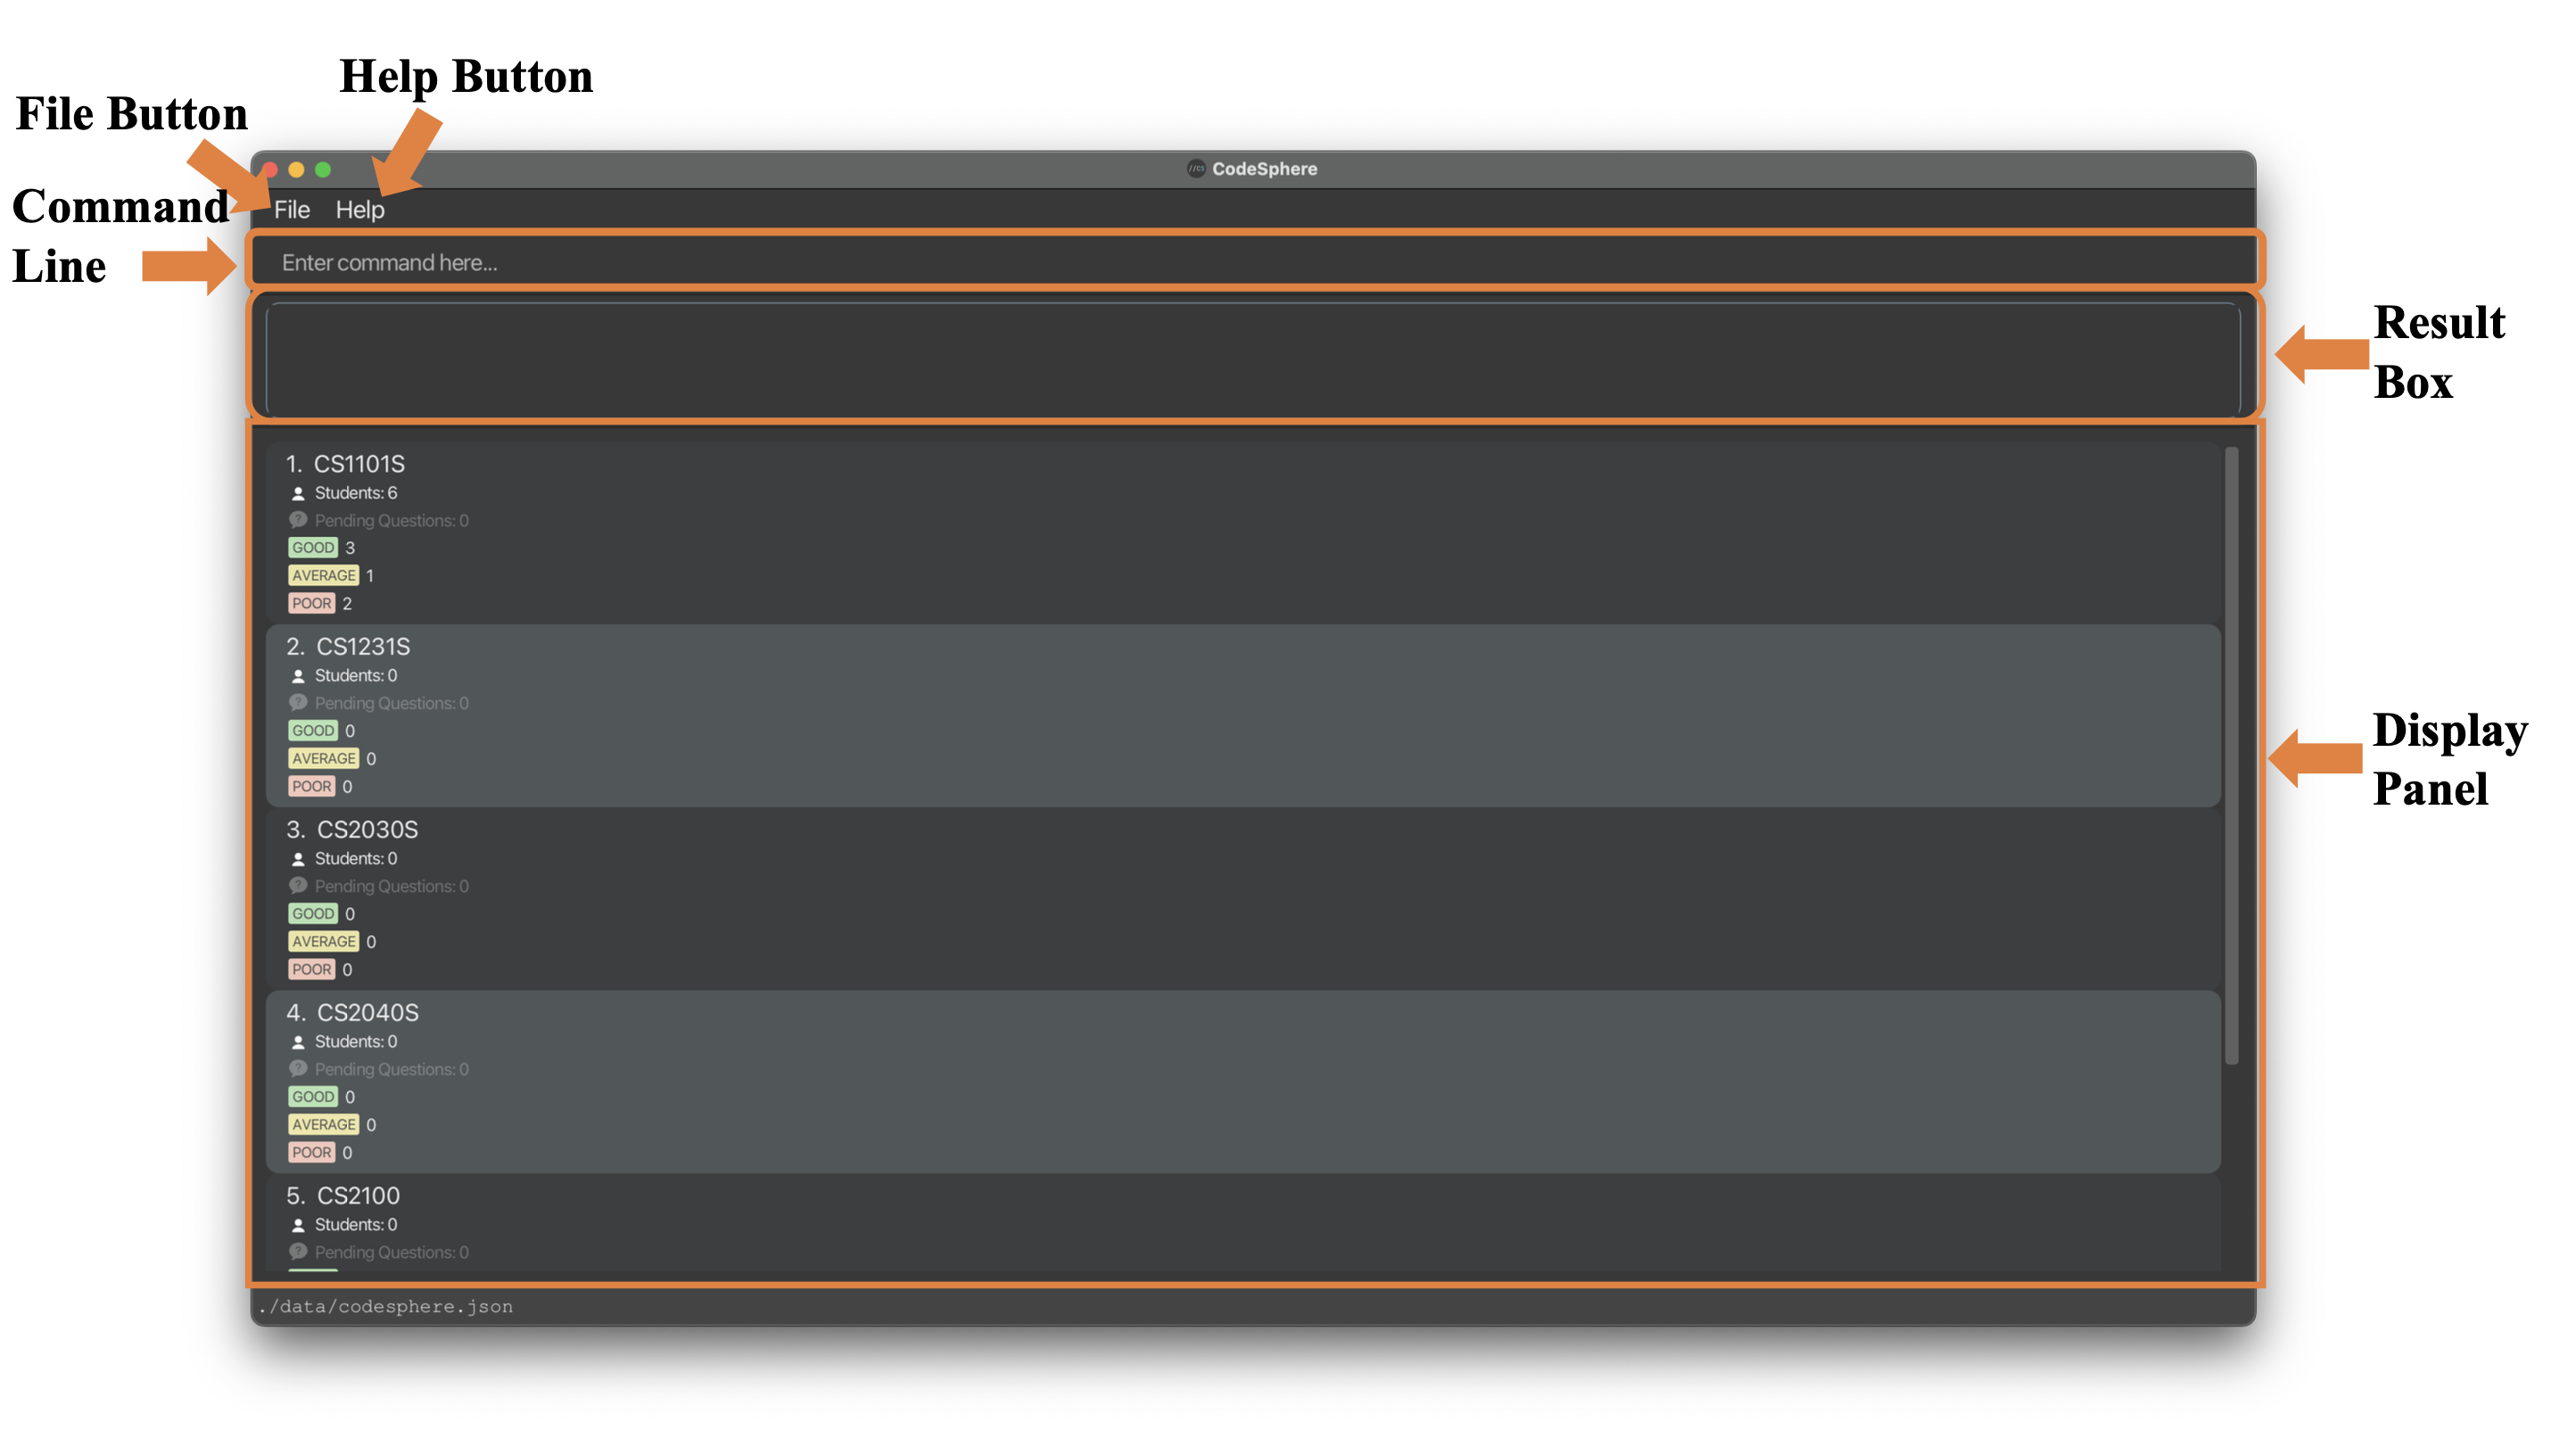
At the top of the application, there is an underlined portion that we will refer to as the Command Line. This is where your commands are typed, and they are confirmed by pressing the Enter key on your keyboard. Below the Command Line is the Result Box (which is the outlined box), which will tell you the outcome of any commands that you have entered. Lastly, underneath that is the Display Panel, which will be updated after each command is entered.
Tutorial: Adding a course
(For demonstration purposes, we’ll be using CS2101 as our chosen course.
Feel free to replace this with any other course.)
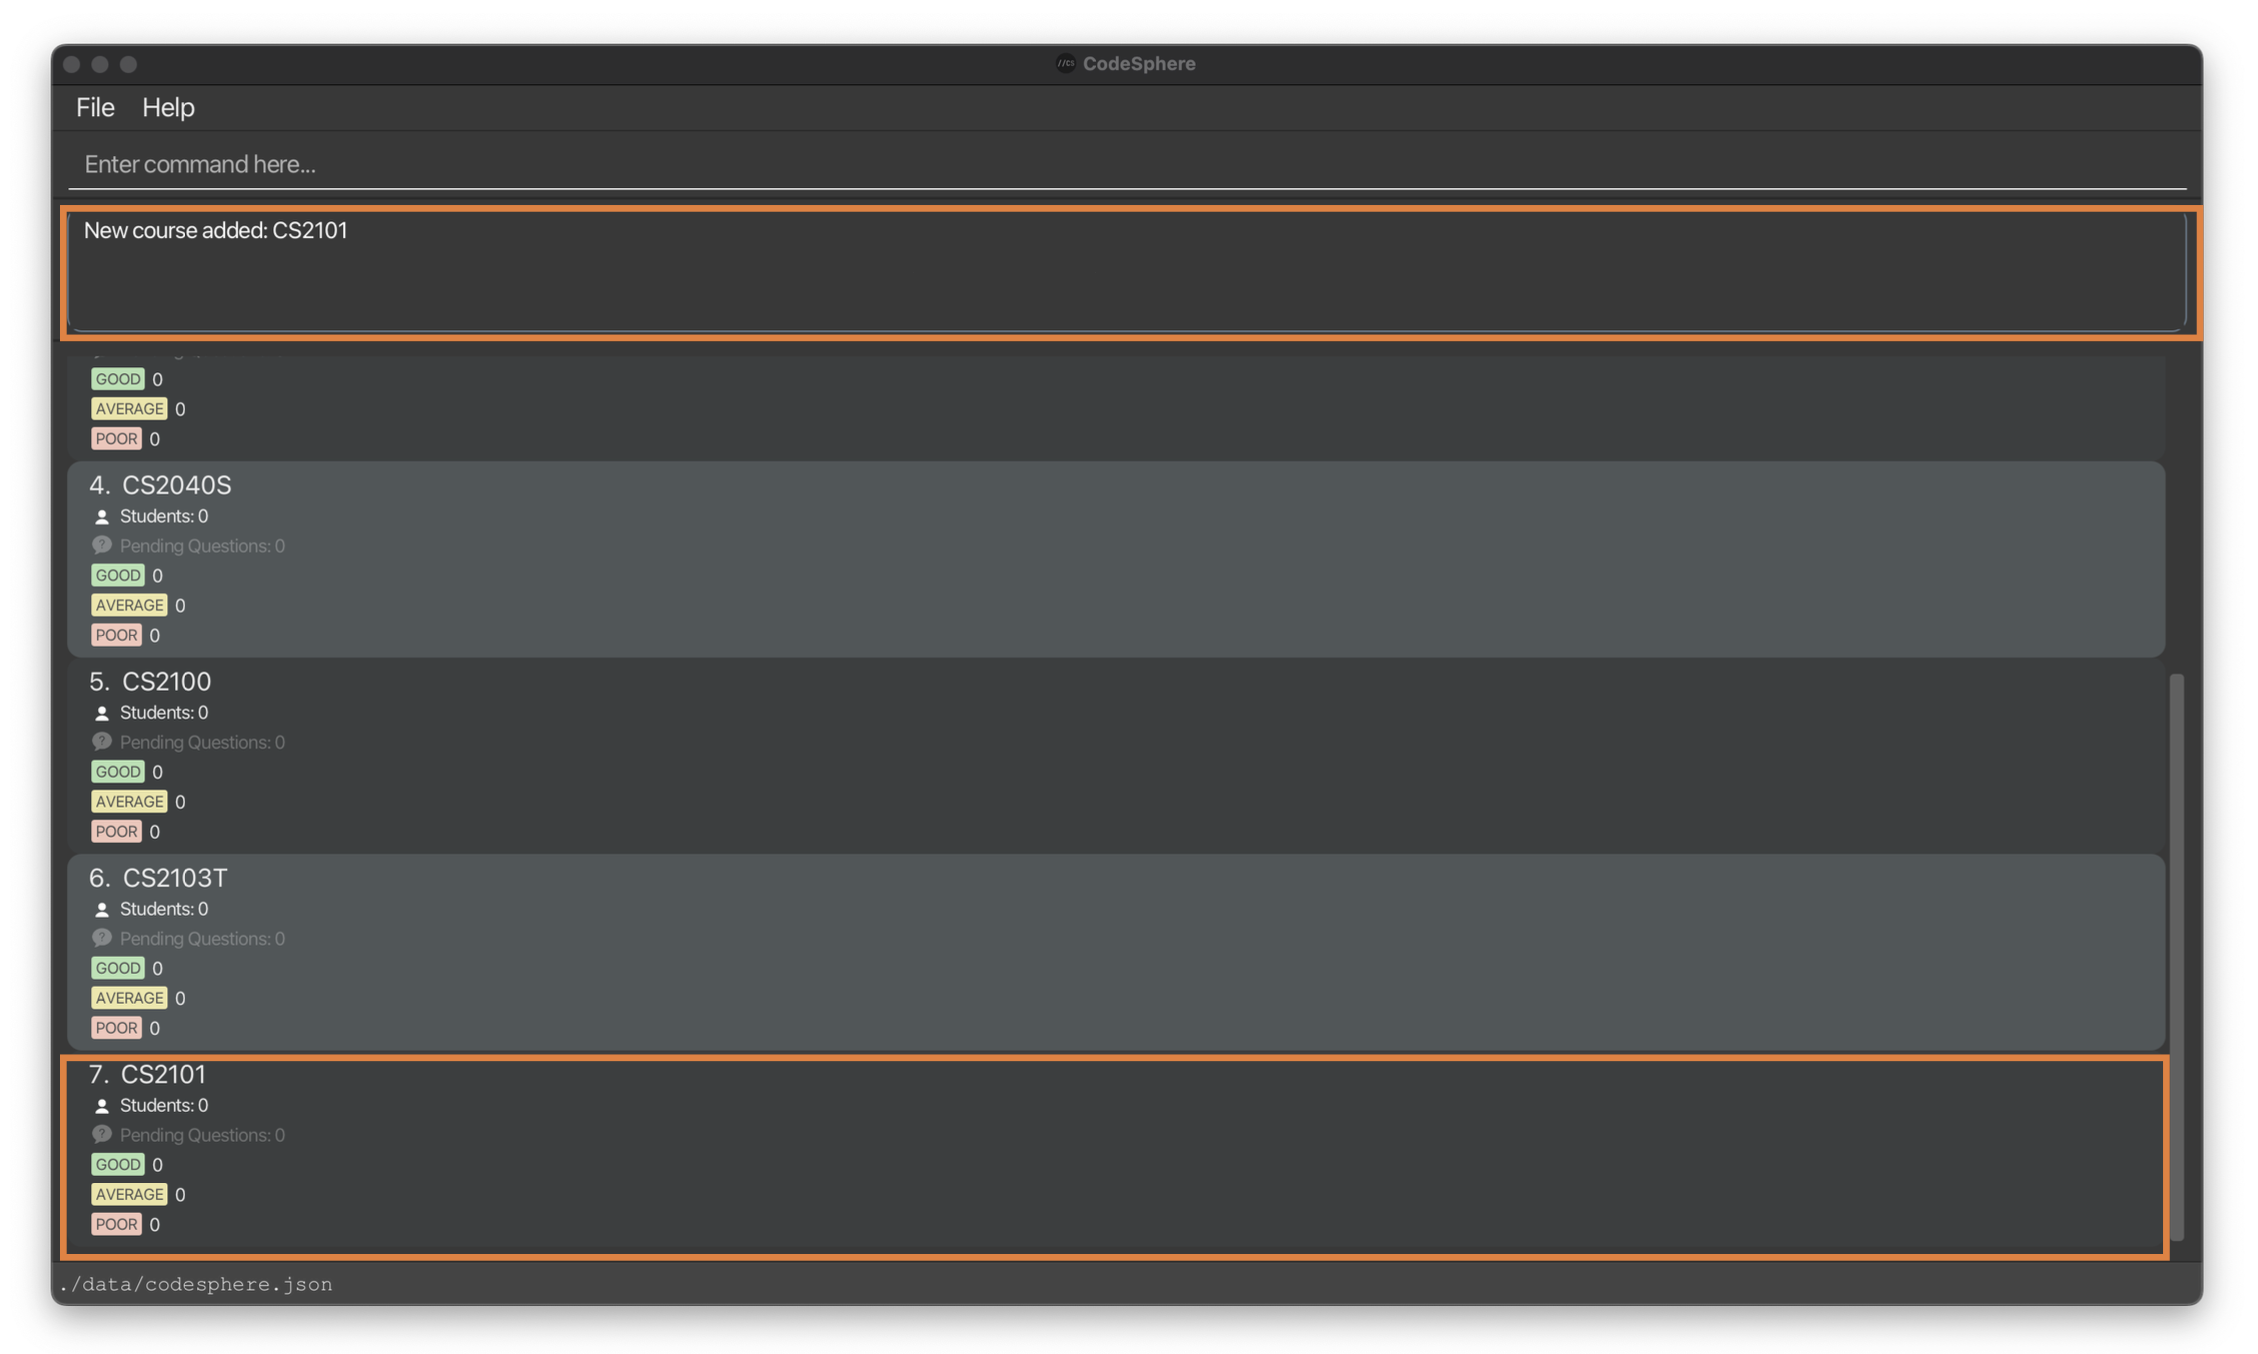
Let’s begin by adding our course into the home page with the command add c/CS2101.
After pressing Enter, you will see a message informing you that there is a New course added: CS2101 in the Result Box and the course CS2101 will appear at the bottom of the list.
You will notice that an item number is displayed beside the course name (note the 7. beside CS2101 in the image), as well as some other information being displayed for each course, like the total number of students and total number of pending questions.
Tutorial: Adding students
Next, let us add some students into our CS2101 course.
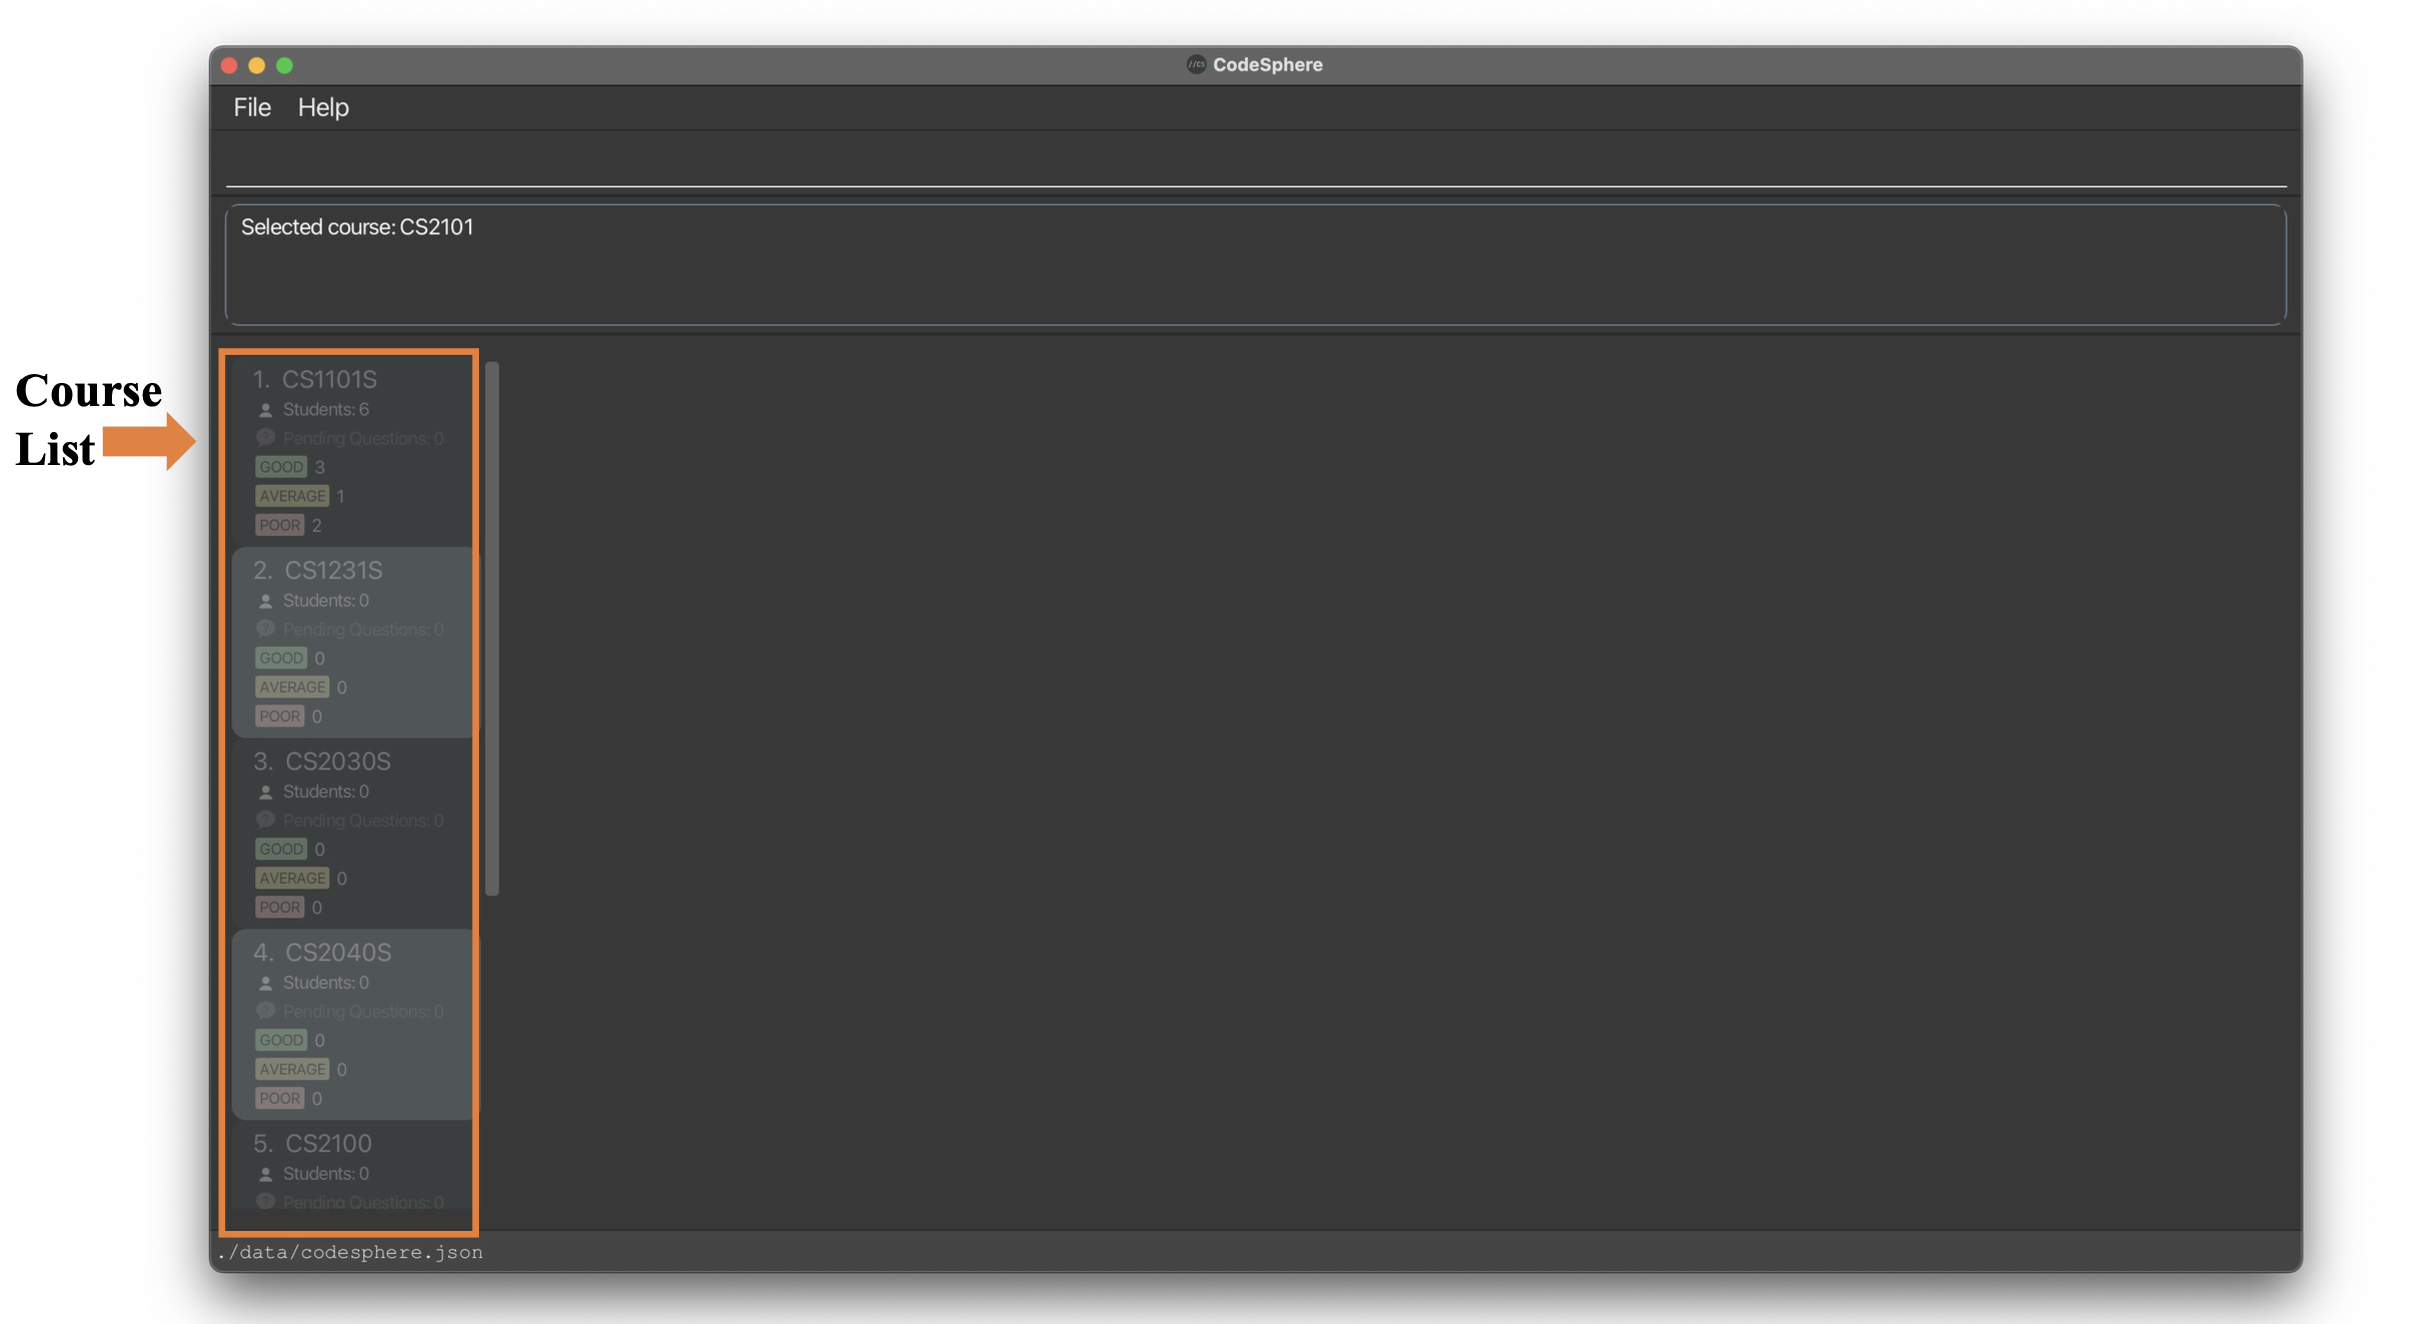
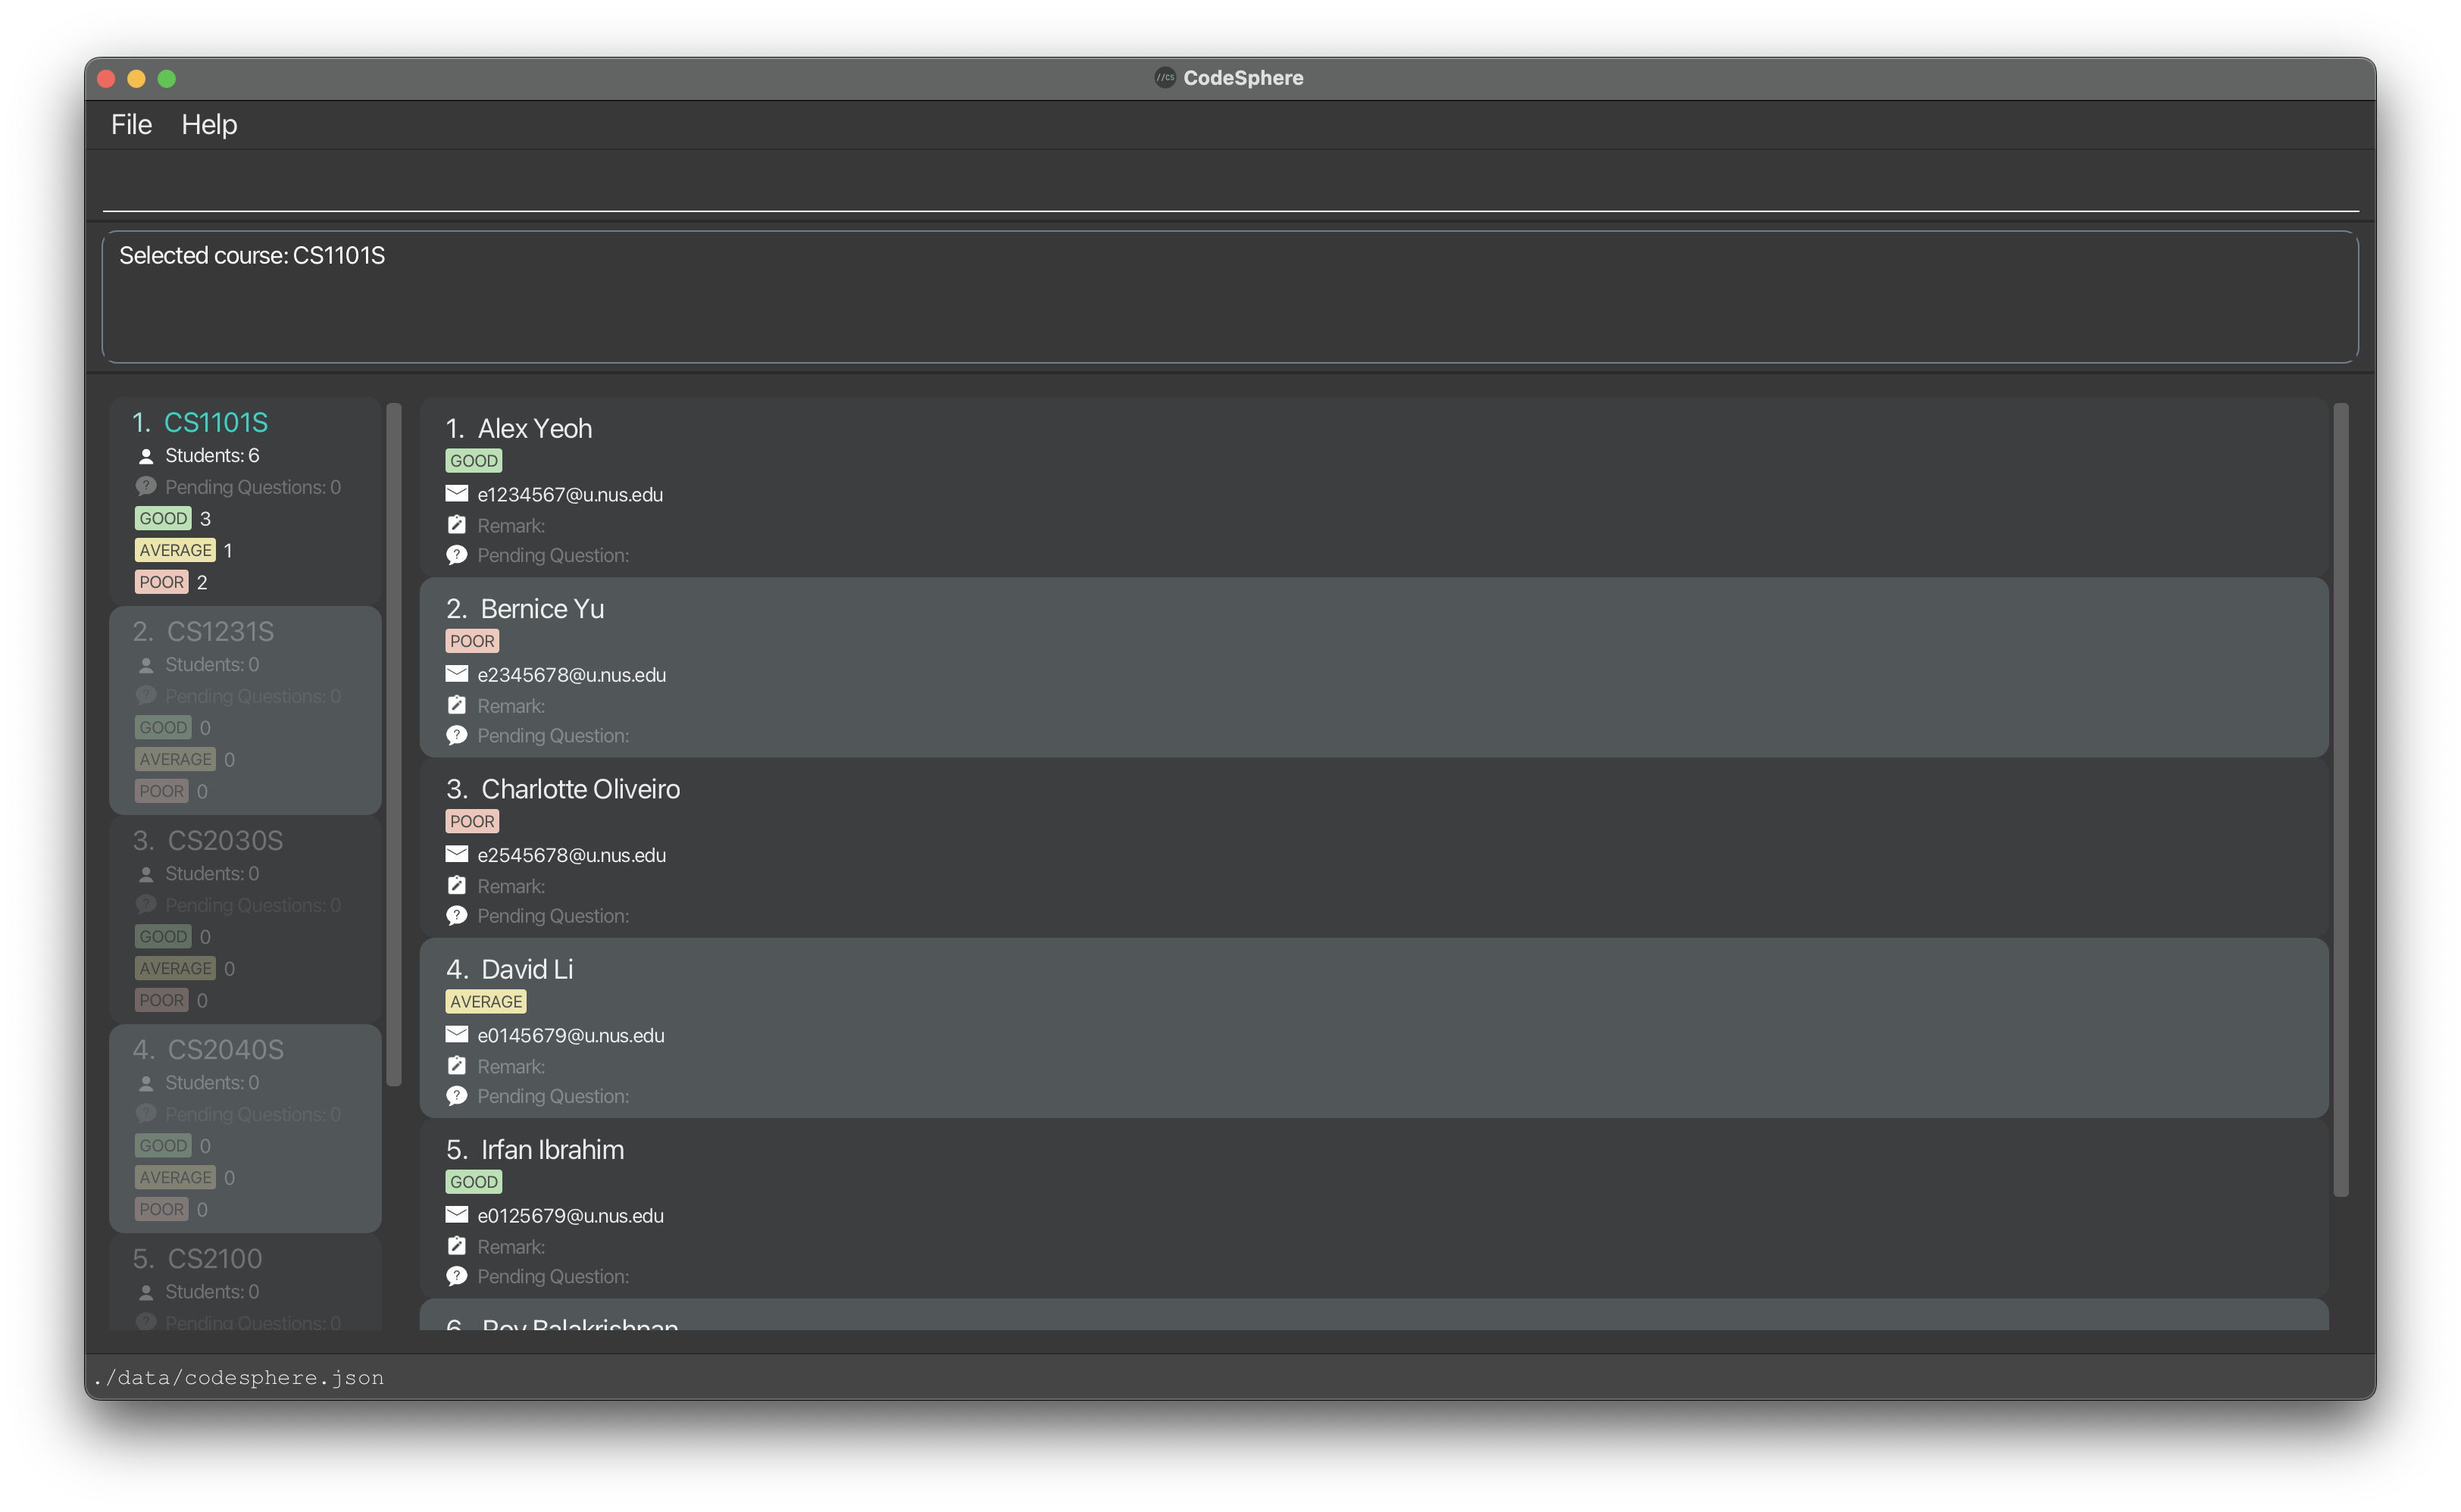
To do that, we will first need to navigate into our CS2101 course by using the command select 7, which selects the seventh course in the course list.
This will bring you to the course page for CS2101 and your application should now change to look like the image below.
In the course page, the course list is now being displayed in the left column, while the right column that will be used to display students added to the selected course is currently empty because students have not been added into CS2101.
Tip: You can always refer to the Result Box to see whether the command you entered has been successful.
The student list for CS2101 is currently empty, so let’s add a few students into the list with the following commands:
(Remember to press ‘Enter’ after each command)
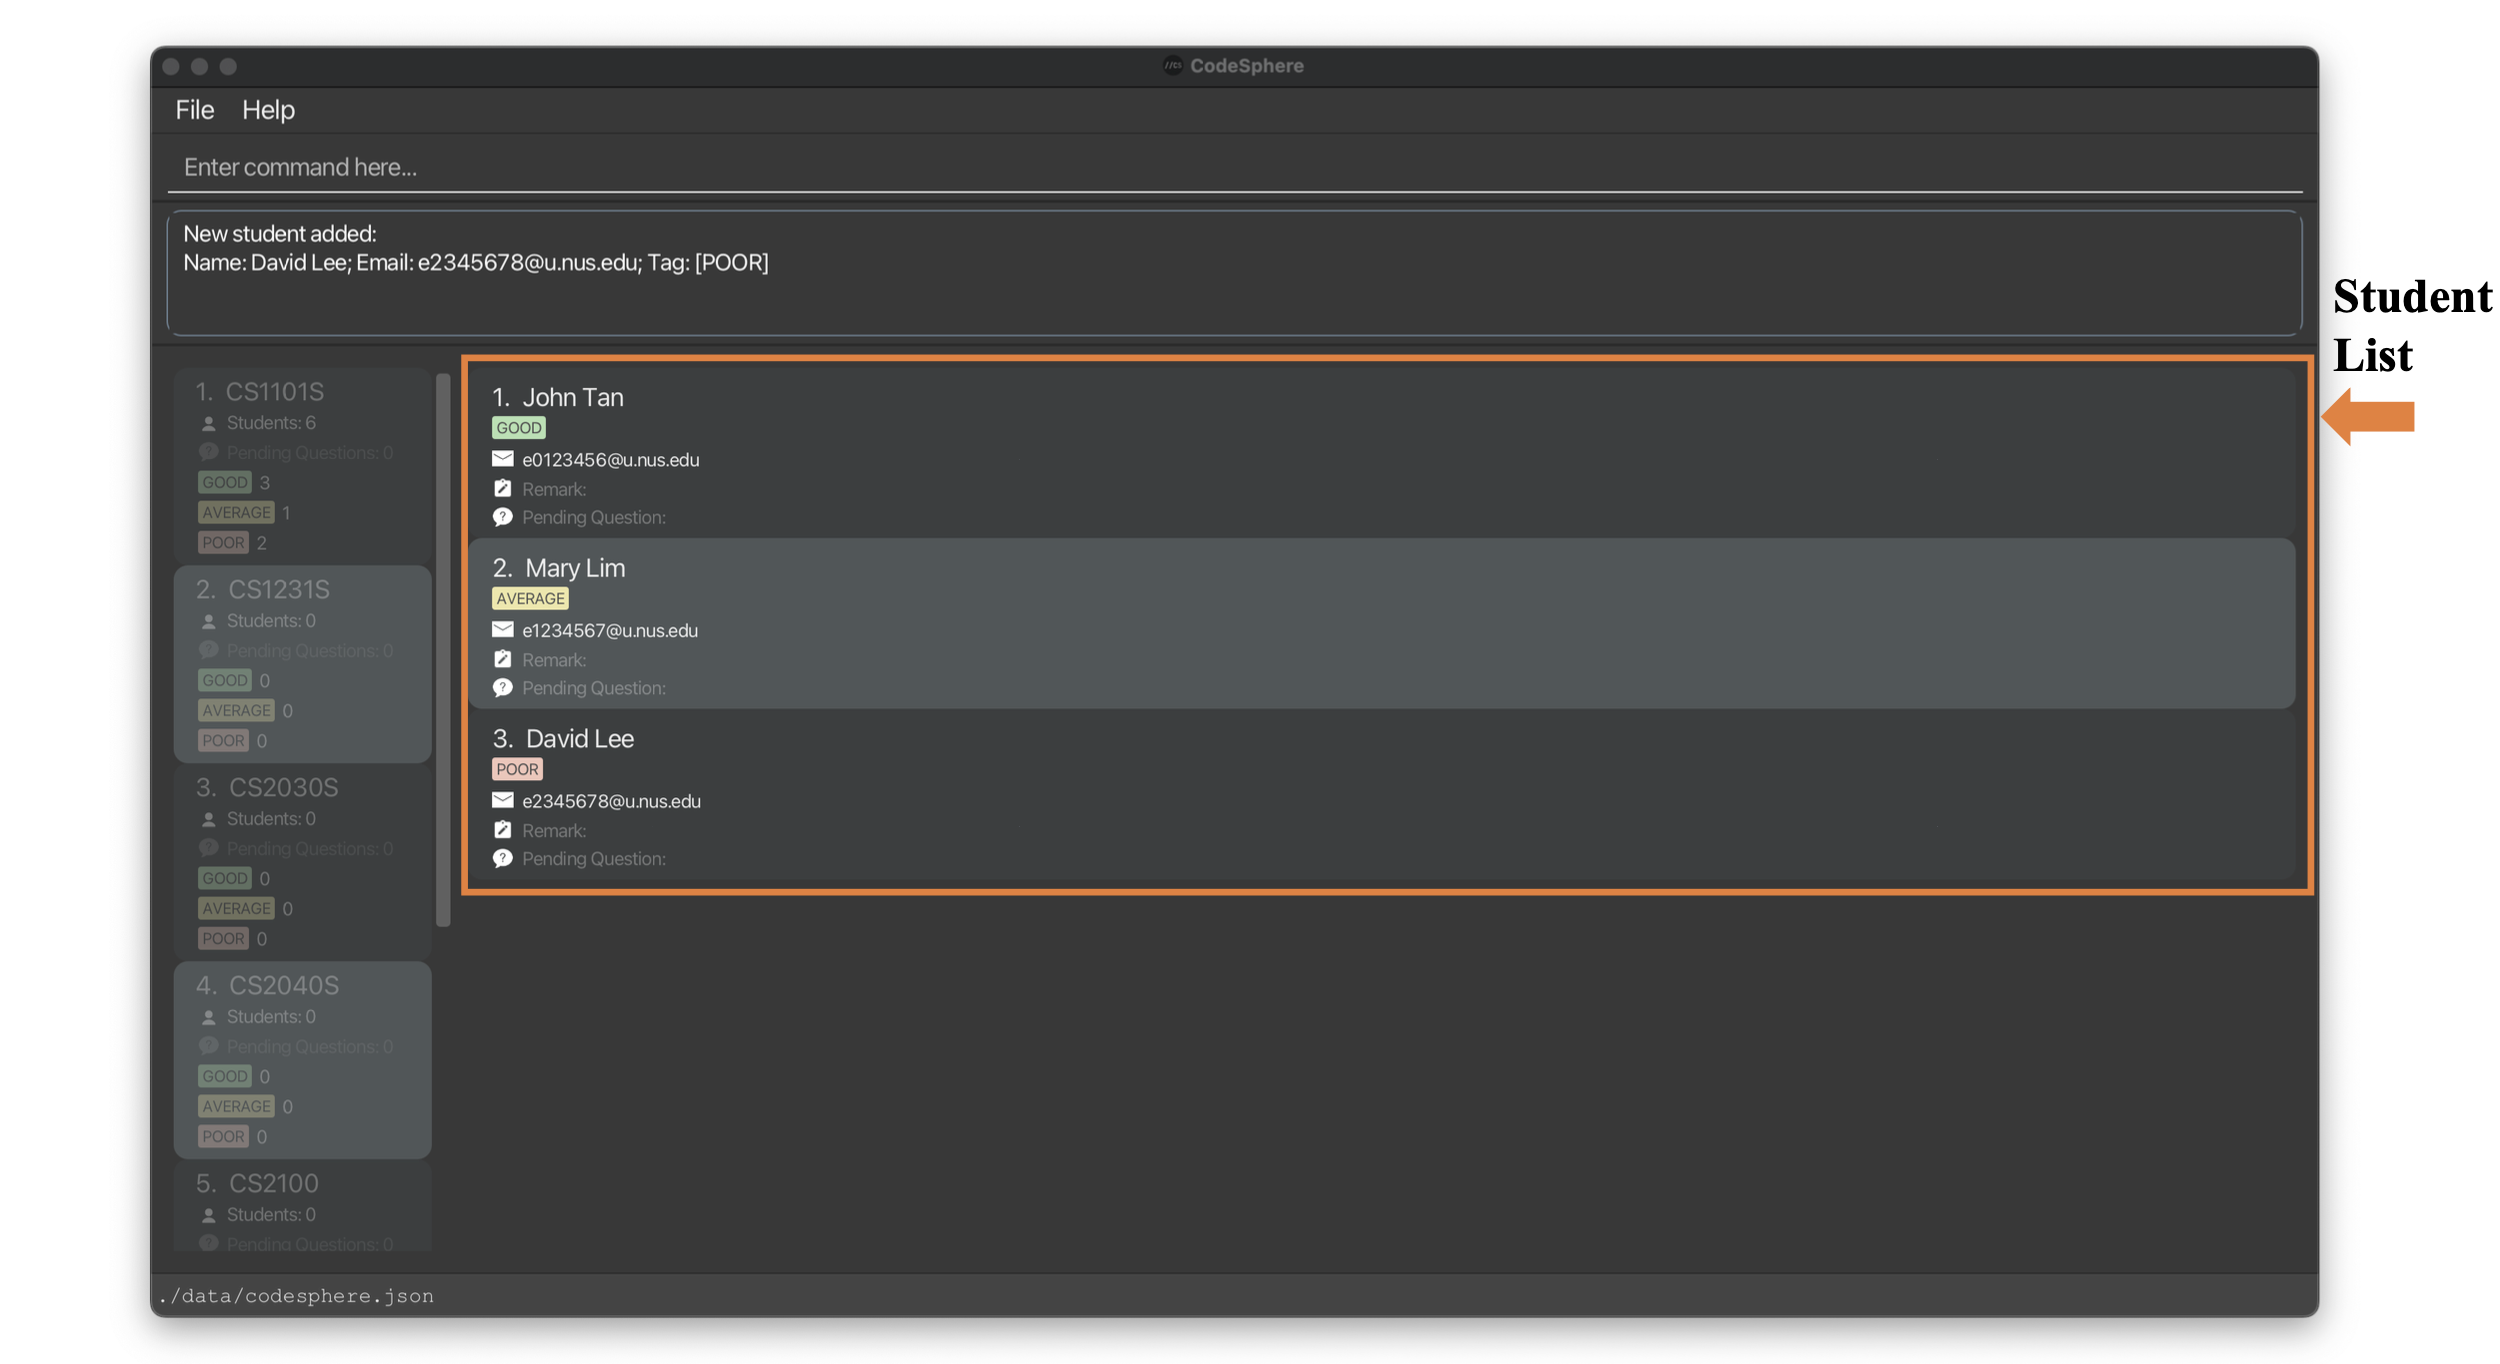
add n/John Tan e/e0123456@u.nus.edu t/goodadd n/Mary Lim e/e1234567@u.nus.edu t/averageadd n/David Lee e/e2345678@u.nus.edu t/poor
Note: When creating students, you must always include their name (
n/), email (e/) and performance tag (t/).
Tutorial: Adding remarks / pending questions
Lastly, let’s take a look at how we can add remarks or pending questions for a student.
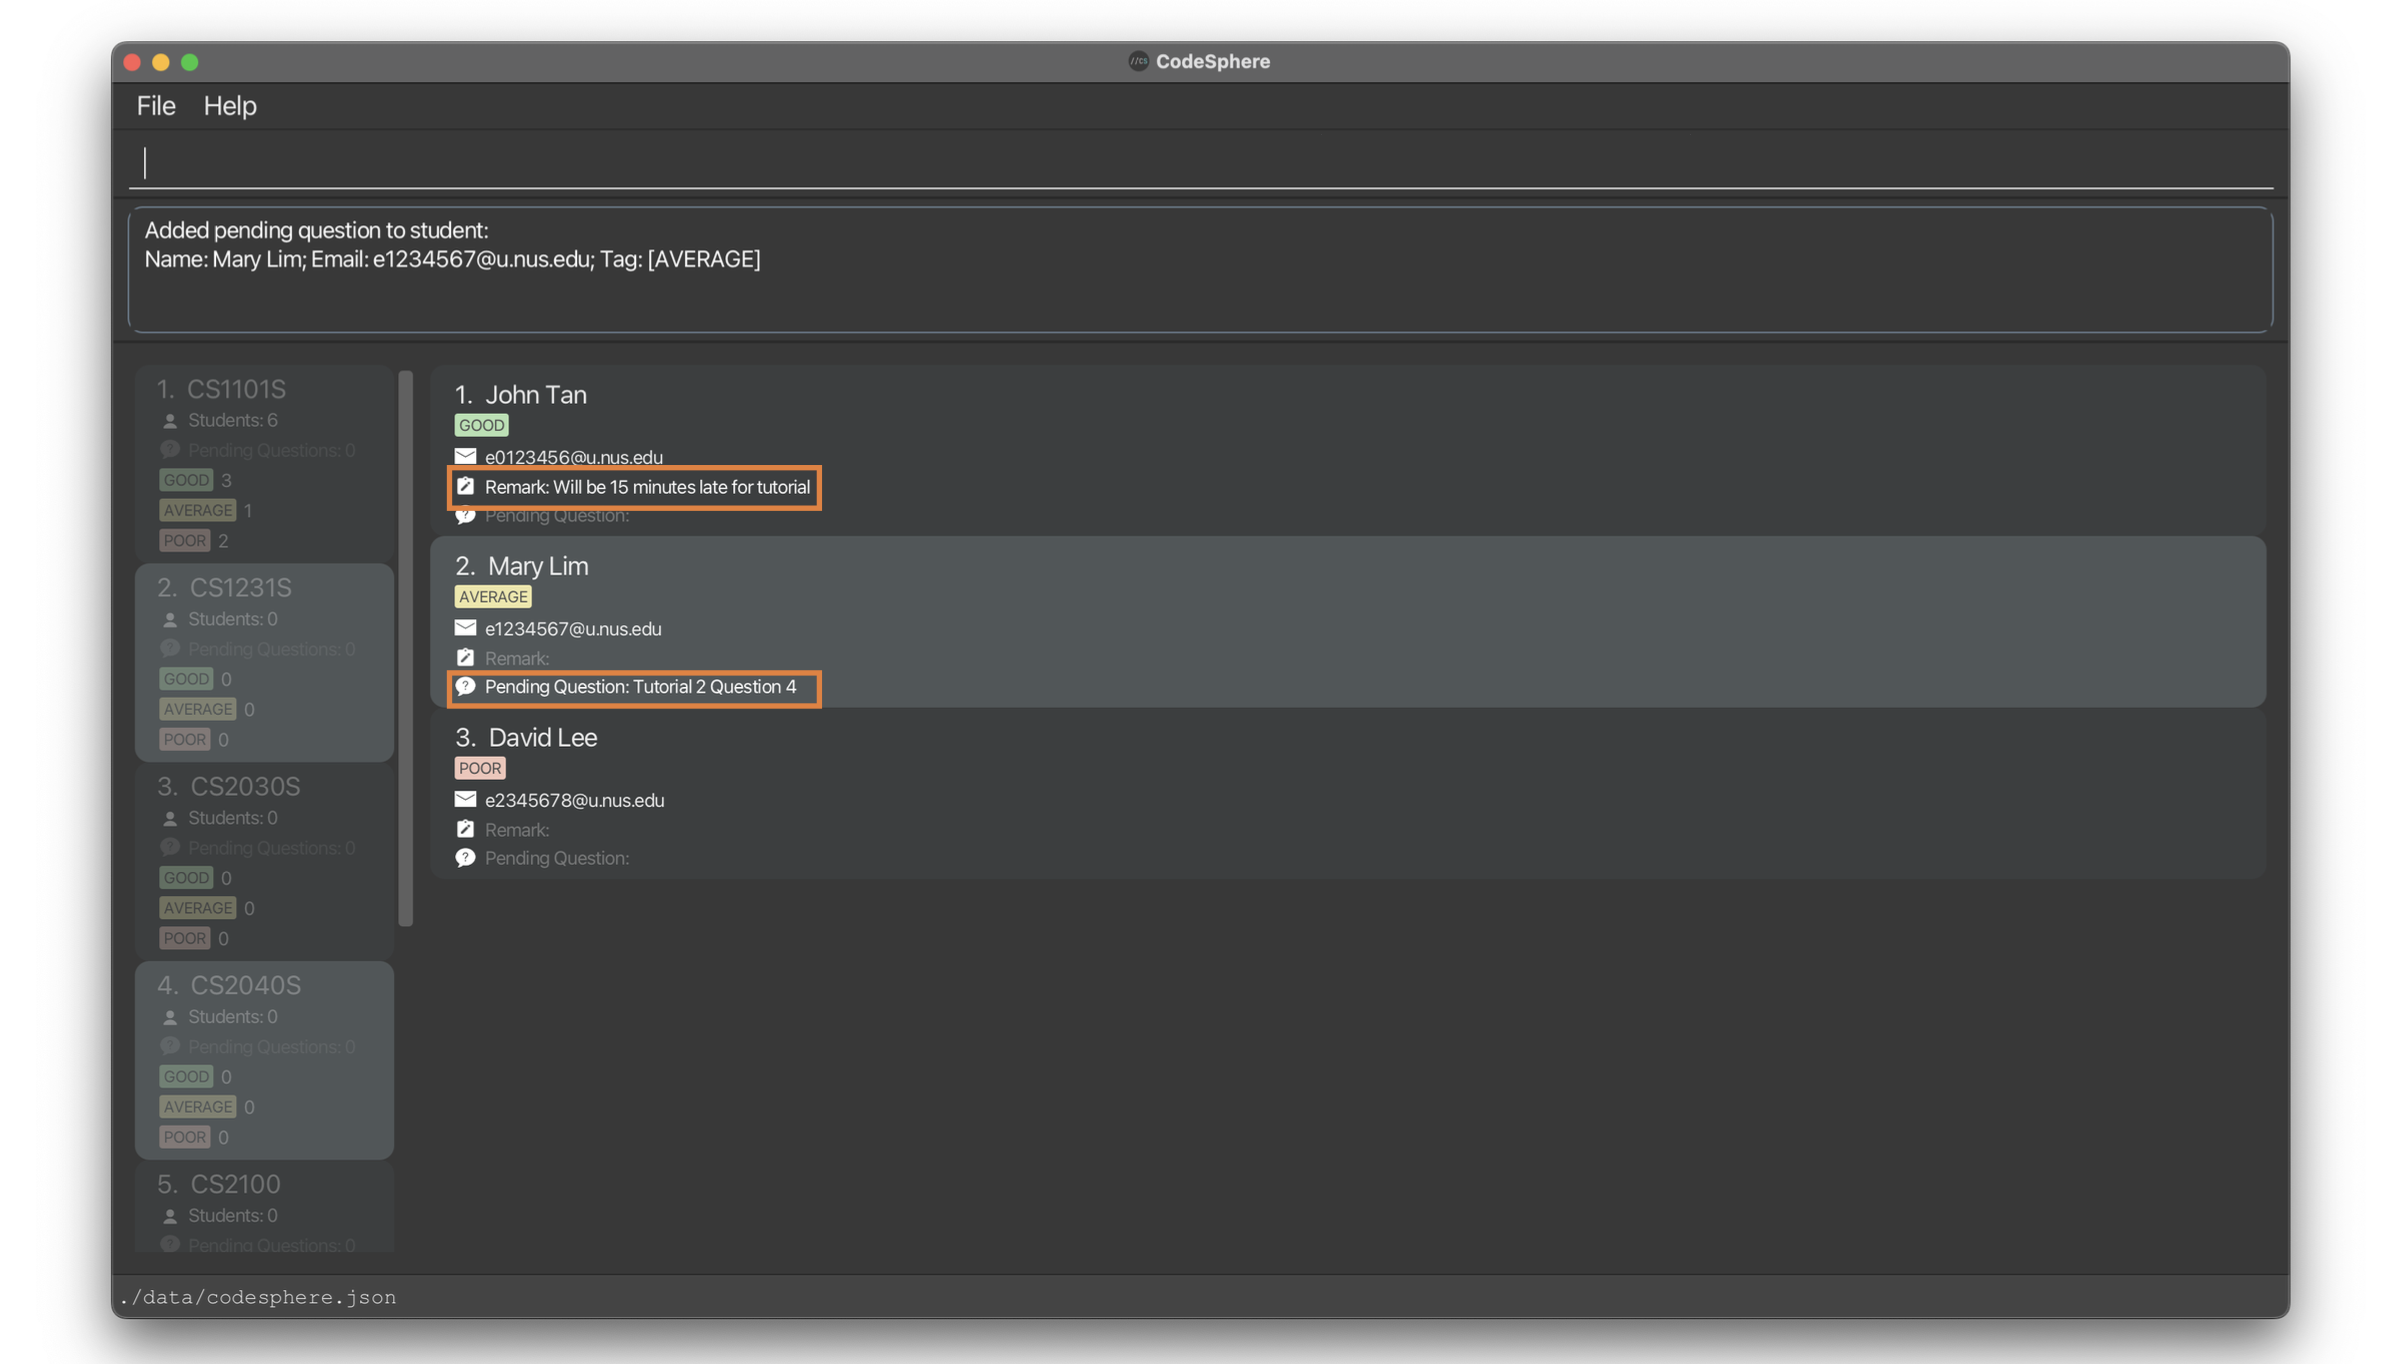
To start, try adding the remark “Will be 15 minutes late for tutorial” to John Tan who is the first student in the list,
by typing remark 1 r/Will be 15 minutes late for tutorial.
Similarly, let’s note down Mary’s pending question about “Tutorial 2 Question 4” through the command pq 2 pq/Tutorial 2 Question 4.
Your page should now be updated with the remark and pending question added to John and Mary respectively.
And with that, you have now successfully created your first course, added a few students, and even noted down some extra information for your students.
As a final tip, you can use the directional UP and DOWN keys on your keyboard to access the commands that you have previously entered.
Now that you know how CodeSphere works, feel free to explore some other features that have been specially curated for you to manage your students with ease, such as listing out all students with pending questions, sorting the students by different criteria or even finding students with certain keywords in selected field.
Features
![]() Notes about the command format:
Notes about the command format:
- Words in
UPPER_CASEare the parameters to be supplied by the user.
- e.g. in
add n/NAME,NAMEis a parameter which can be used asadd n/John Doe.
- e.g. in
- Items in square brackets are optional.
- e.g.
n/NAME [r/REMARK]can be used asn/John Doe r/Need more helpor asn/John Doe.
- e.g.
Accessing Input History
CodeSphere saves all inputs that you have previously entered. In the CLI command box, just use your ‘up’ and ‘down’ arrow keys to access any inputs that you have entered before.
Universal Commands
Commands in CodeSphere are mostly only used exclusively on the home page or the course page. However, commands in this section can be used on either page at any time.
Viewing help : help
Shows a message explaining how to access the help page.
Format: help
Entering the help command returns the following result:

Exiting the program : exit
Exits the program.
Format: exit
Home Page Commands
The home page in CodeSphere displays the list of courses that you are currently overseeing and have stored in the application. Courses are arranged in order of addition, with the first course added at the top of the course list.
Commands exclusive to the home page can help you:
-
adda new course -
editthe details of an existing course -
deletean existing course -
clearall existing courses -
findall courses with course name containing the keyword specified -
resetthe course list being displayed to its original order
There is also a select command that brings you to the course page of the selected course.
Adding a course : add
Adds a course into the list of courses.
Format: add c/COURSE_NAME
-
COURSE_NAME: A valid course in NUS. Each course name should consist of a two or three letter prefix, four digits, and an optional one letter suffix. - Note that the alphabets in the input for
COURSE_NAMEare case-insensitive, and they will all be stored and displayed as uppercase letters. For example, enteringadd c/cs1101soradd c/CS1101Swill both result inCS1101Sbeing added to the course list.
Examples:
add c/CS2103Tadd c/cs2100add c/GEA1000-
add c/st2334returns the following result: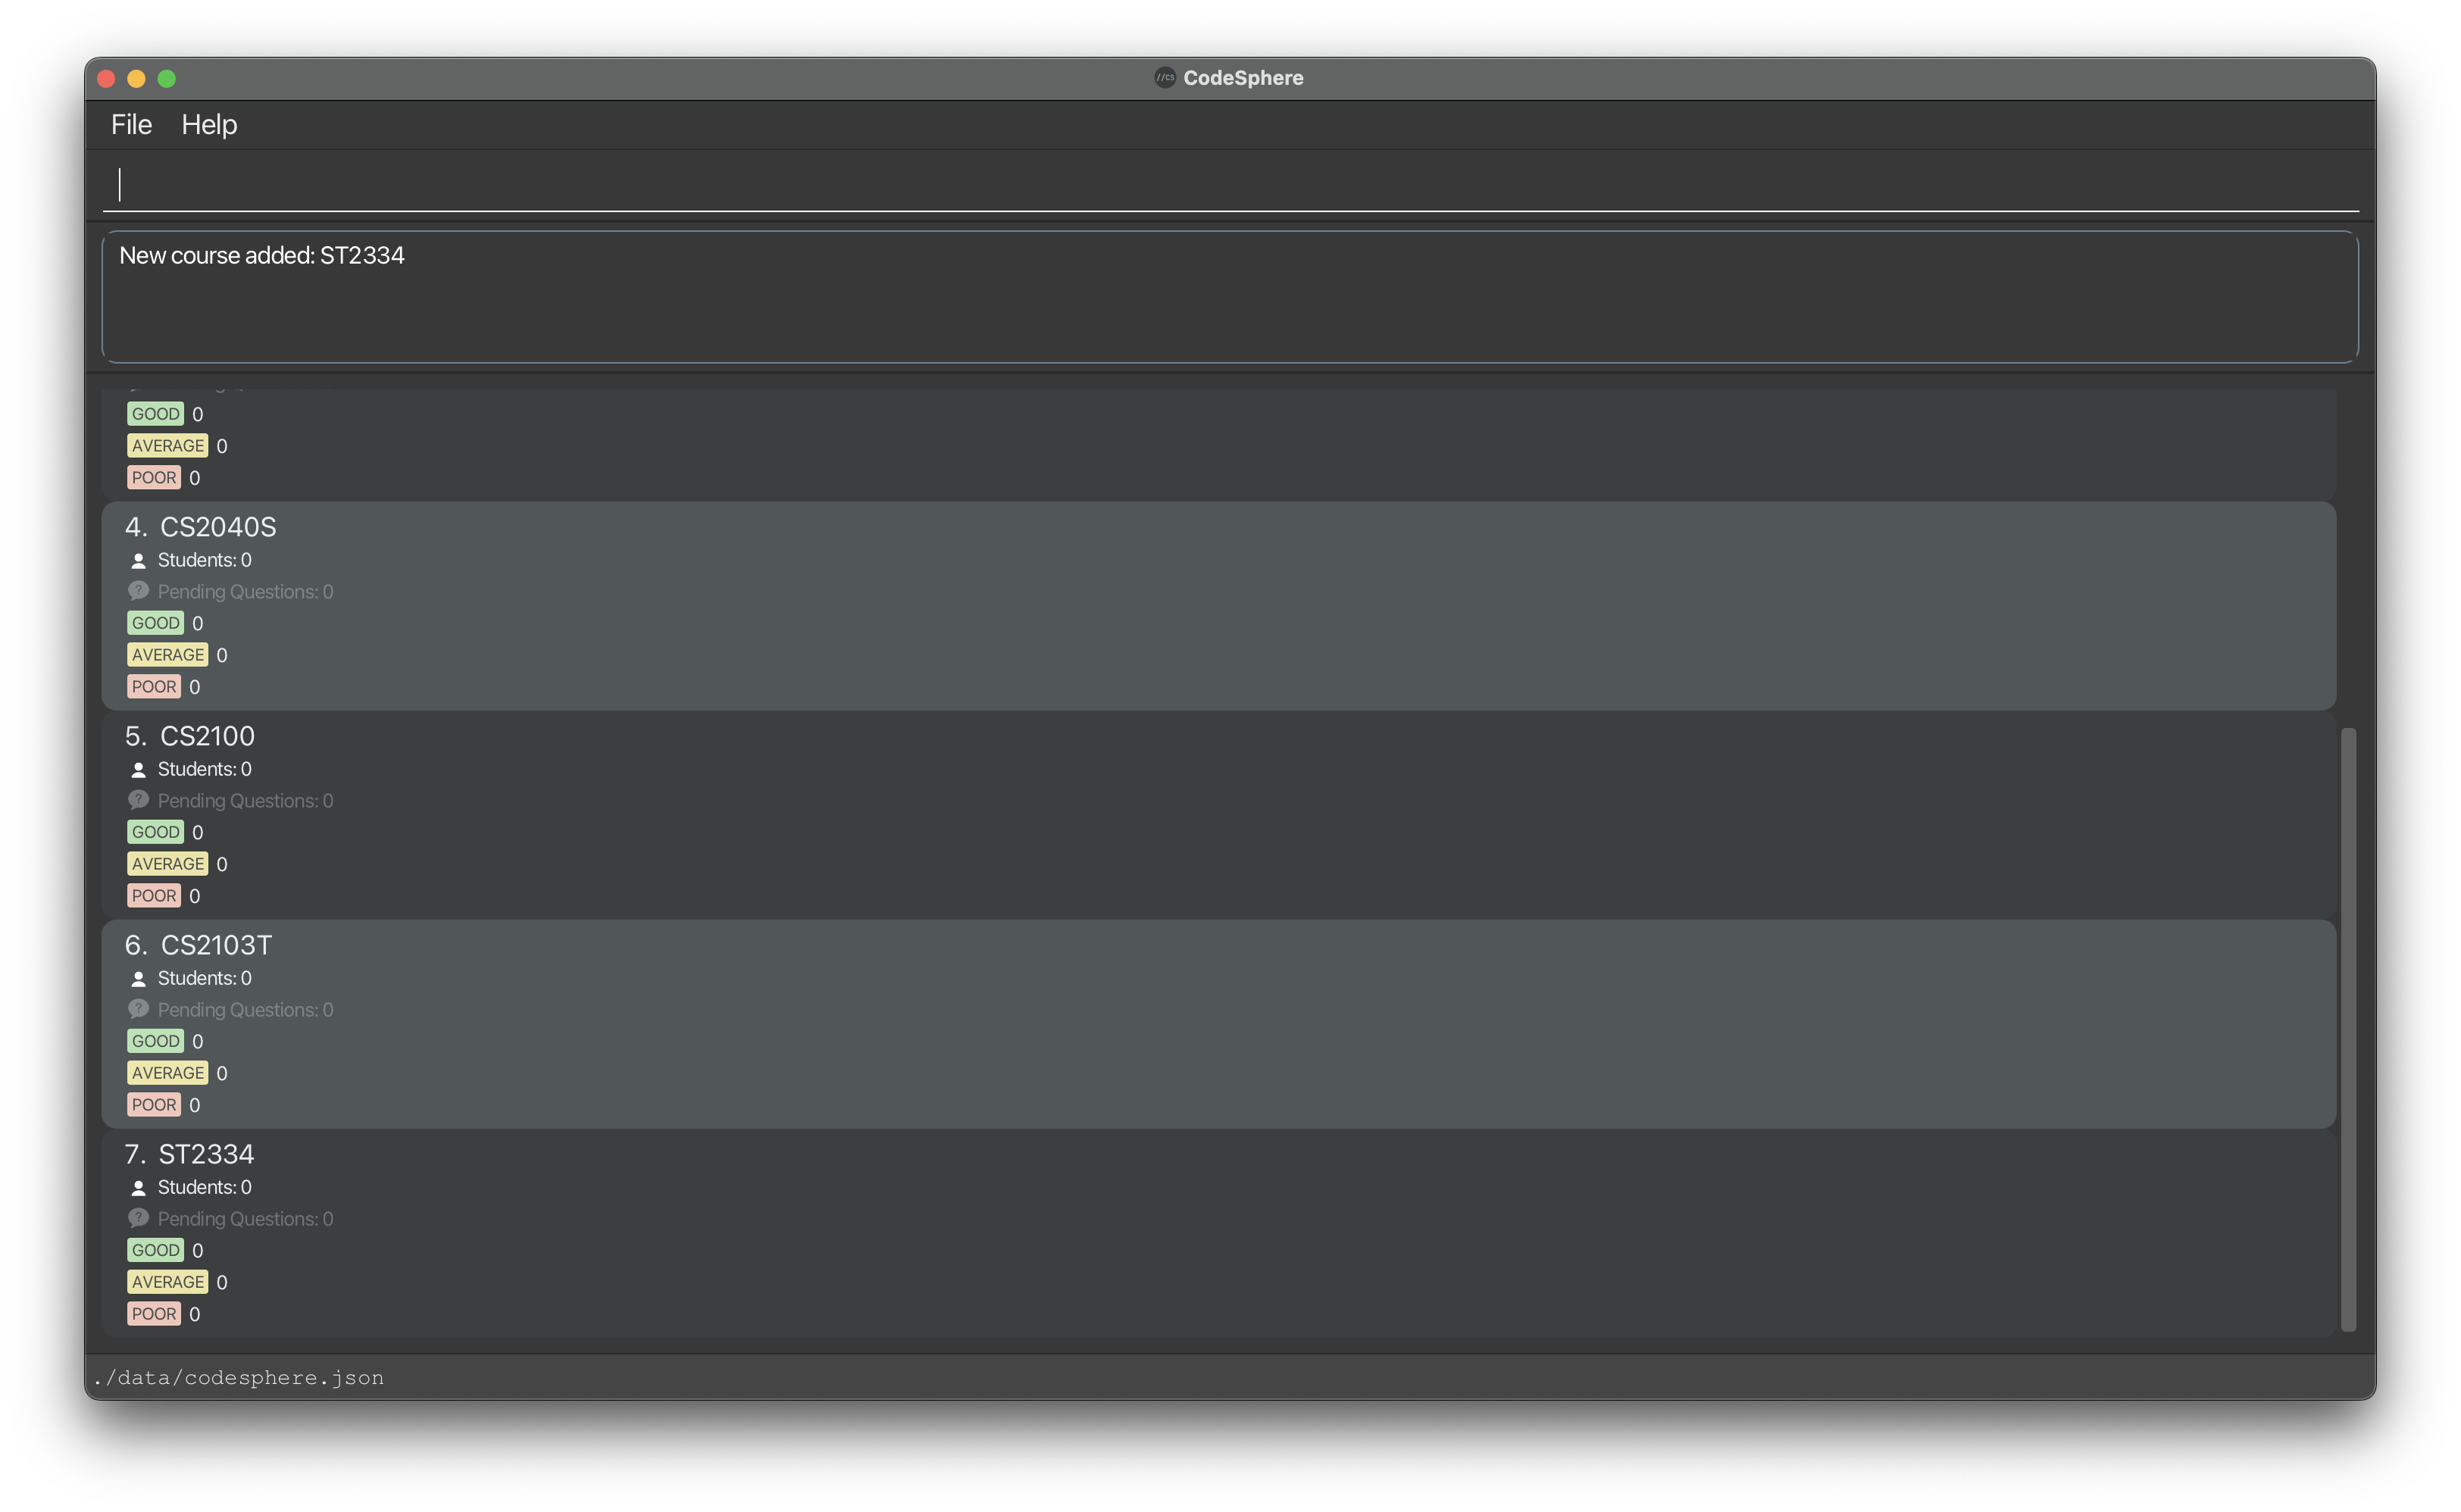
Editing a course : edit
Edits the details of an existing course from the list of courses.
Format: edit INDEX c/NEW_COURSE_NAME
-
INDEX: Refers to the index number shown in the displayed course list. It must be a positive integer (1, 2, 3, …), and it should fall within the range of courses currently displayed such that it corresponds to a valid course. -
NEW_COURSE_NAME: A valid course in NUS. Each course name should consist of a two or three letter prefix, four digits, and an optional one letter suffix. - The existing
COURSE_NAMEfor the course at the specifiedINDEXwill be updated to the inputNEW_COURSE_NAME. - Note that the alphabets in the input for
NEW_COURSE_NAMEare case-insensitive, and they will all be stored and displayed as uppercase letters. For example, enteringedit 1 c/cs1101soredit 1 c/CS1101Swill both result in the course at index 1 being updated toCS1101S.
Examples:
-
edit 1 c/cs1231edits theCOURSE_NAMEof the first course in the course list to becomeCS1231. -
edit 1 c/CS1101return the following result:
Deleting a course : delete
Deletes the specified course from the list of courses.
Format: delete INDEX
-
INDEX: Refers to the index number shown in the displayed course list. It must be a positive integer (1, 2, 3, …), and it should fall within the range of courses currently displayed such that it corresponds to a valid course. - The course at the specified
INDEXwill be deleted.
Examples:
-
delete 4deletes the course at index 4 in the displayed course list. -
delete 2returns the following result: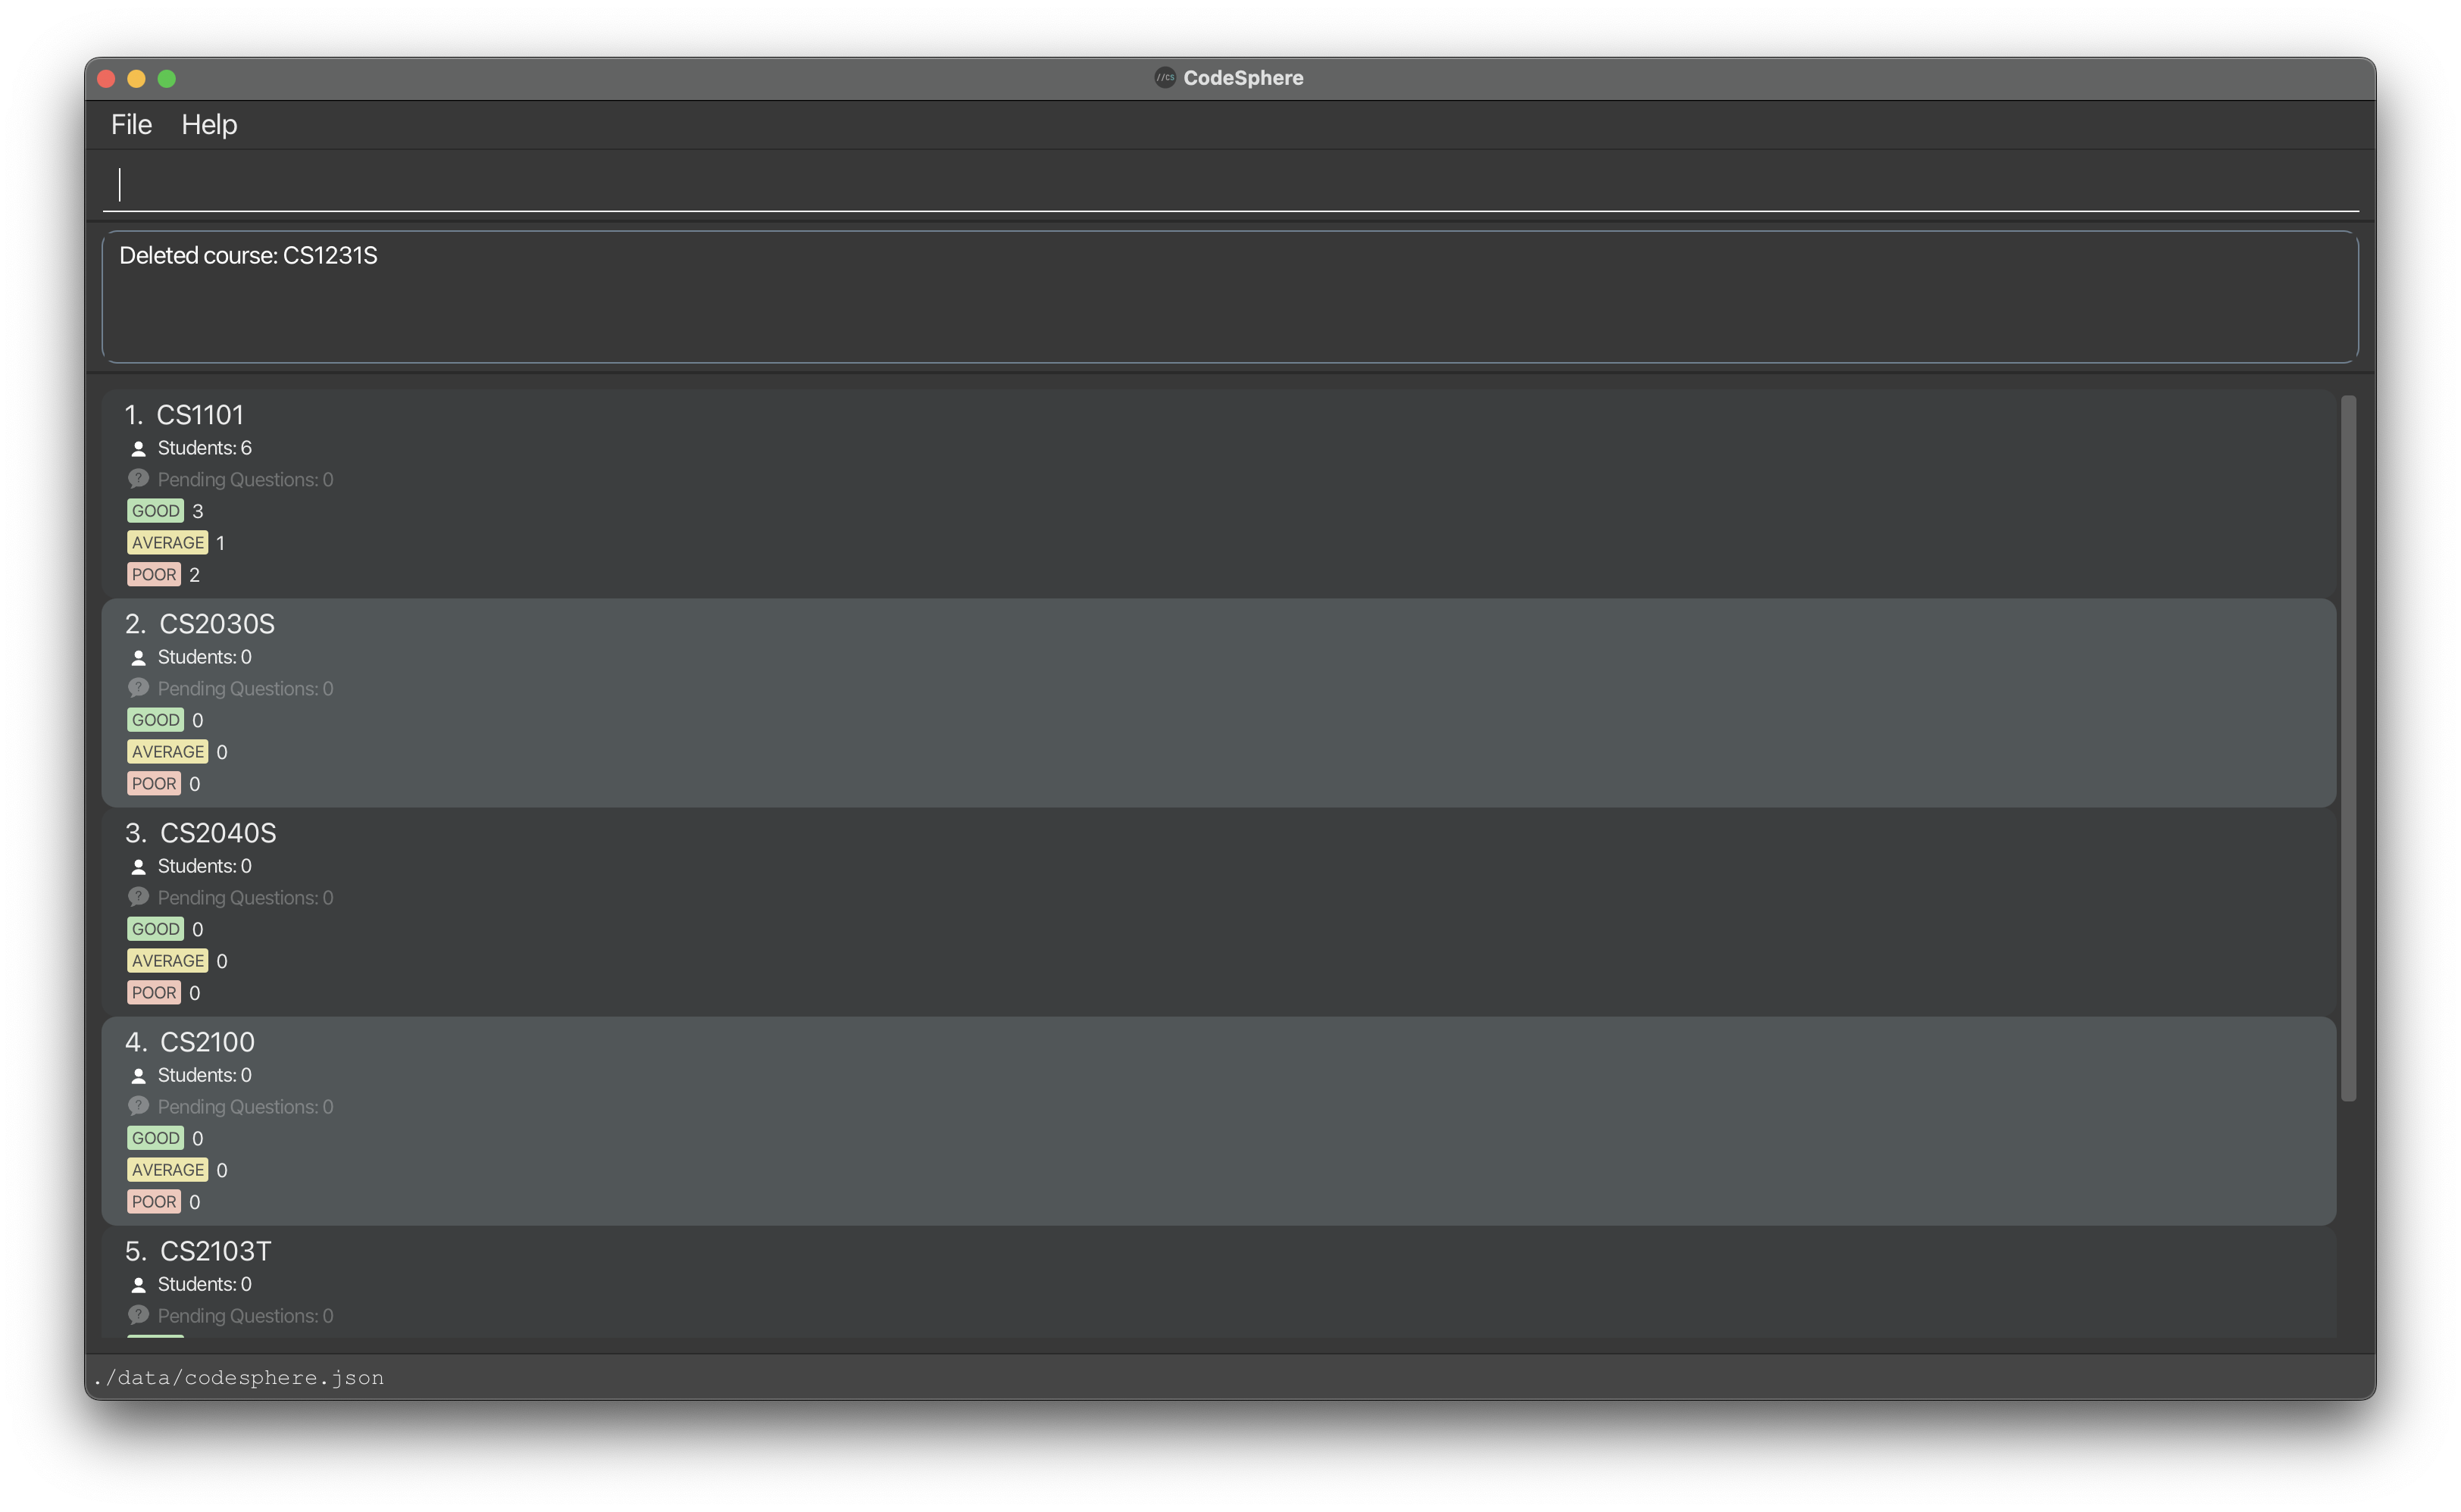
delete course command because this action cannot be undone.
Clearing all courses : clear
Clears all courses in the displayed list of courses.
Format: clear
-
clearreturns the following result: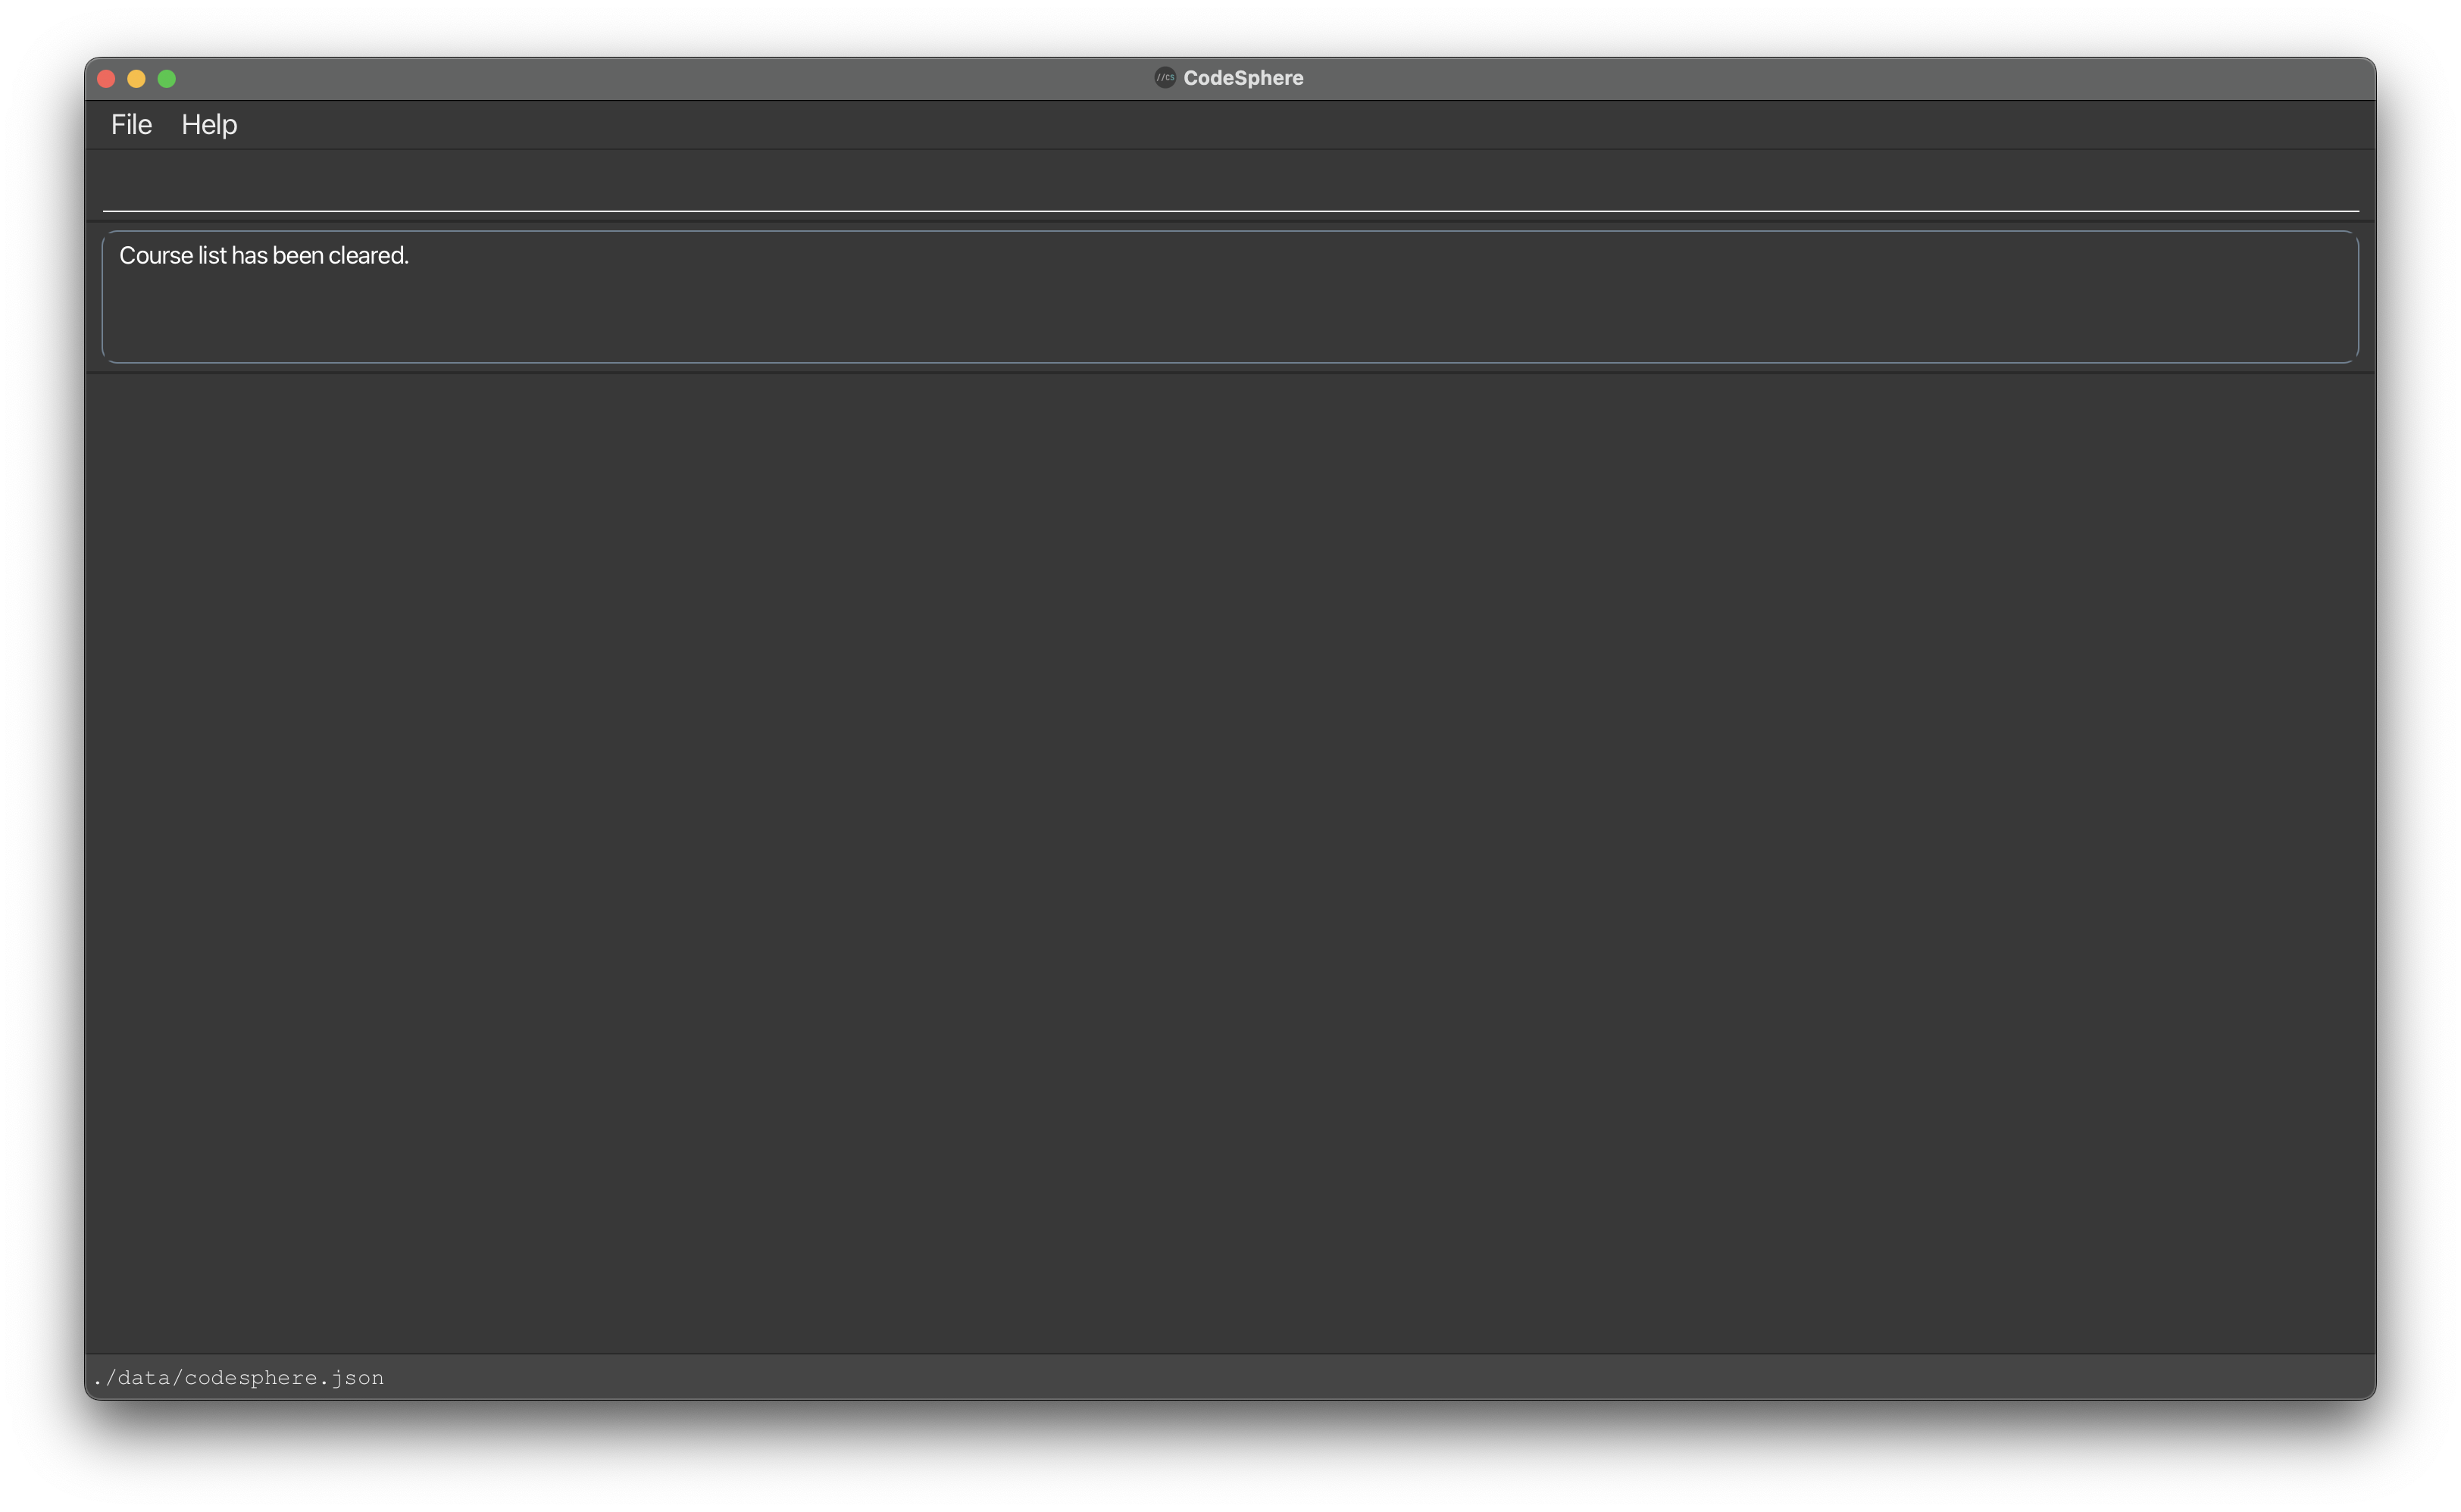
clear course command because this action cannot be undone.
Selecting a course : select
Selects the specified course from the list of courses.
Format: select INDEX
-
INDEX: Refers to the index number shown in the displayed course list. It must be a positive integer (1, 2, 3, …), and it should fall within the range of courses currently displayed such that it corresponds to a valid course. - The course at the specified
INDEXwill be selected.
Example:
-
select 2selects the course at index 2 of the displayed course list. -
select 1returns the following result: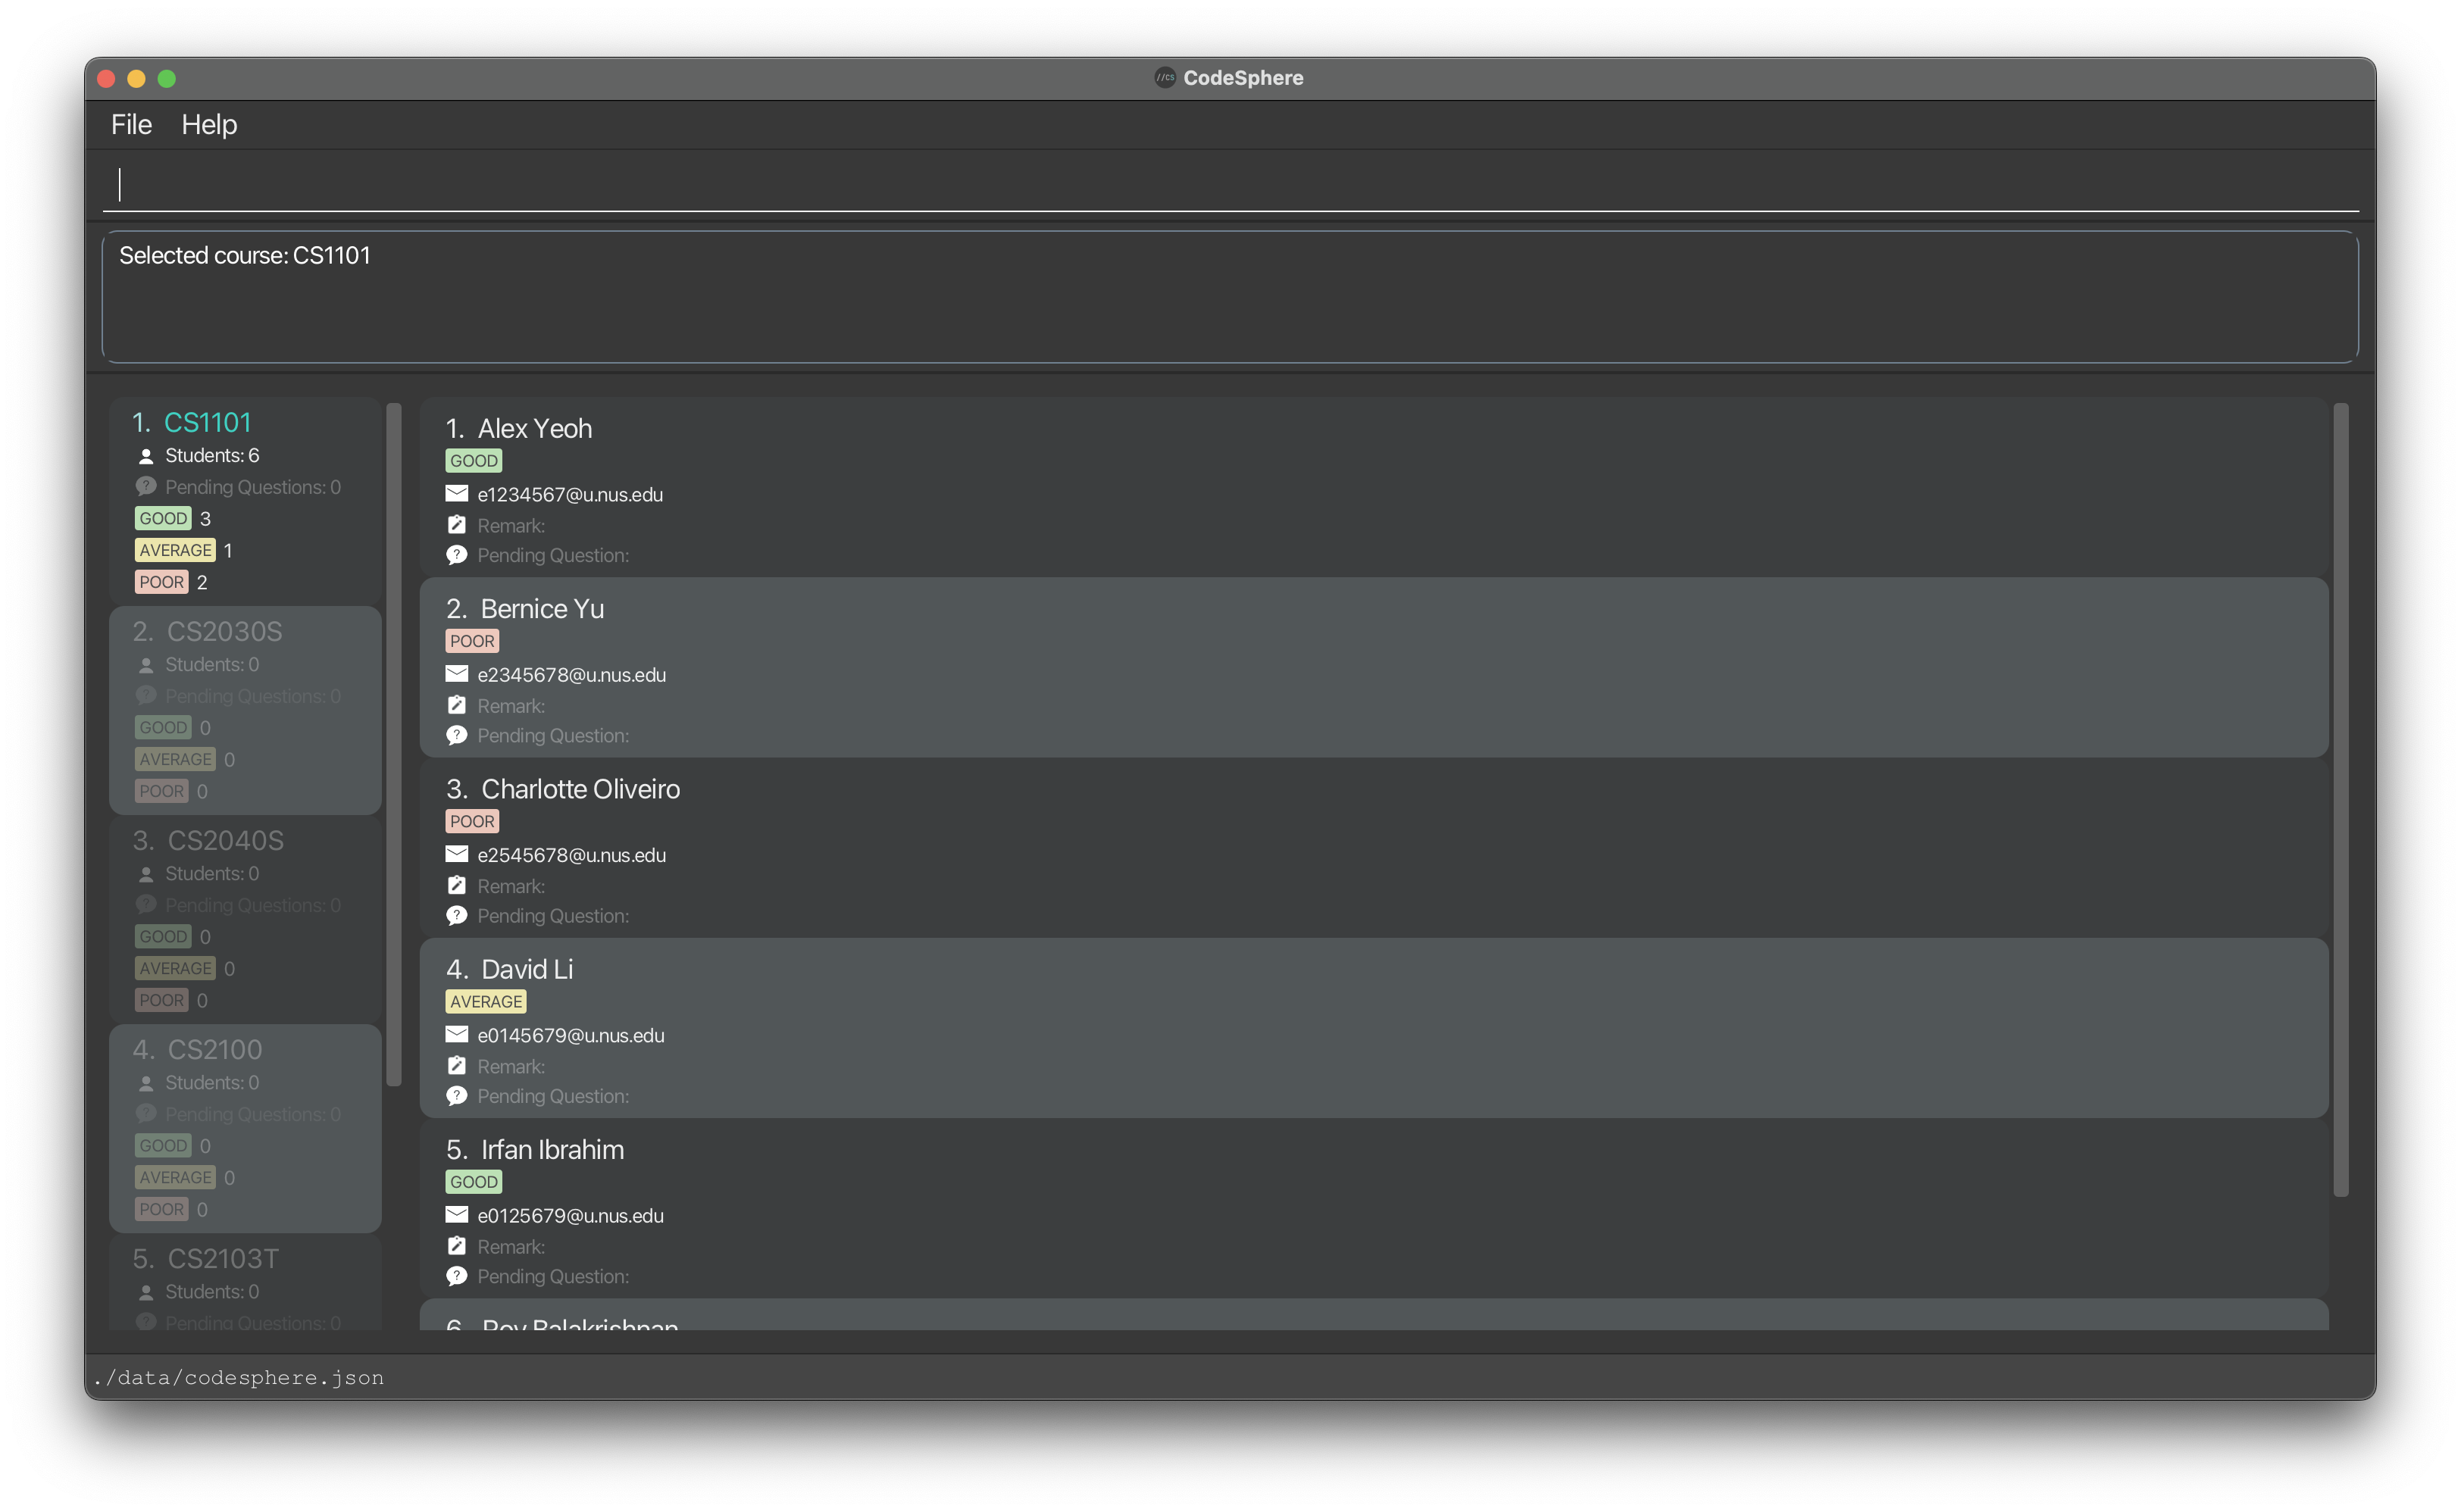
Finding a course : find
Finds courses from the list of courses that match a given a keyword.
Format: find KEYWORD
- As long as the
KEYWORDis contained in the course name, that course will be displayed. - The search for
KEYWORDis case-insensitive. For example,cswill match any course name containingCS. - If there are multiple words specified for
KEYWORD, each word is searched for independently. The final result contains courses that contain any of the words specified forKEYWORD.
Example:
-
find Sdisplays all courses withSin their course name. -
find CS GEAdisplays all courses withCSorGEAin their course name. -
find st CS1101returns the following result: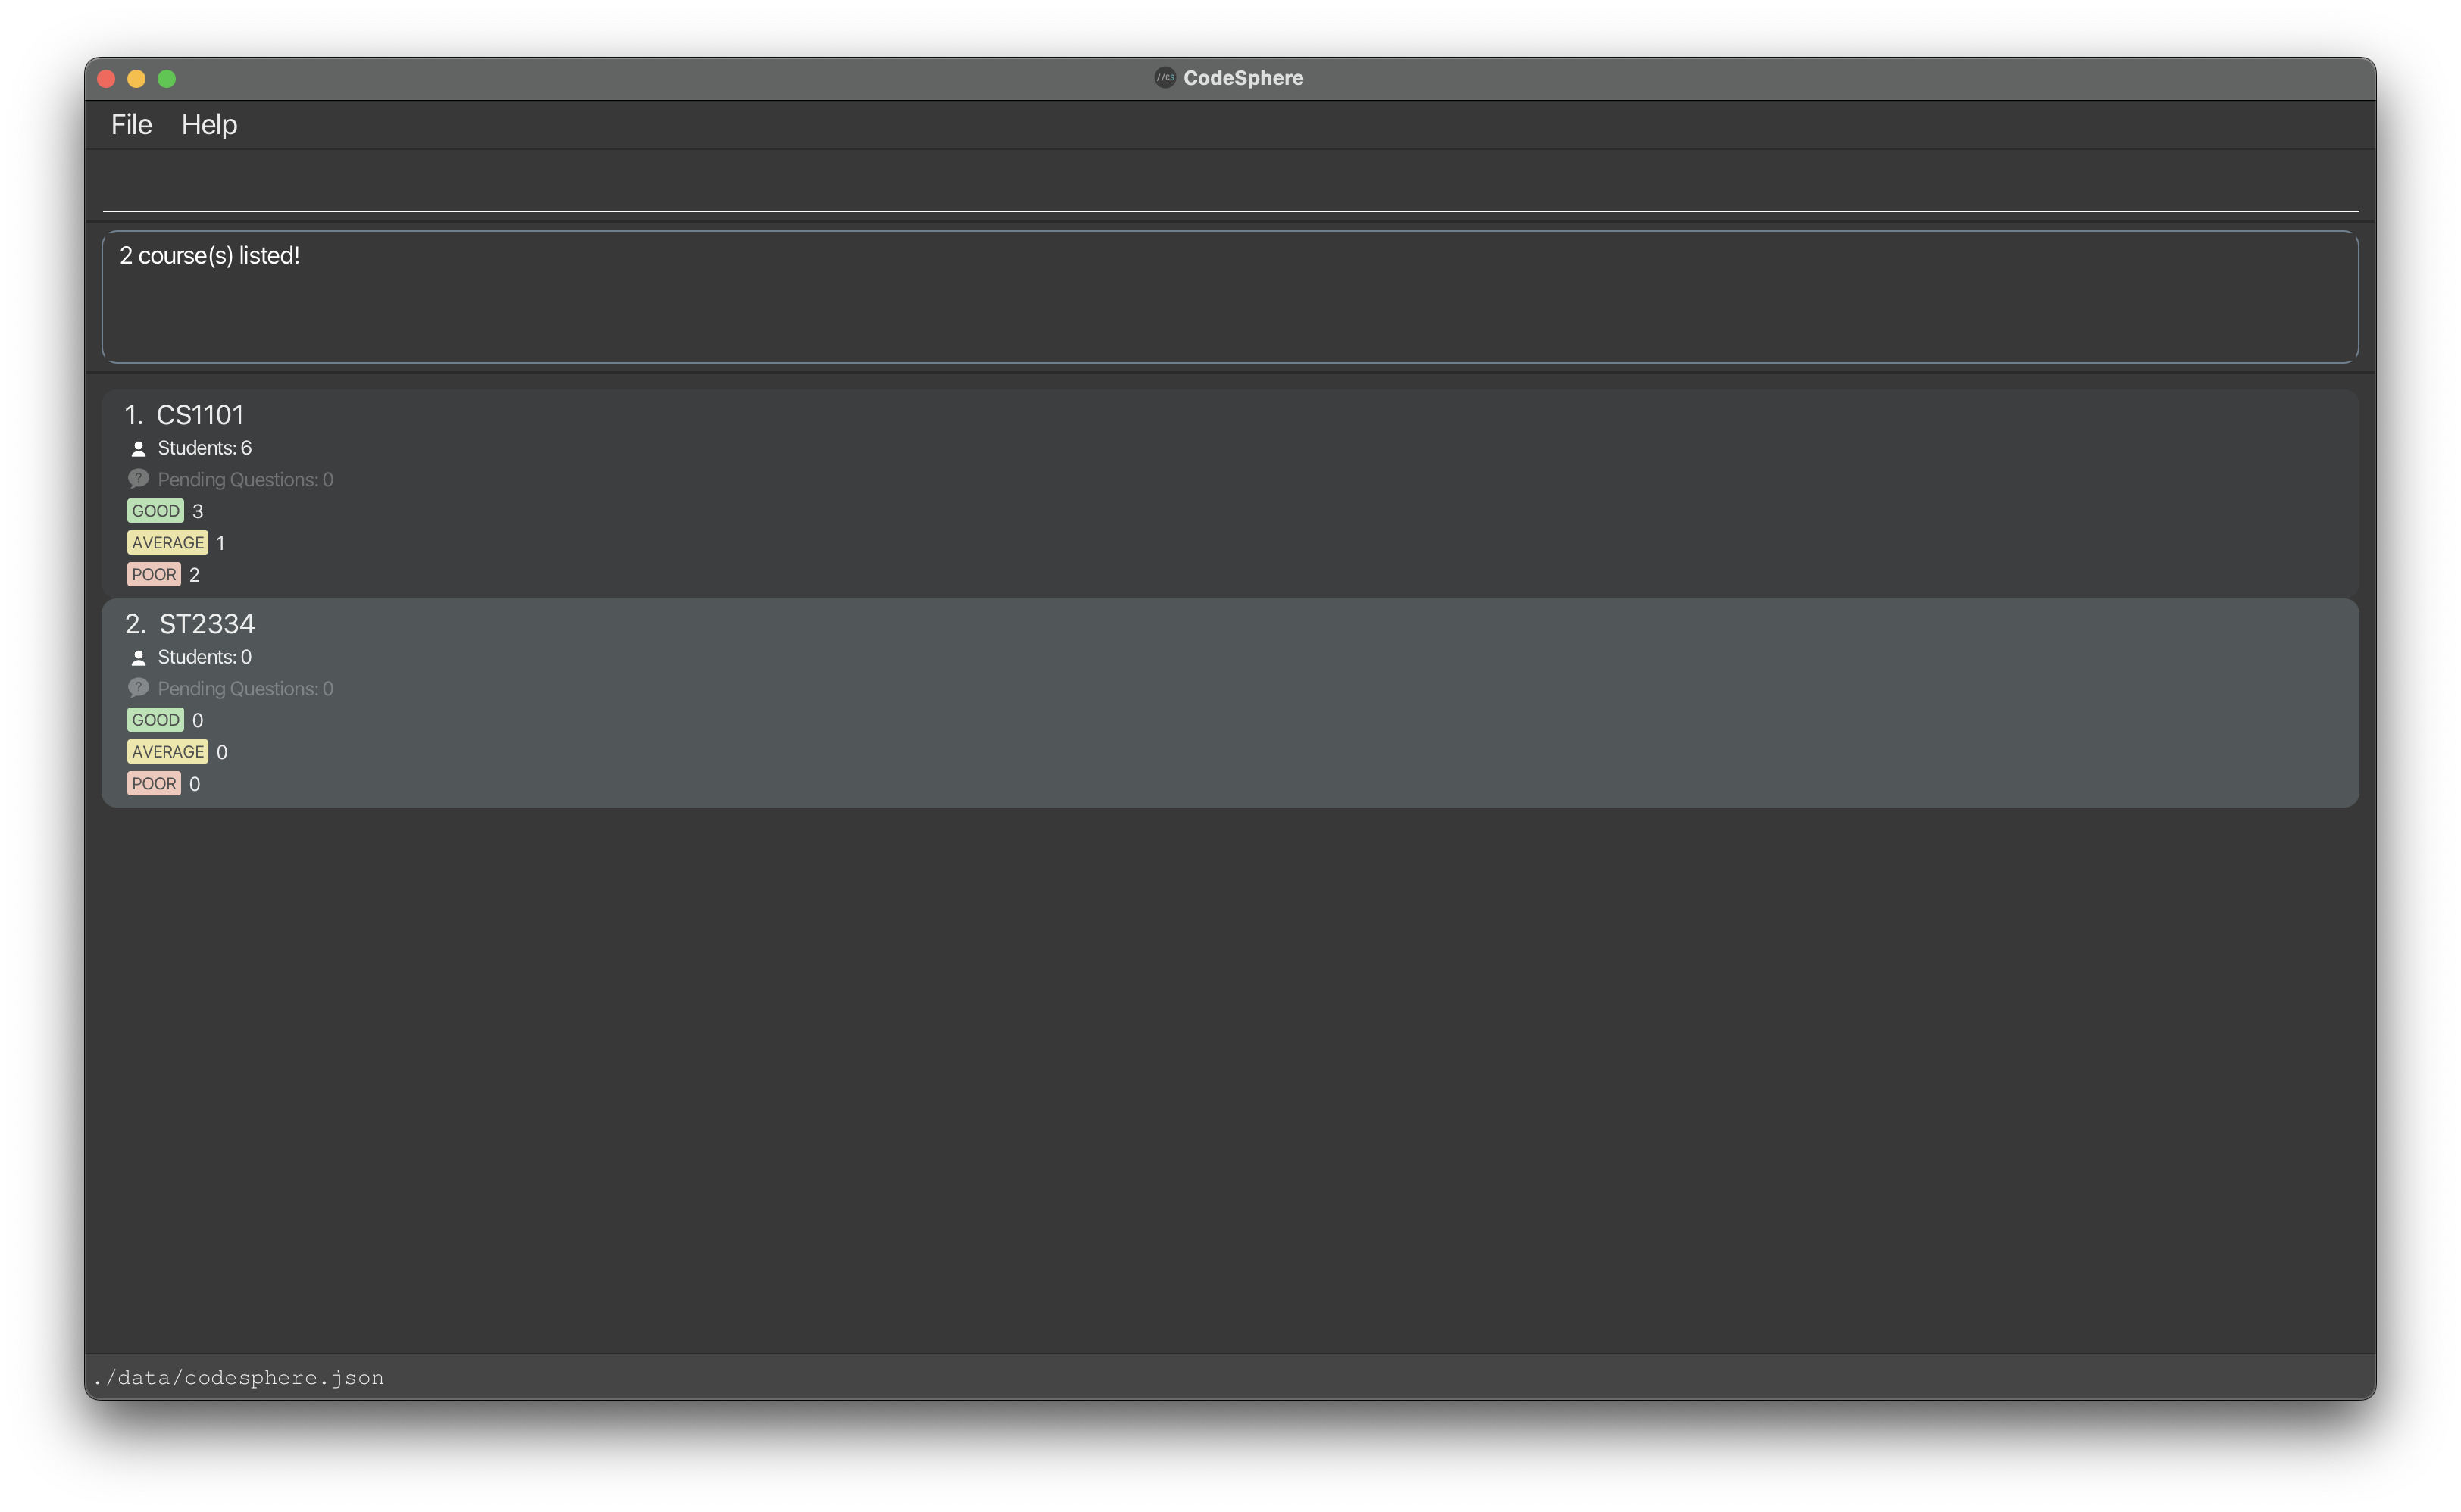
Resetting the course list : reset
Resets a filtered course list to its original order, where courses are arranged chronologically based on their order of addition, with the first course added at the top of the displayed list.
Format: reset
- Recall that
findwill show a filtered course list.resethelps to restore the filtered course list back to its original order. -
resetreturns the following result: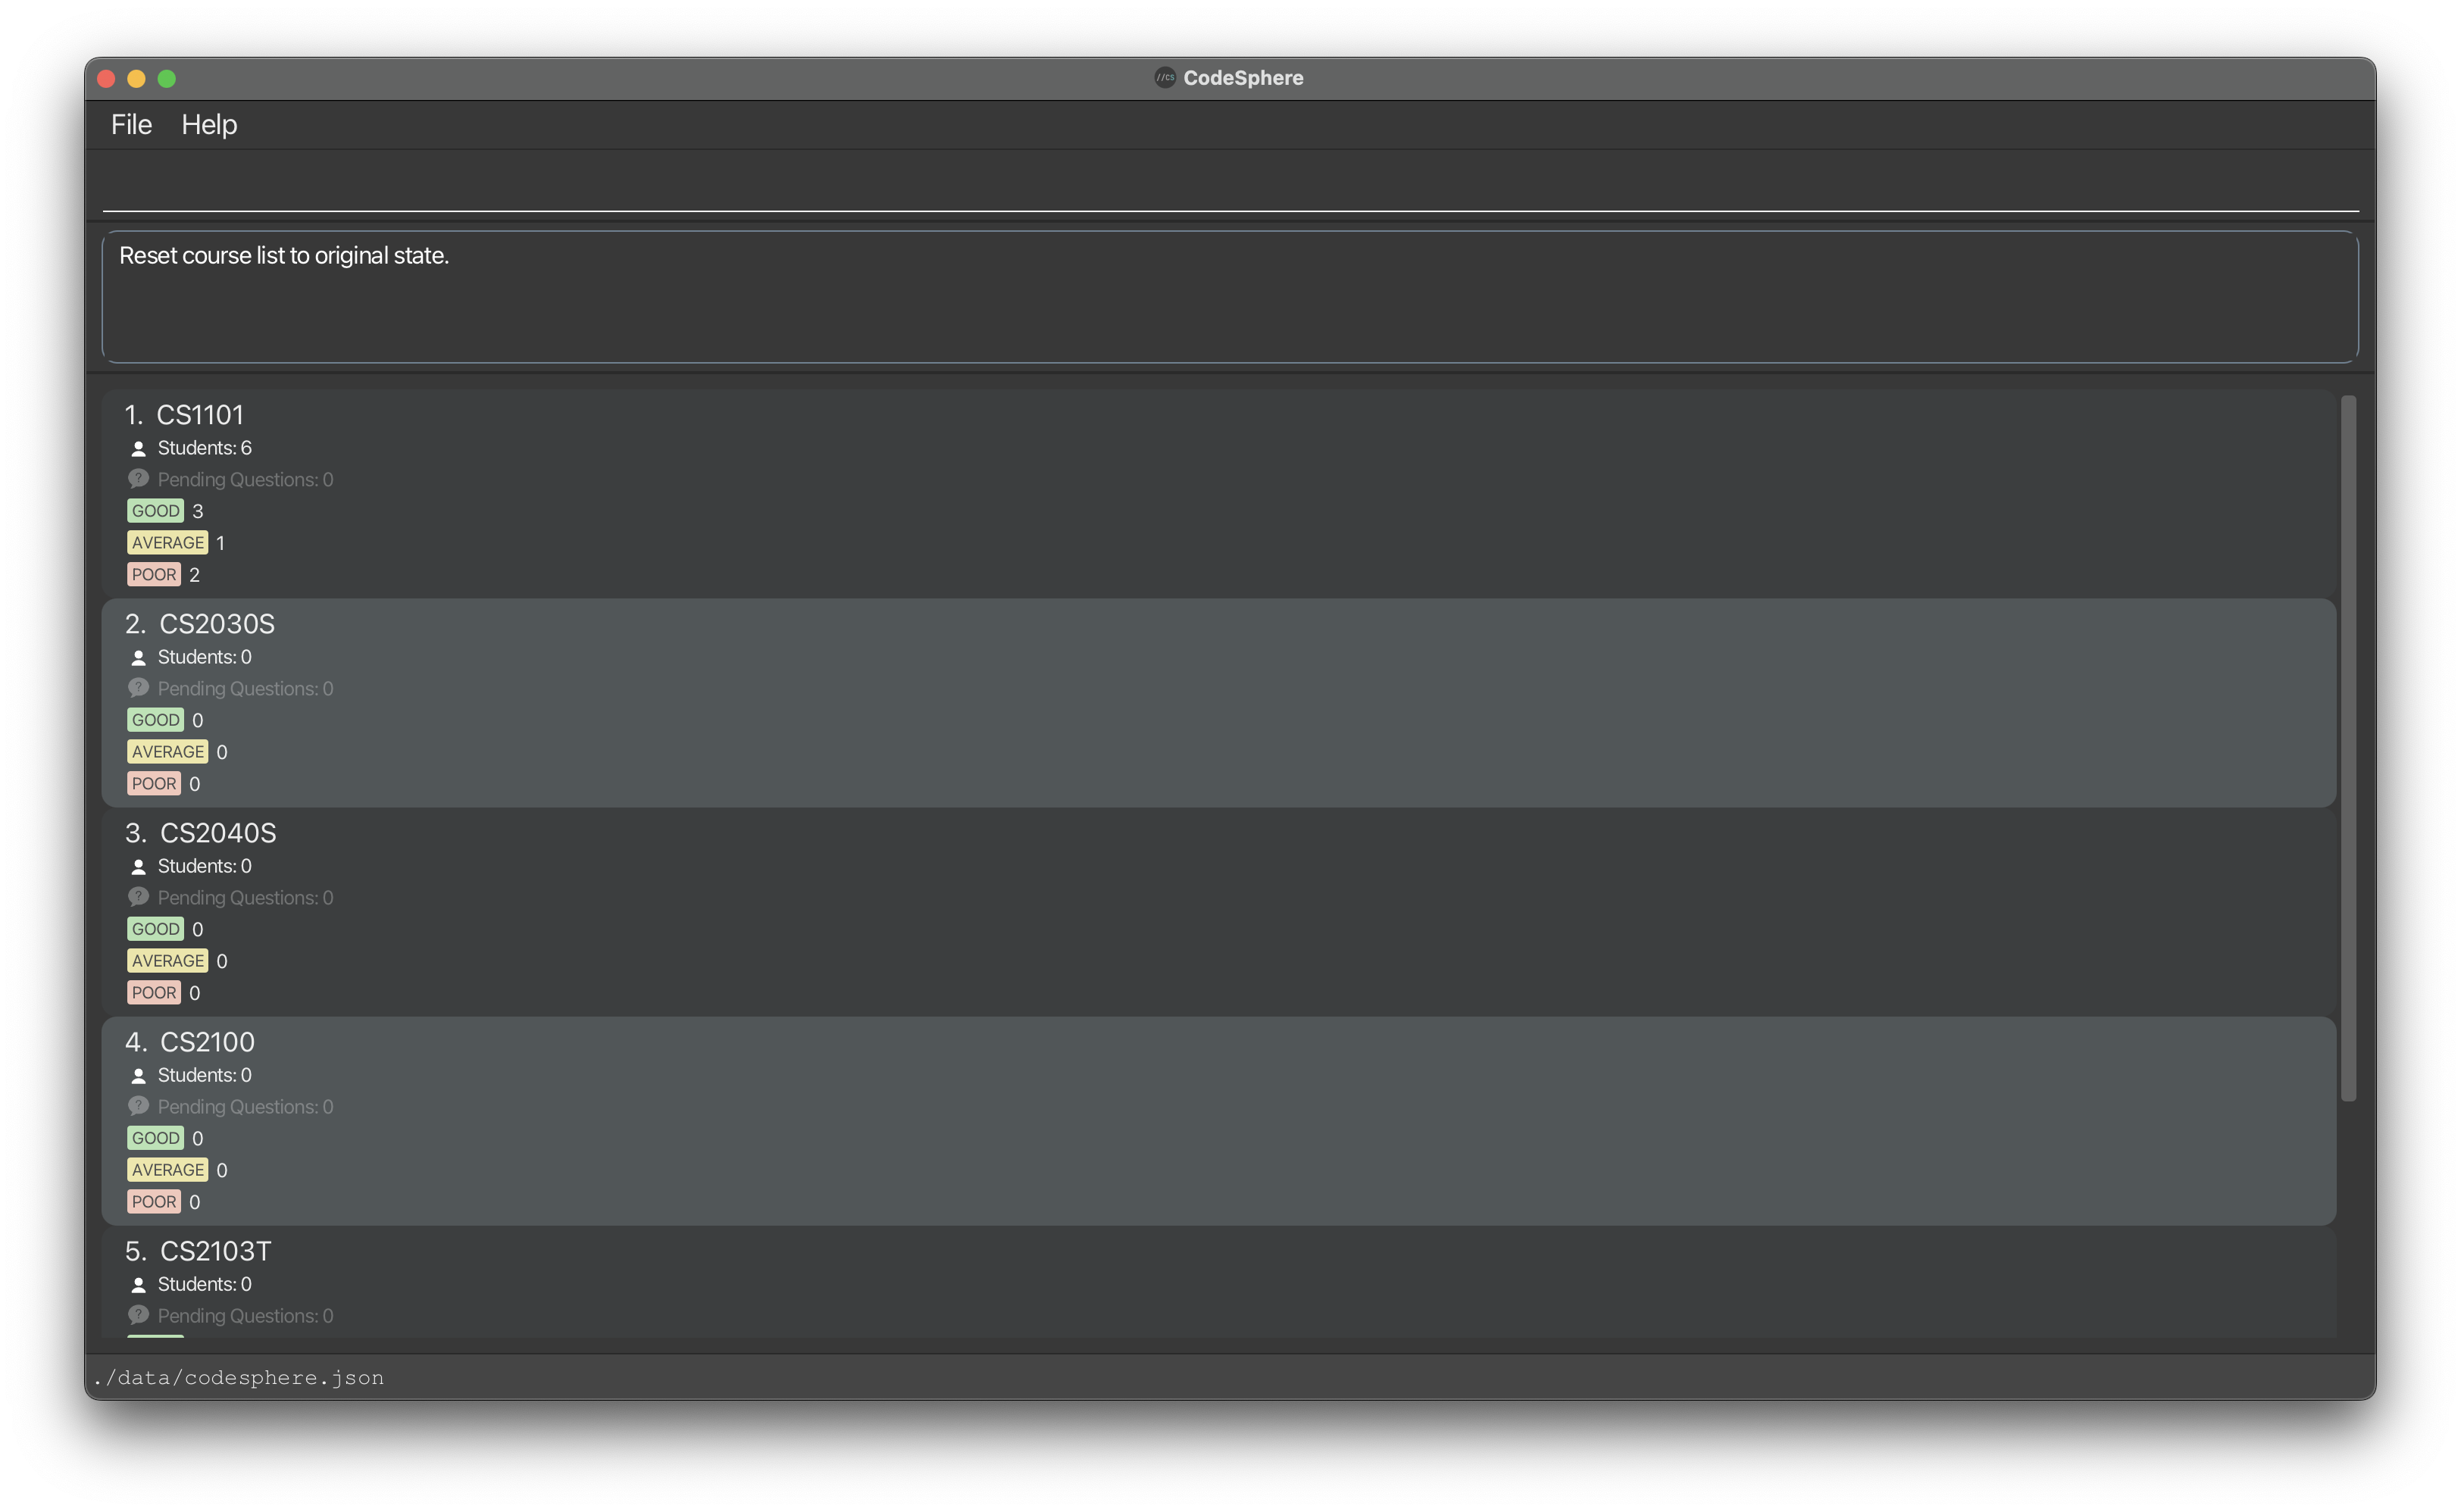
Course Page Commands
Once you have created and selected a course to manage, you can now start adding your students in the course that you wish to track. For each course, the course page displays a list of students that you have added into that particular course. Students are arranged in order of addition, with the first student added at the top of the list.
Commands exclusive to the course page can help you:
-
adda new student -
editthe details of an existing student -
deletean existing student -
clearall existing students -
resetthe student list displayed to its original order -
sortthe displayed student list by the specified field -
findstudents in the course according to the specified field and keywords -
listall existing students with a non-empty pending question field - add a
remarkto an existing student - add a pending question
pqto an existing student -
removea remark or pending question from an existing student
Adding a student : add
Adds a student to the list of students in the selected course.
Format: add n/NAME e/EMAIL t/TAG
-
NAME: Student names can only contain alphabets and some special characters (, / - ‘). Note that alphabets in the input forNAMEare case-sensitive. -
EMAIL: NUS undergraduate student’s email, in the format of “exxxxxxx@u.nus.edu”. Note that the alphabets in the input forEMAILare case-insensitive, and they will all be stored and displayed as uppercase letters. For example, usinge/e1234567@u.nus.eduore/E1234567@U.NUS.EDUwill both result ine1234567@u.nus.edubeing added as a student’sEMAIL. -
TAG: Represents a student’s performance level in the selected course. Valid performance tags includeGOOD,AVERAGEandPOOR. Note that the input forTAGis case-insensitive, and they will all be stored and displayed as uppercase letters. For example, usingt/goodort/GOODwill both result inGOODbeing added as a student’sTAG.
Examples:
add n/Susan Tan e/e0946283@u.nus.edu t/GOODadd n/Koh Mei Ling, Mary e/e9739423@u.nus.edu t/AVERAGE-
add n/Ashley-Jane Lim e/E9739153@U.NUS.EDU t/poorreturns the following result: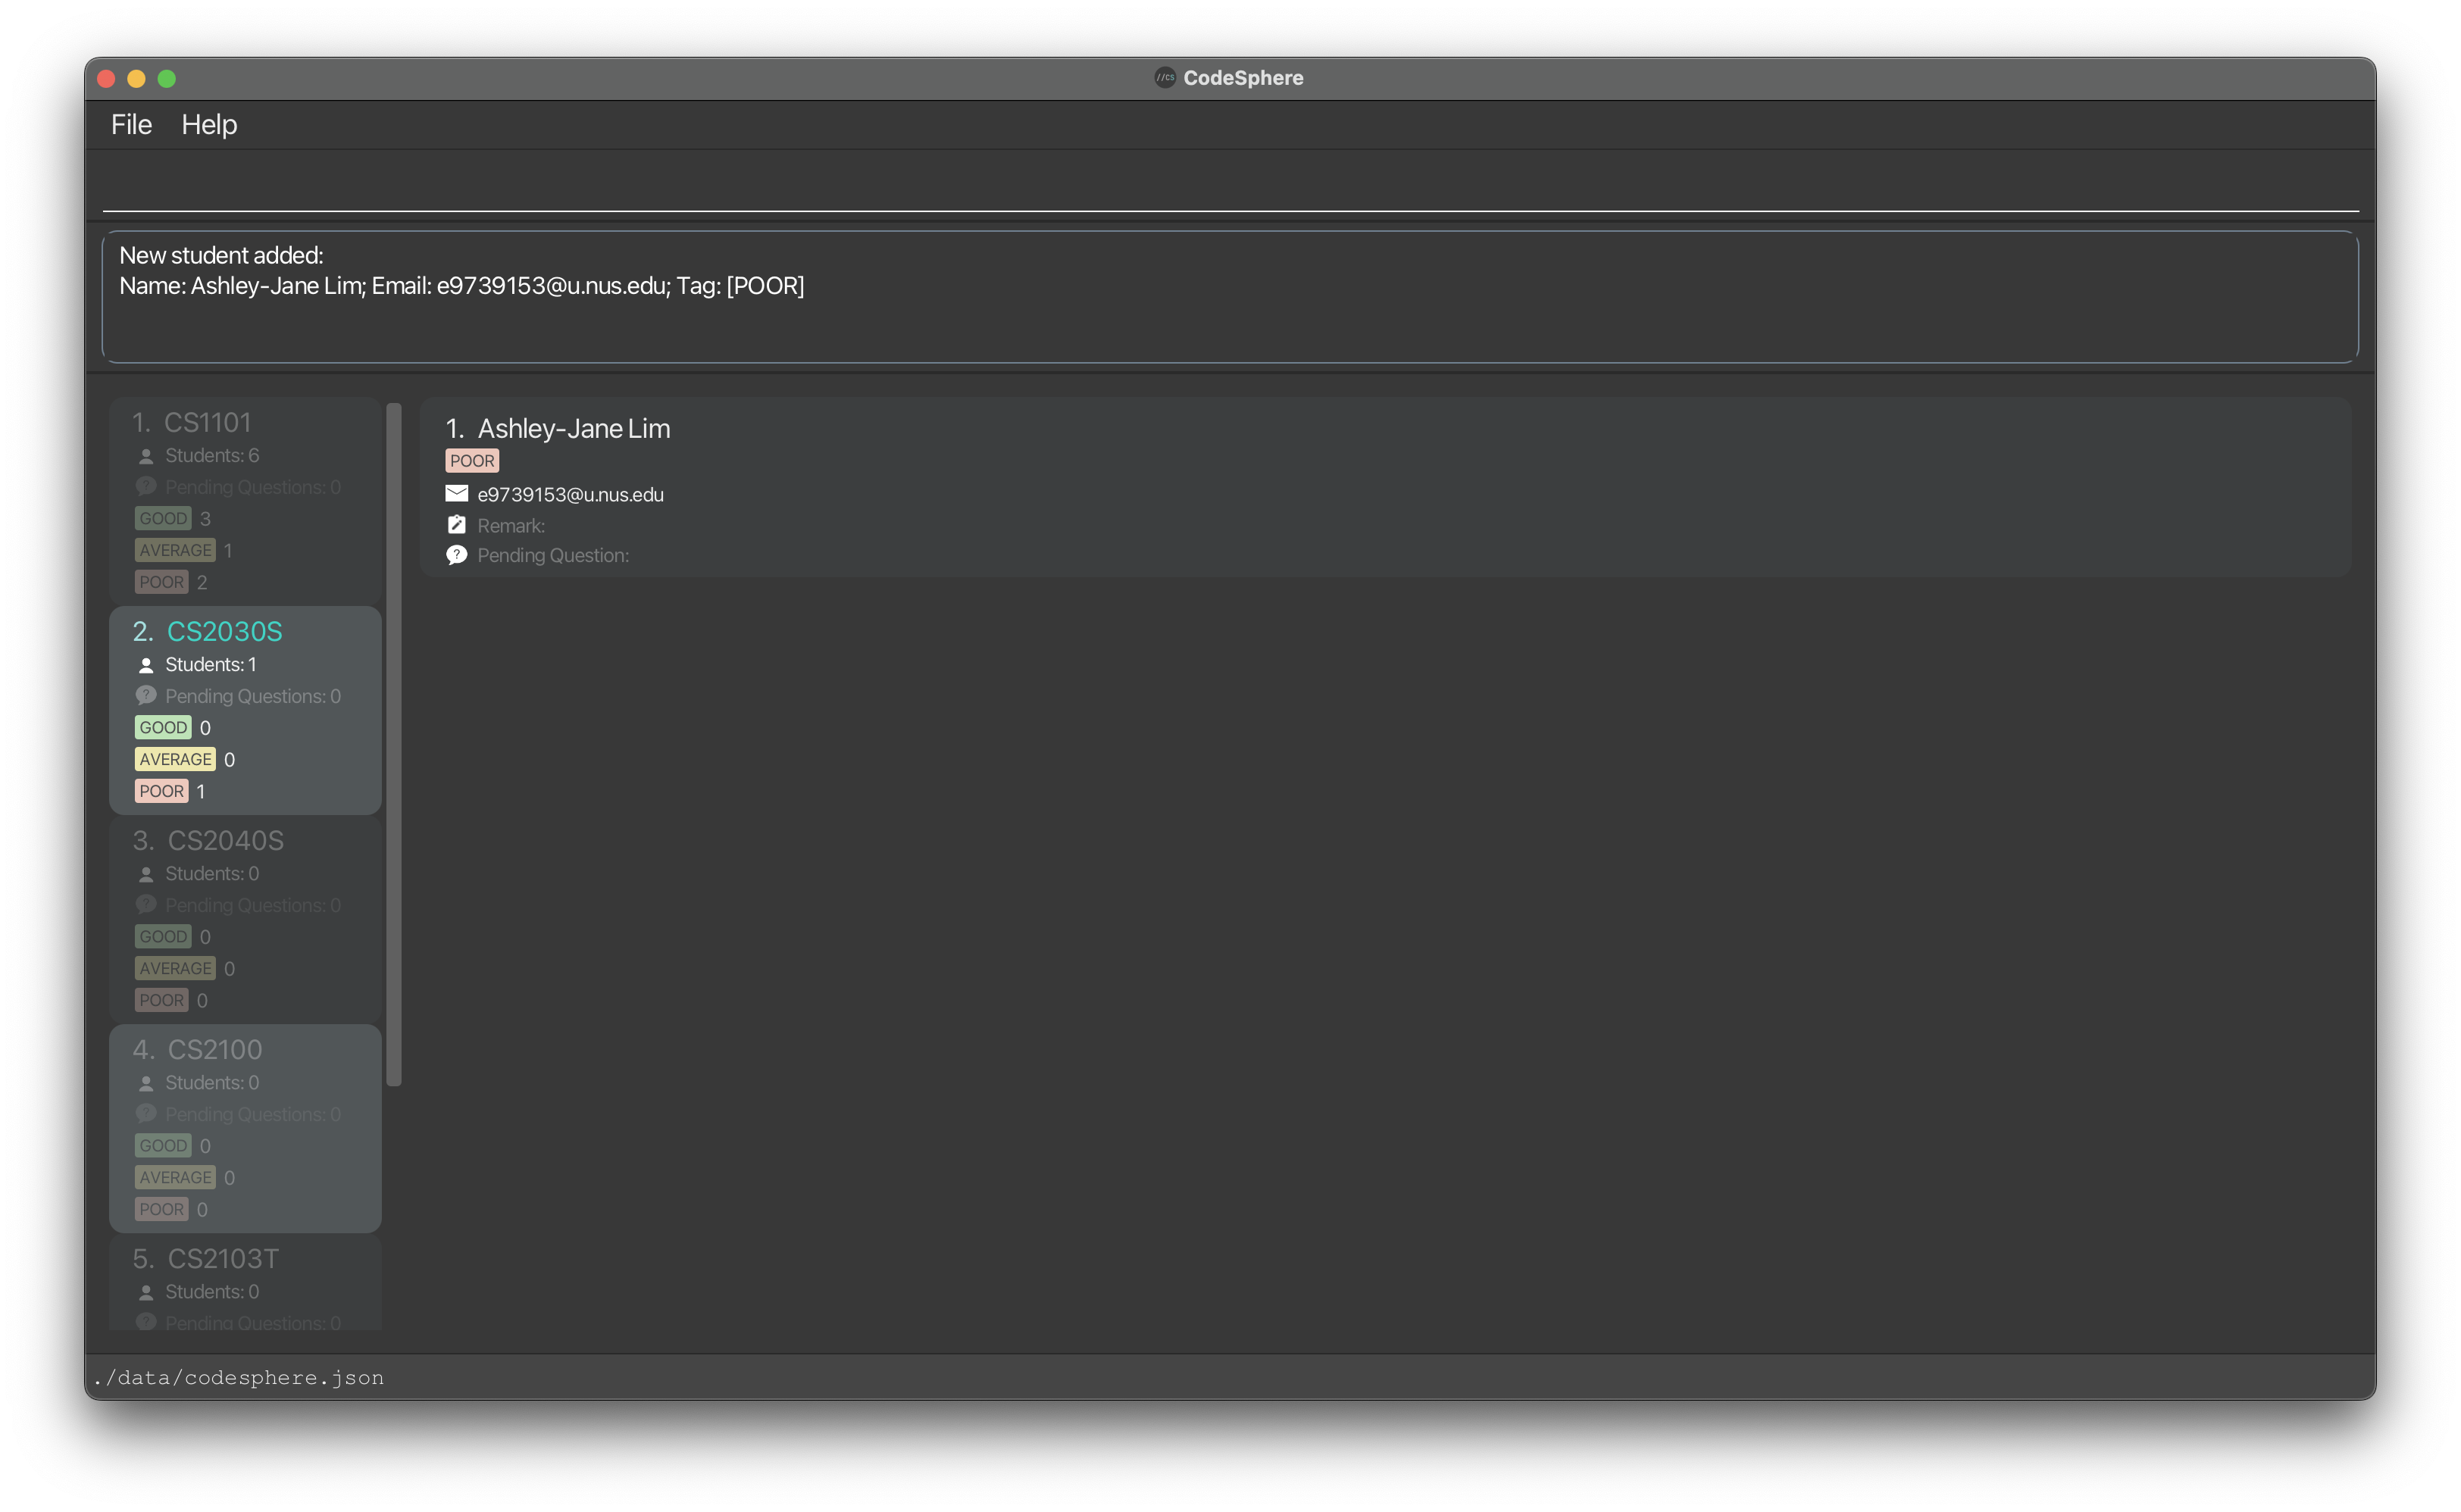
Editing a student : edit
Edits the details of an existing student from the list of students in the selected course.
Format: edit INDEX [n/NAME] [e/EMAIL] [t/TAG] [r/REMARK] [pq/PENDING_QUESTION]
-
INDEX: Refers to the index number shown in the displayed student list. It must be a positive integer (1, 2, 3, …), and it should fall within the range of students currently displayed such that it corresponds to a valid student. - All fields after
INDEXare optional, as indicated by square brackets [ ]. But at least one of the optional fields must be provided. - Field(s) specified in the command will replace existing field(s) for the student at the specified
INDEX. - The inputs for each field should not contain other valid prefixes. For example,
edit 1 r/new remark e/o, where theREMARKfield is intended to benew remark e/o, is not allowed because the valid prefixe/forEMAILis included in the input for theREMARKfield. - Note that when editing tags/remarks/pending questions, the respective existing fields of the student will be removed, meaning that adding of tags/remarks/pending questions is not cumulative.
Examples:
-
edit 1 t/goodedits the tag of the first student in the displayed student list to be GOOD. -
edit 2 n/Alex Yeoh t/averageedits the name of the second student to be Alex Yeoh and changes the tag to AVERAGE. -
edit 3 r/participativeedits the remark of the third student to be “participative”. -
edit 4 pq/what is a logic gate? n/David Leereturns the following result: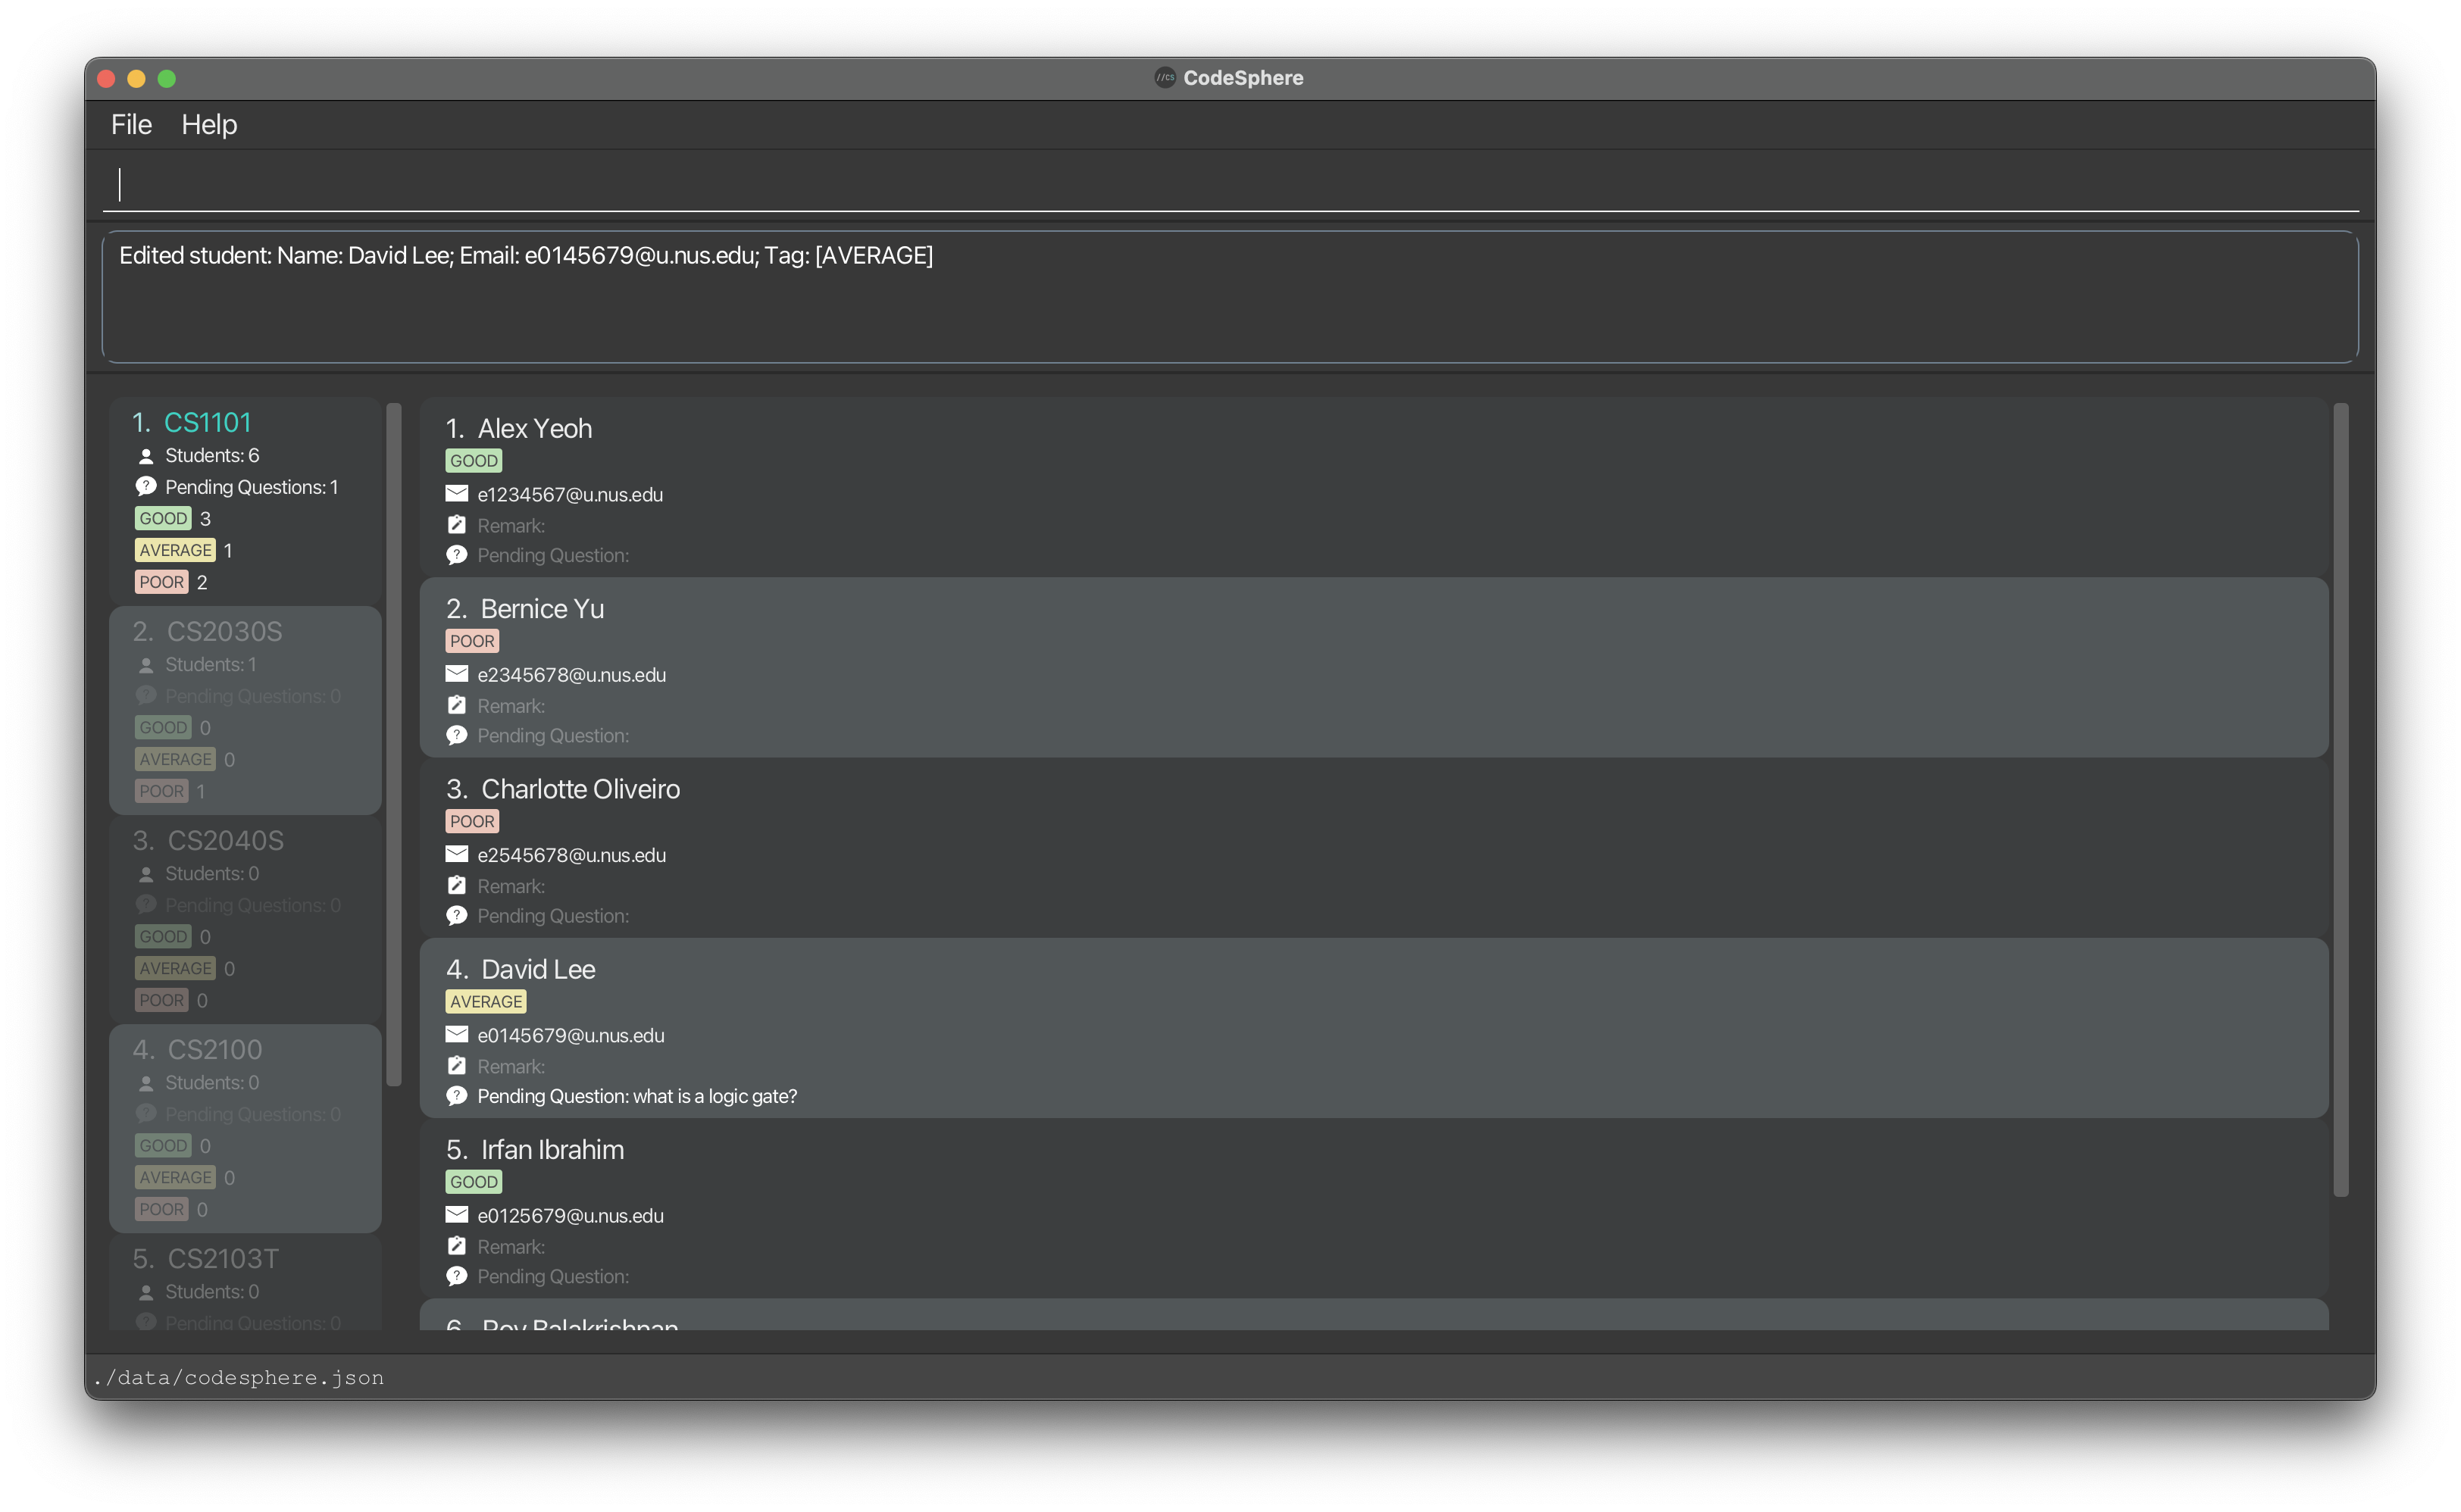
Deleting a student : delete
Deletes the specified student from the list of students in the selected course.
Format: delete INDEX
-
INDEX: Refers to the index number shown in the displayed student list. It must be a positive integer (1, 2, 3, …), and it should fall within the range of students currently displayed such that it corresponds to a valid student. - The student at the specified
INDEXwill be deleted from the student list of the selected course.
Example:
-
delete 2deletes the student at index 2 of the displayed students list. -
delete 1returns the following result: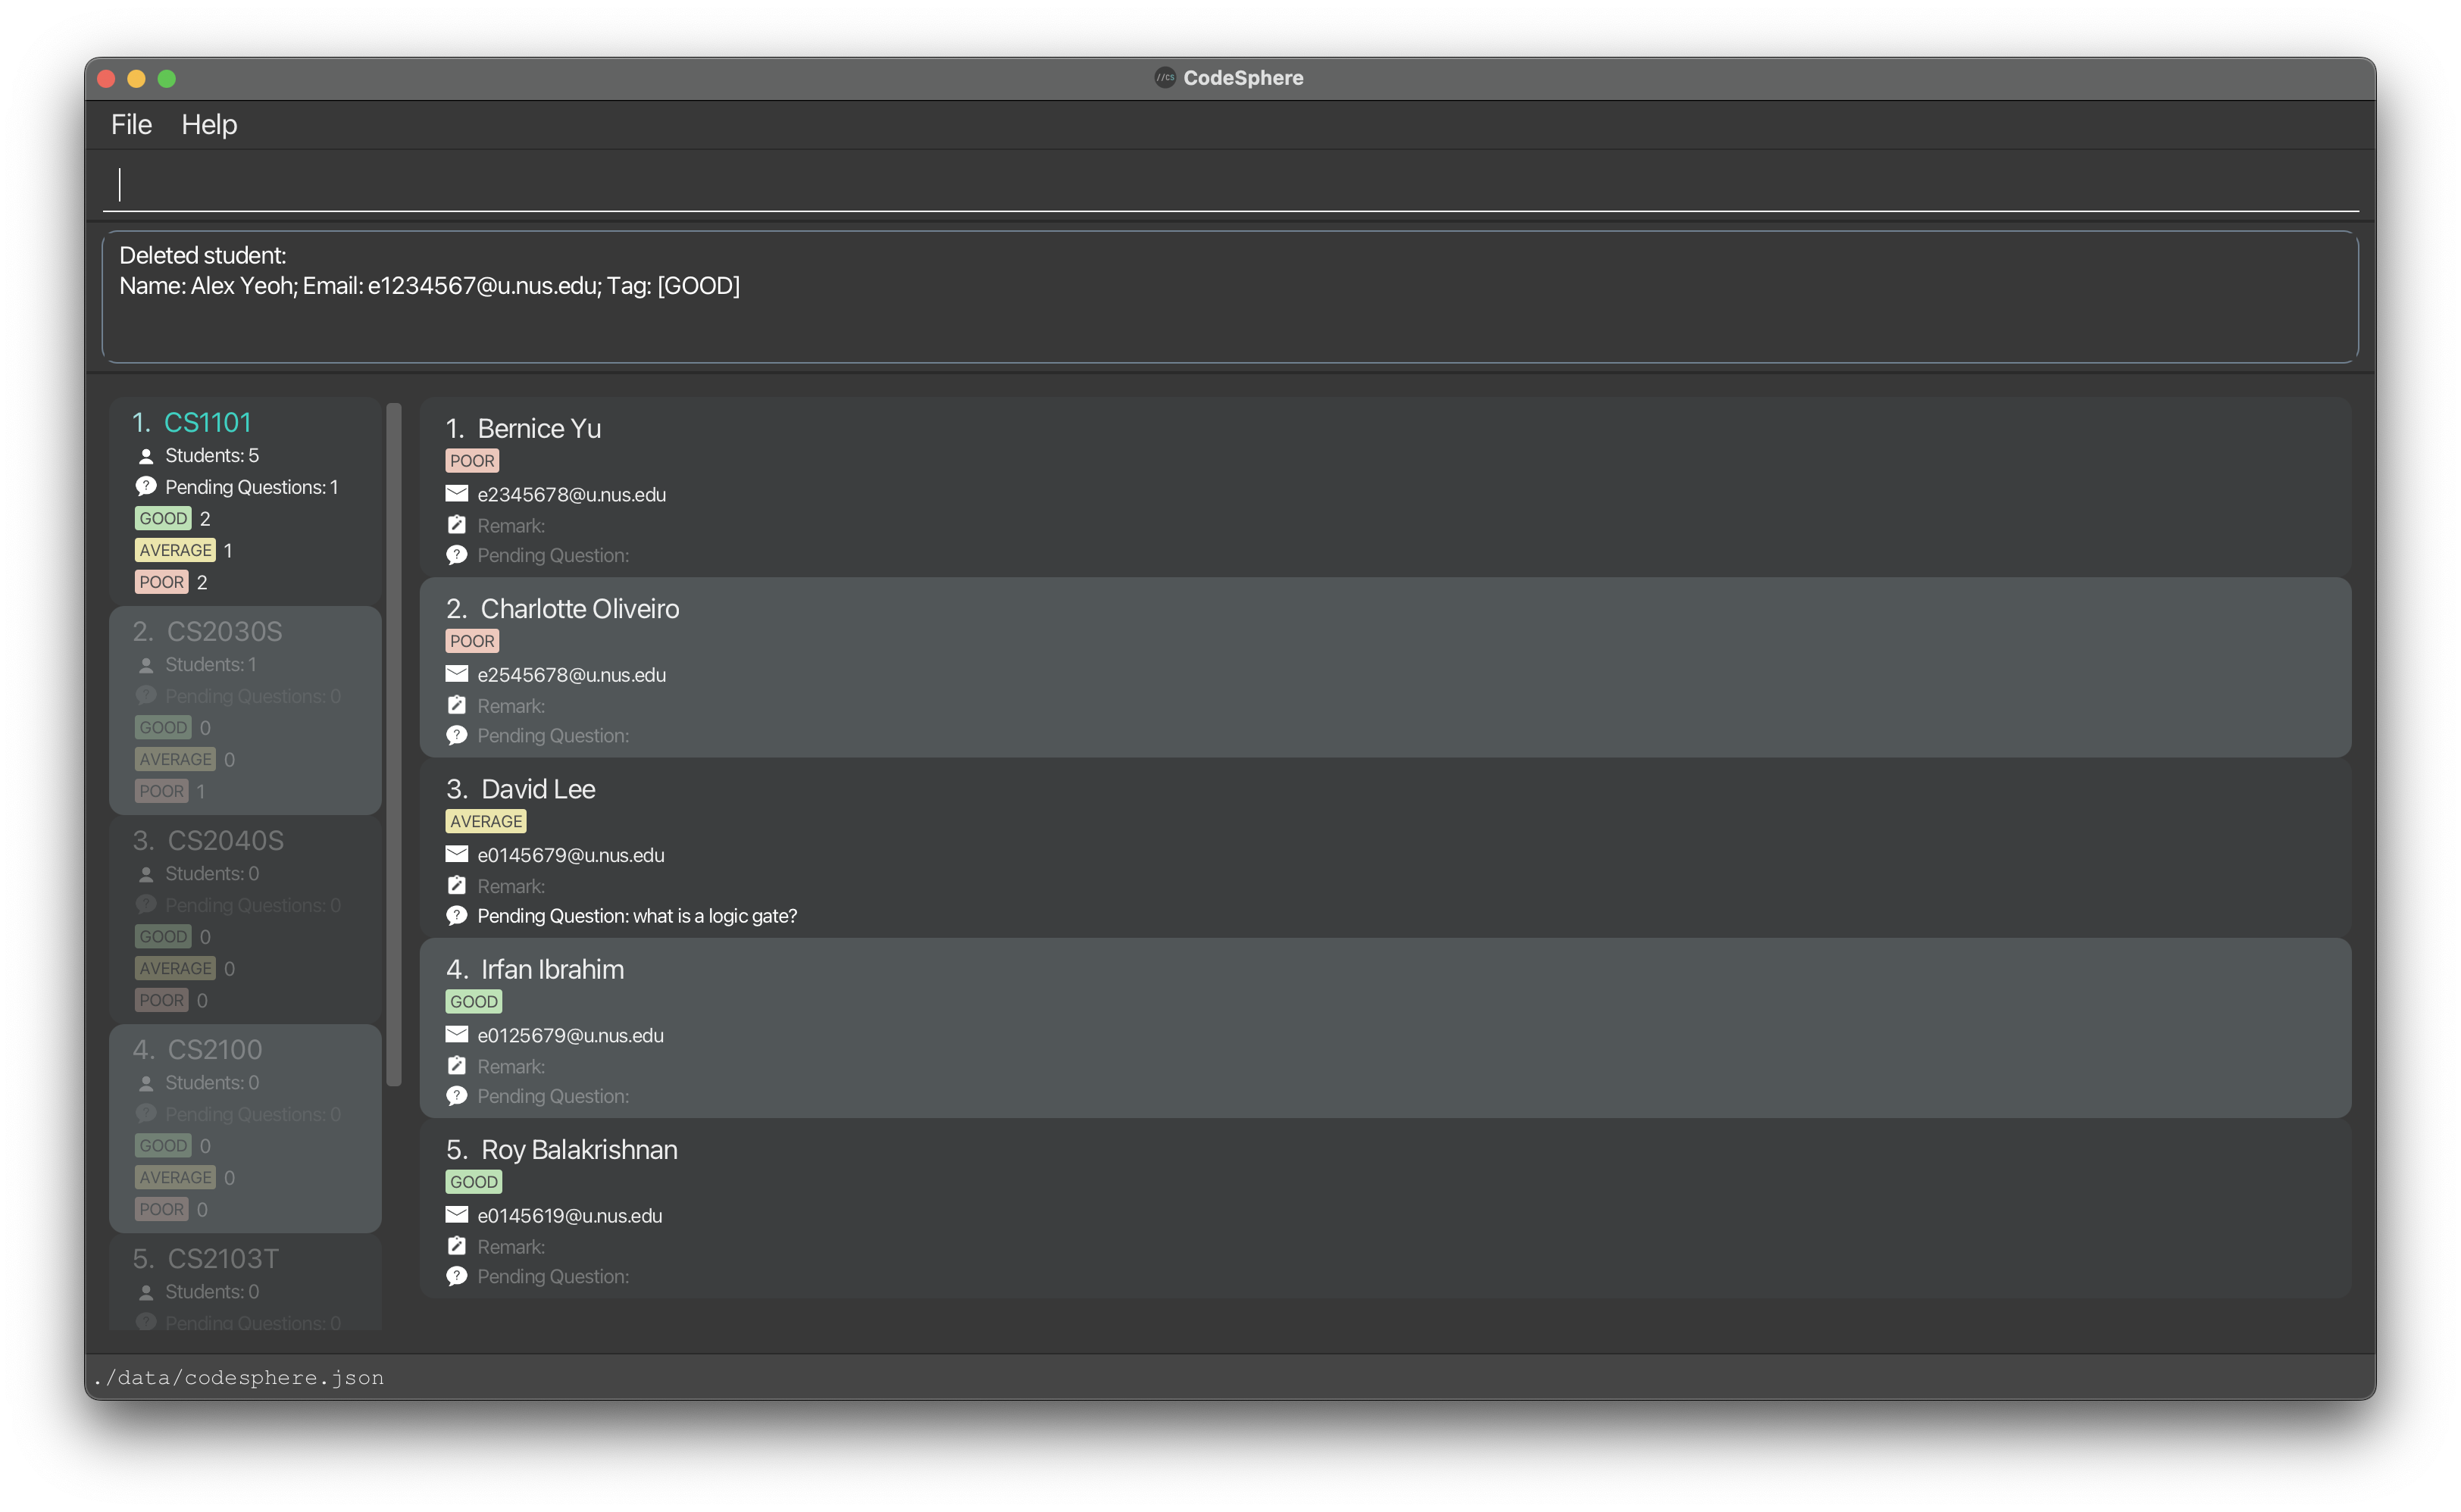
Clearing all students : clear
Clears all students in the displayed list of students in the selected course.
Format: clear
-
clearreturns the following result: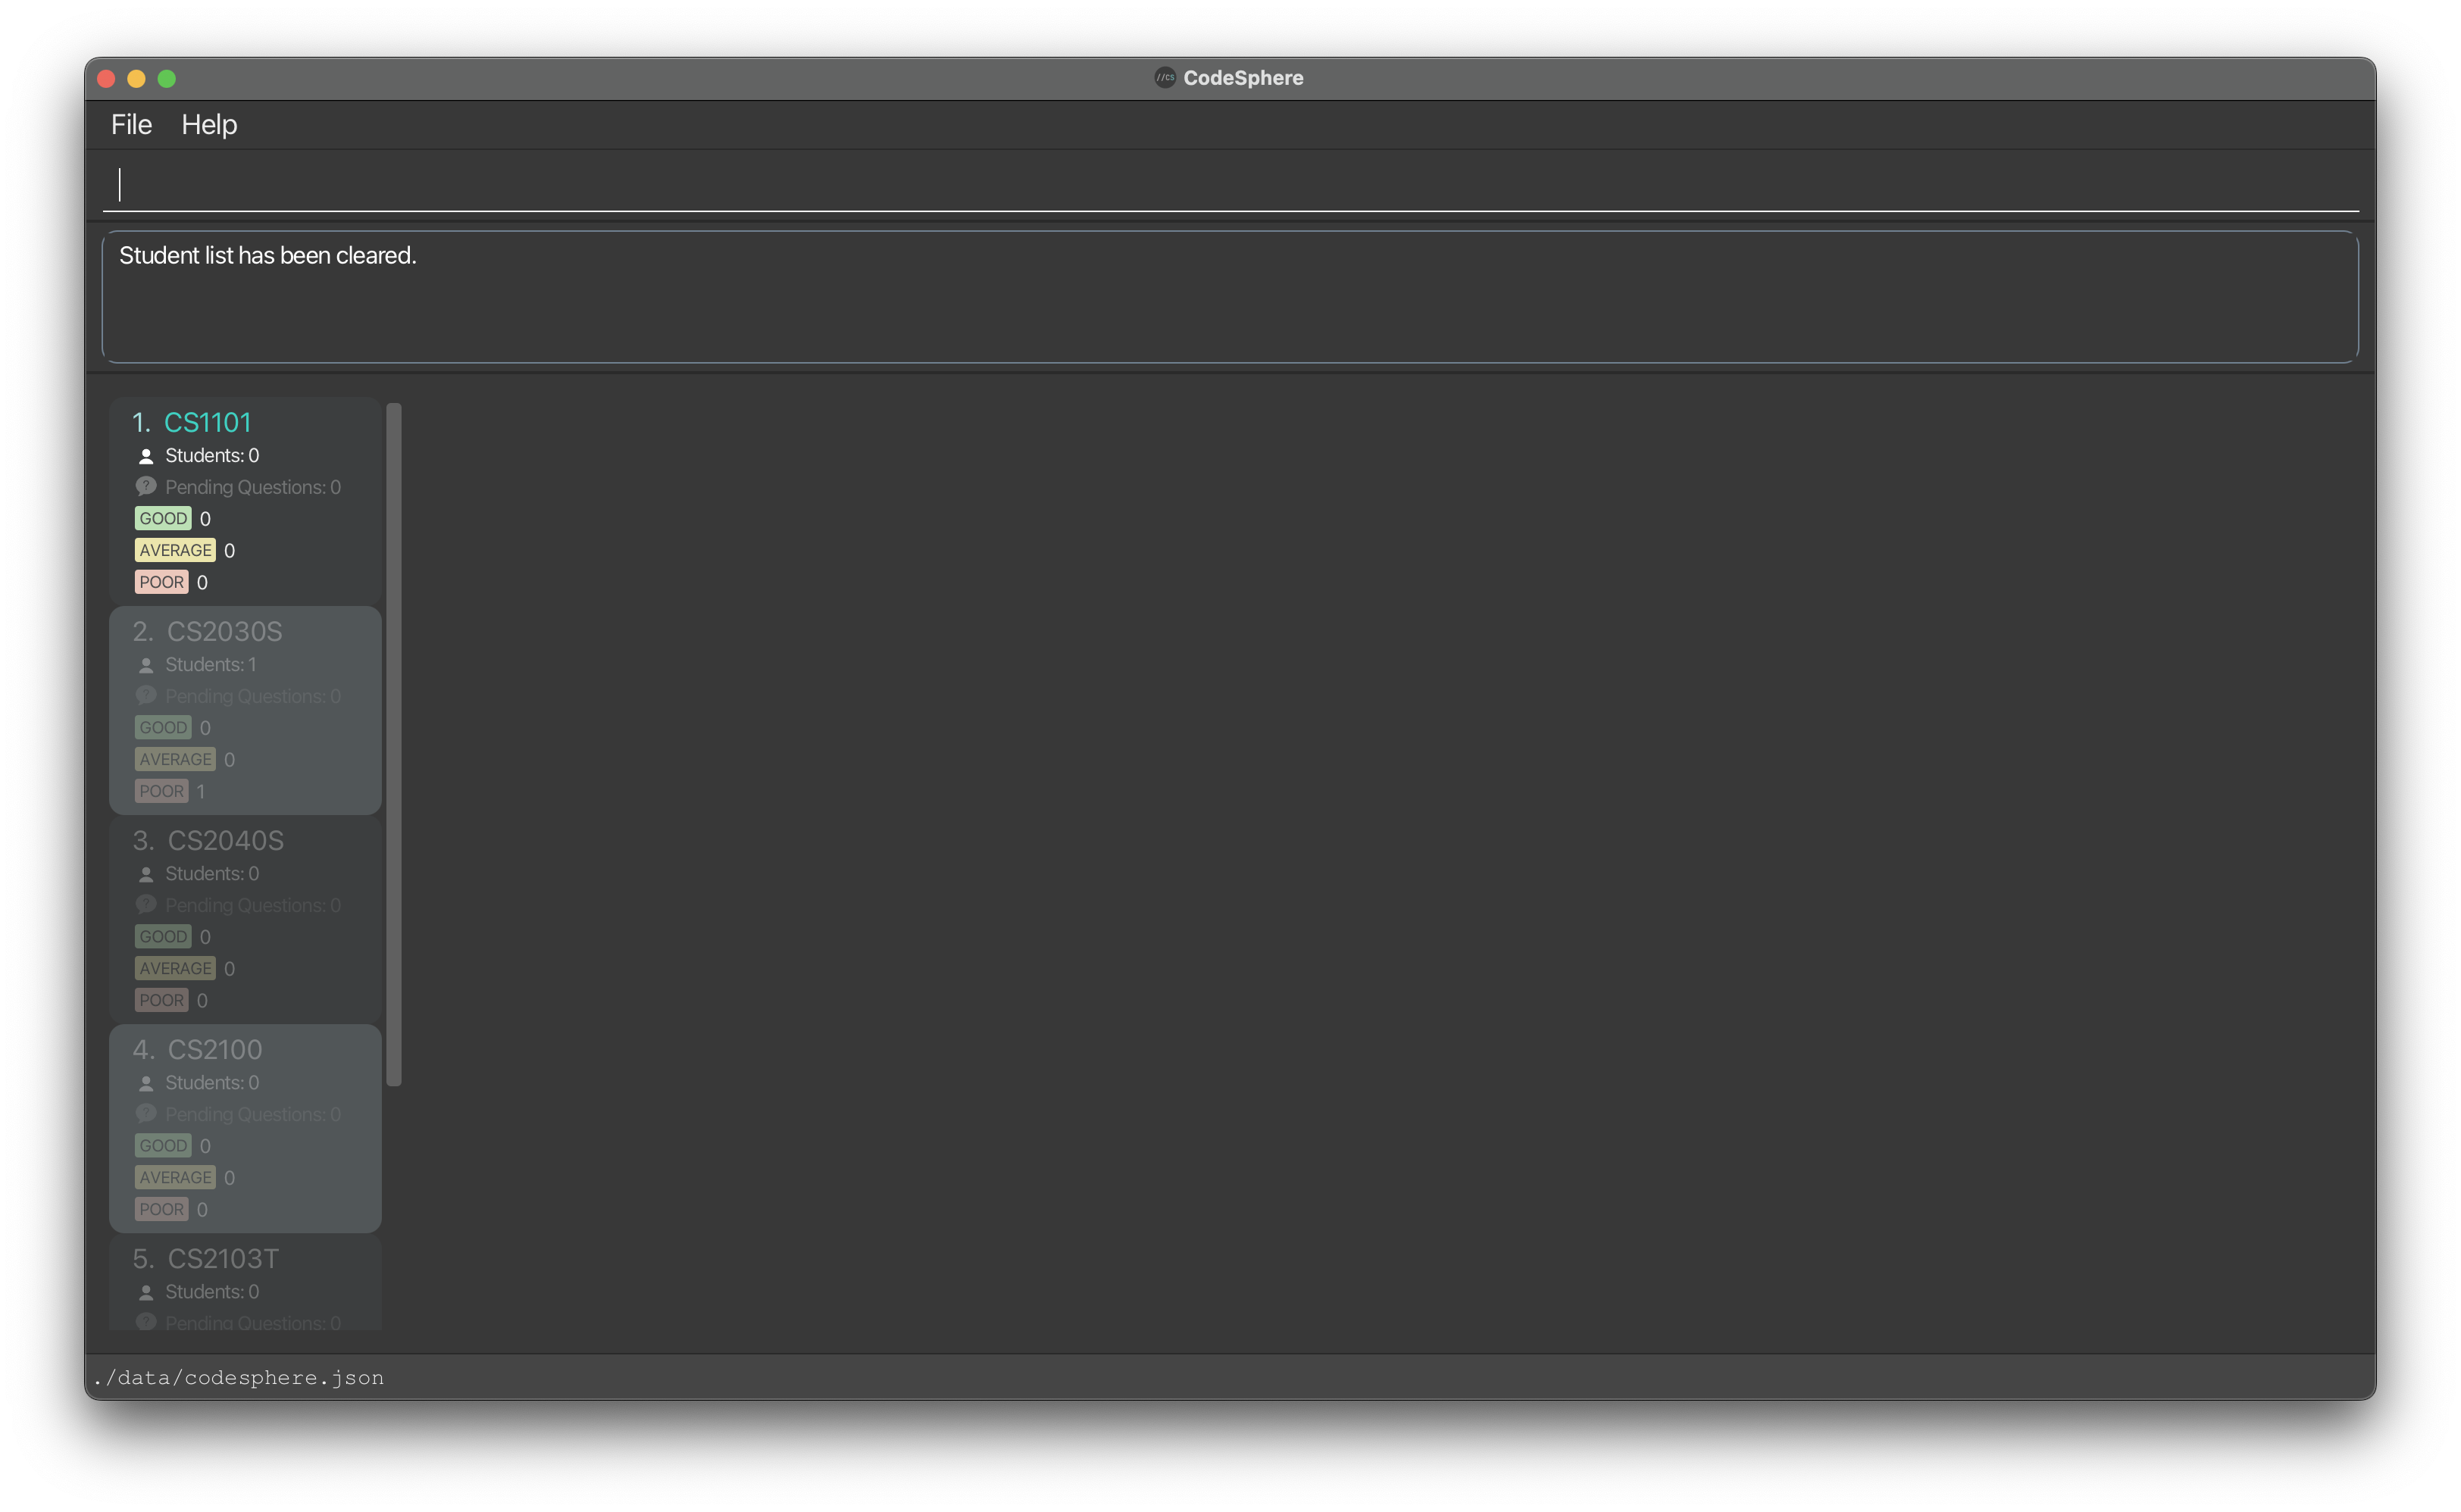
clear student command because this action cannot be undone.
Resetting the student list : reset
Resets a filtered or sorted student list to its original order, where students are arranged chronologically based on their order of addition, with the first student added at the top of the displayed list.
Format:reset
-
resetreturns the following result: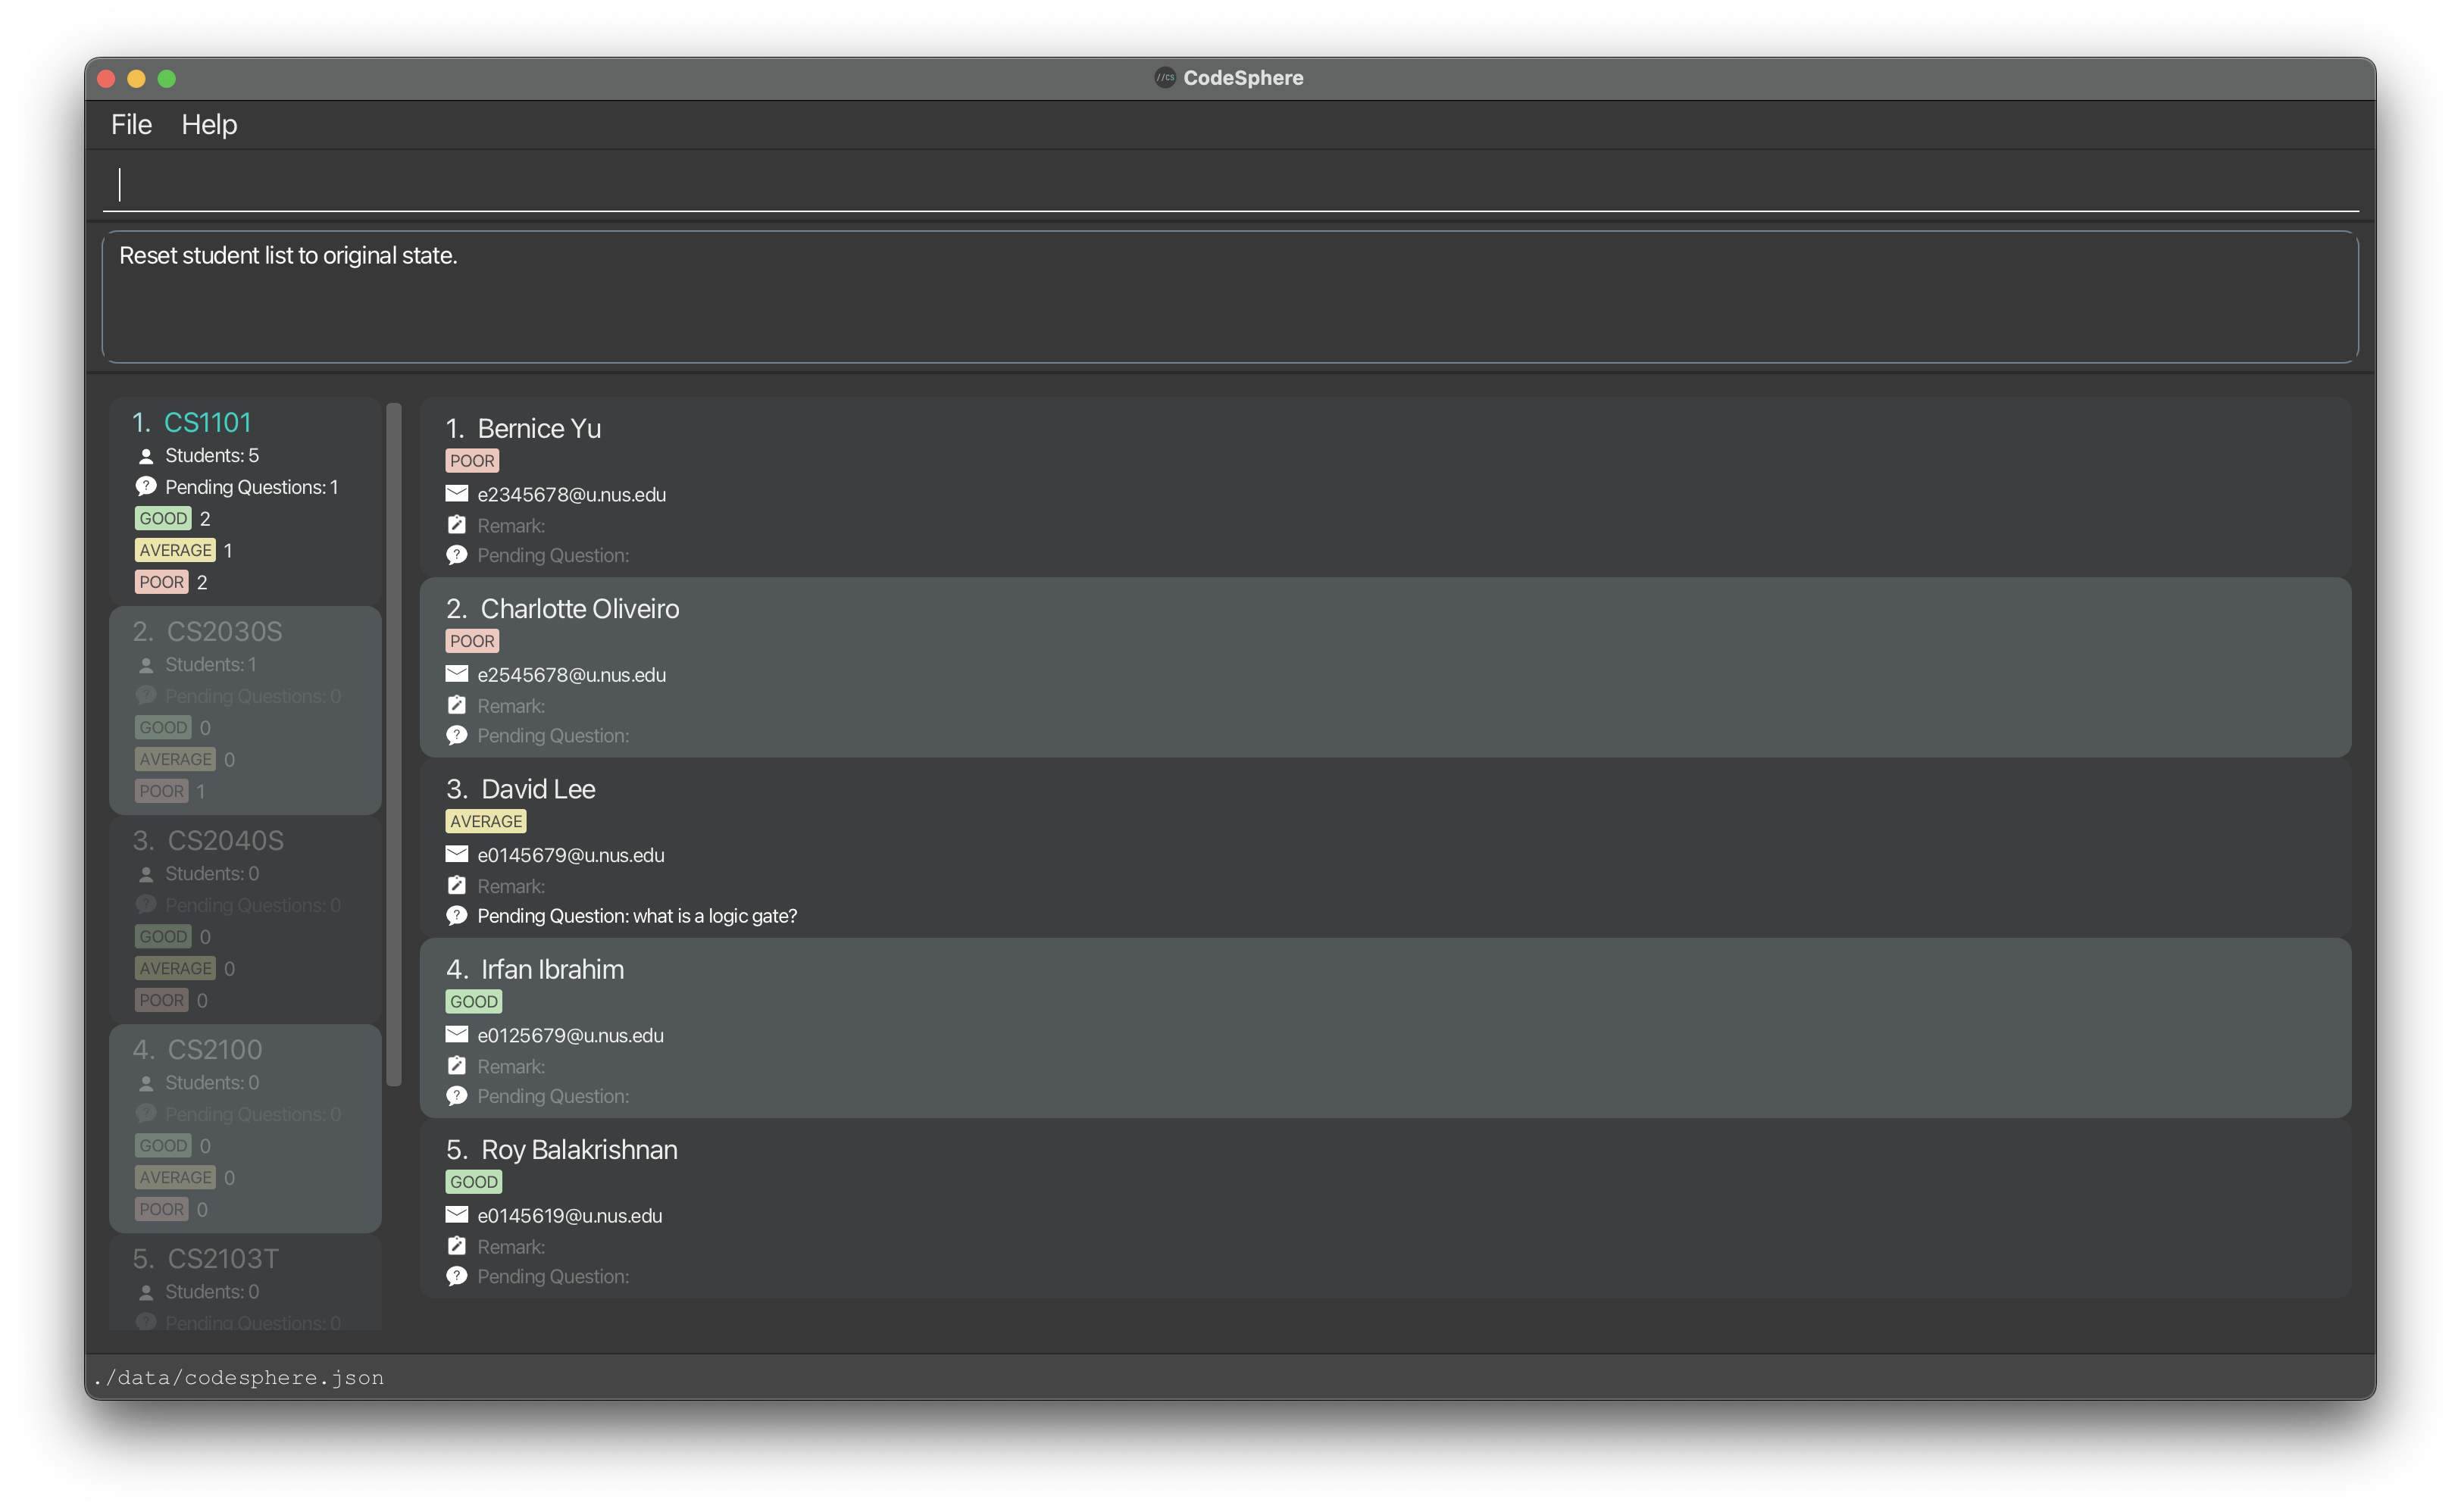
Sorting all students : sort
Sorts the list of students you are overseeing in the selected course by name or by tag.
Format: sort s/SORT_CRITERIA
-
SORT_CRITERIA: Represents the criteria that the user wishes to sort the student list by. ValidSORT_CRITERIAincludeNAMEandTAG. Note that the input forSORT_CRITERIAis case-insensitive. - The student list for the selected course will be sorted according to the specified
SORT_CRITERIA. -
SORT_CRITERIAofNAMEsorts the students list by name and displays students whose names start with ‘A’ at the top of the list. -
SORT_CRITERIAofTAGsorts the students list by performance tags and displays students withGOODtags top of the list.
Examples:
-
sort s/tagsorts the student list by tag. -
sort s/NAMEsorts the student list by name. -
sort s/tagreturns the following result: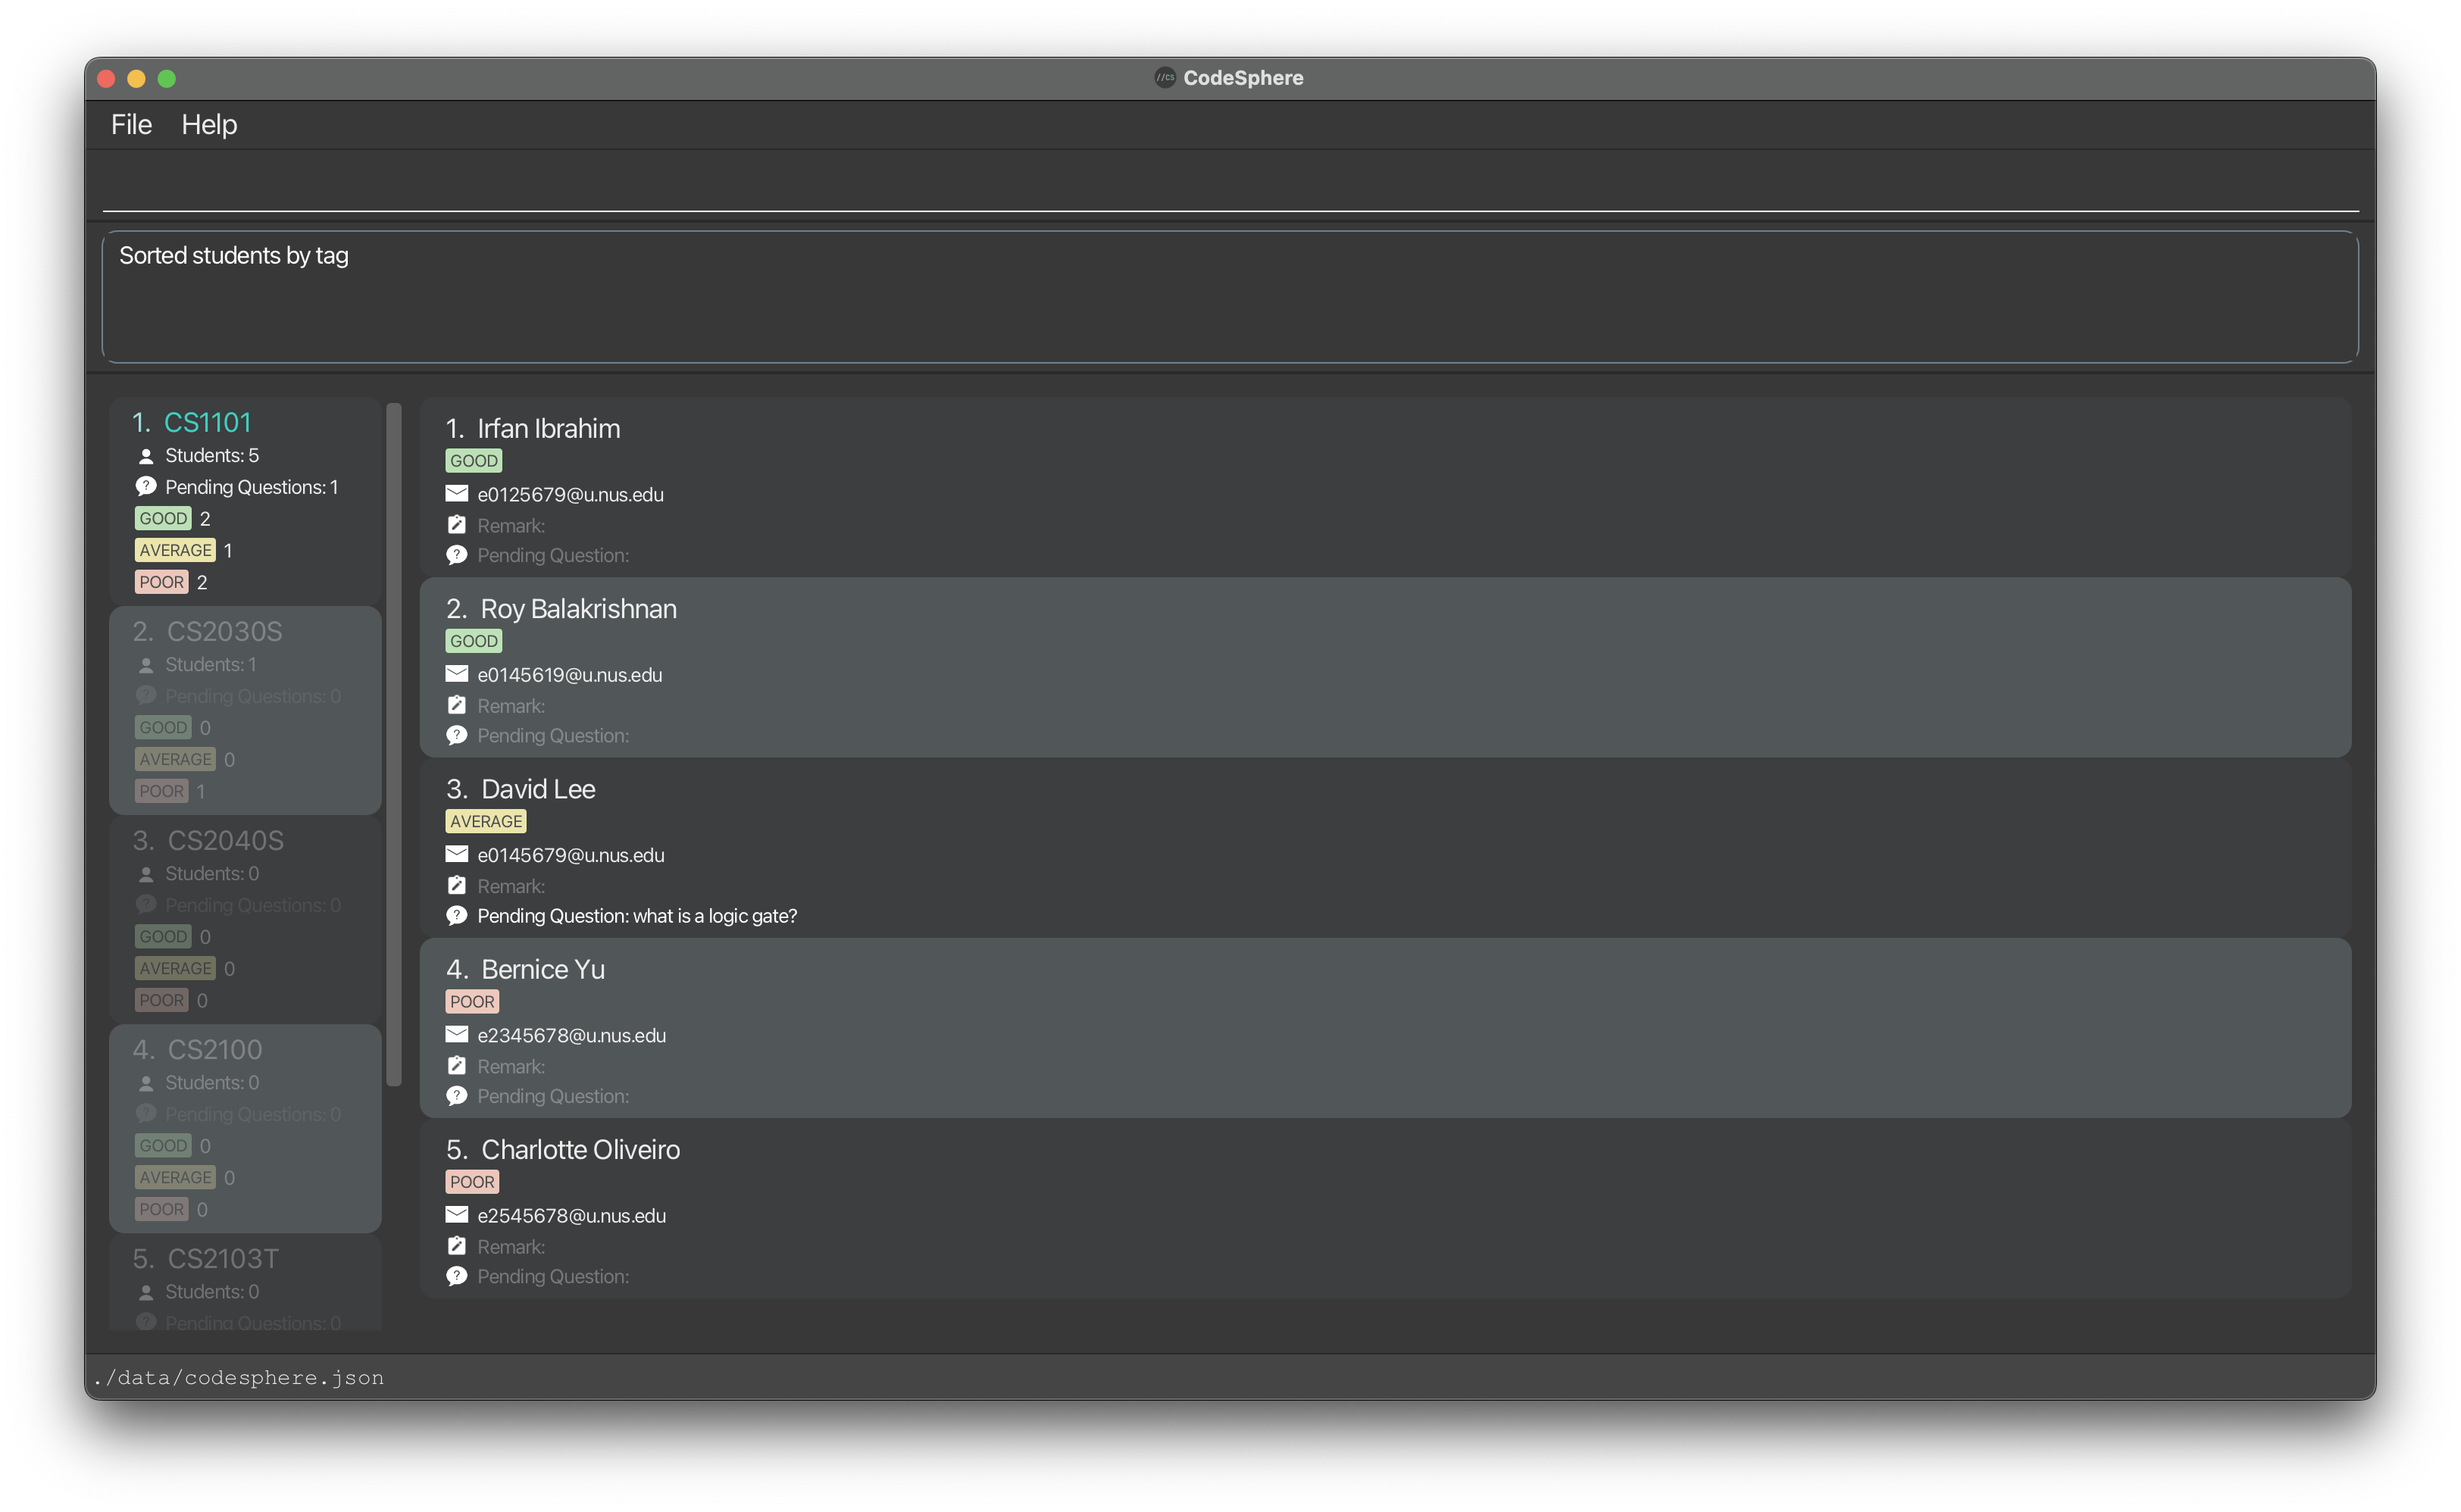
Finding a student : find
Finds students from the list of students in the selected course that match the given keyword(s) for a specified field.
Format: find [n/NAME] [e/EMAIL] [t/TAG] [pq/QUESTION] [r/REMARK]
- The search is case-insensitive. For example, hans will match Hans.
- Only one prefix can be specified each time you use the command.
- The search is dependent on the prefix.
- The order of the keywords does not matter. For example,
Hans Bowill matchBo Hans. - Substring search is supported. For example,
find n/Hanwill return students whose name isHans.
Examples:
-
find n/JohnreturnsjohnandJohn Doe. -
find t/goodFind the student(s) tagged asGOOD, and the details of the student(s) will be displayed. -
find pq/logicreturns the following result: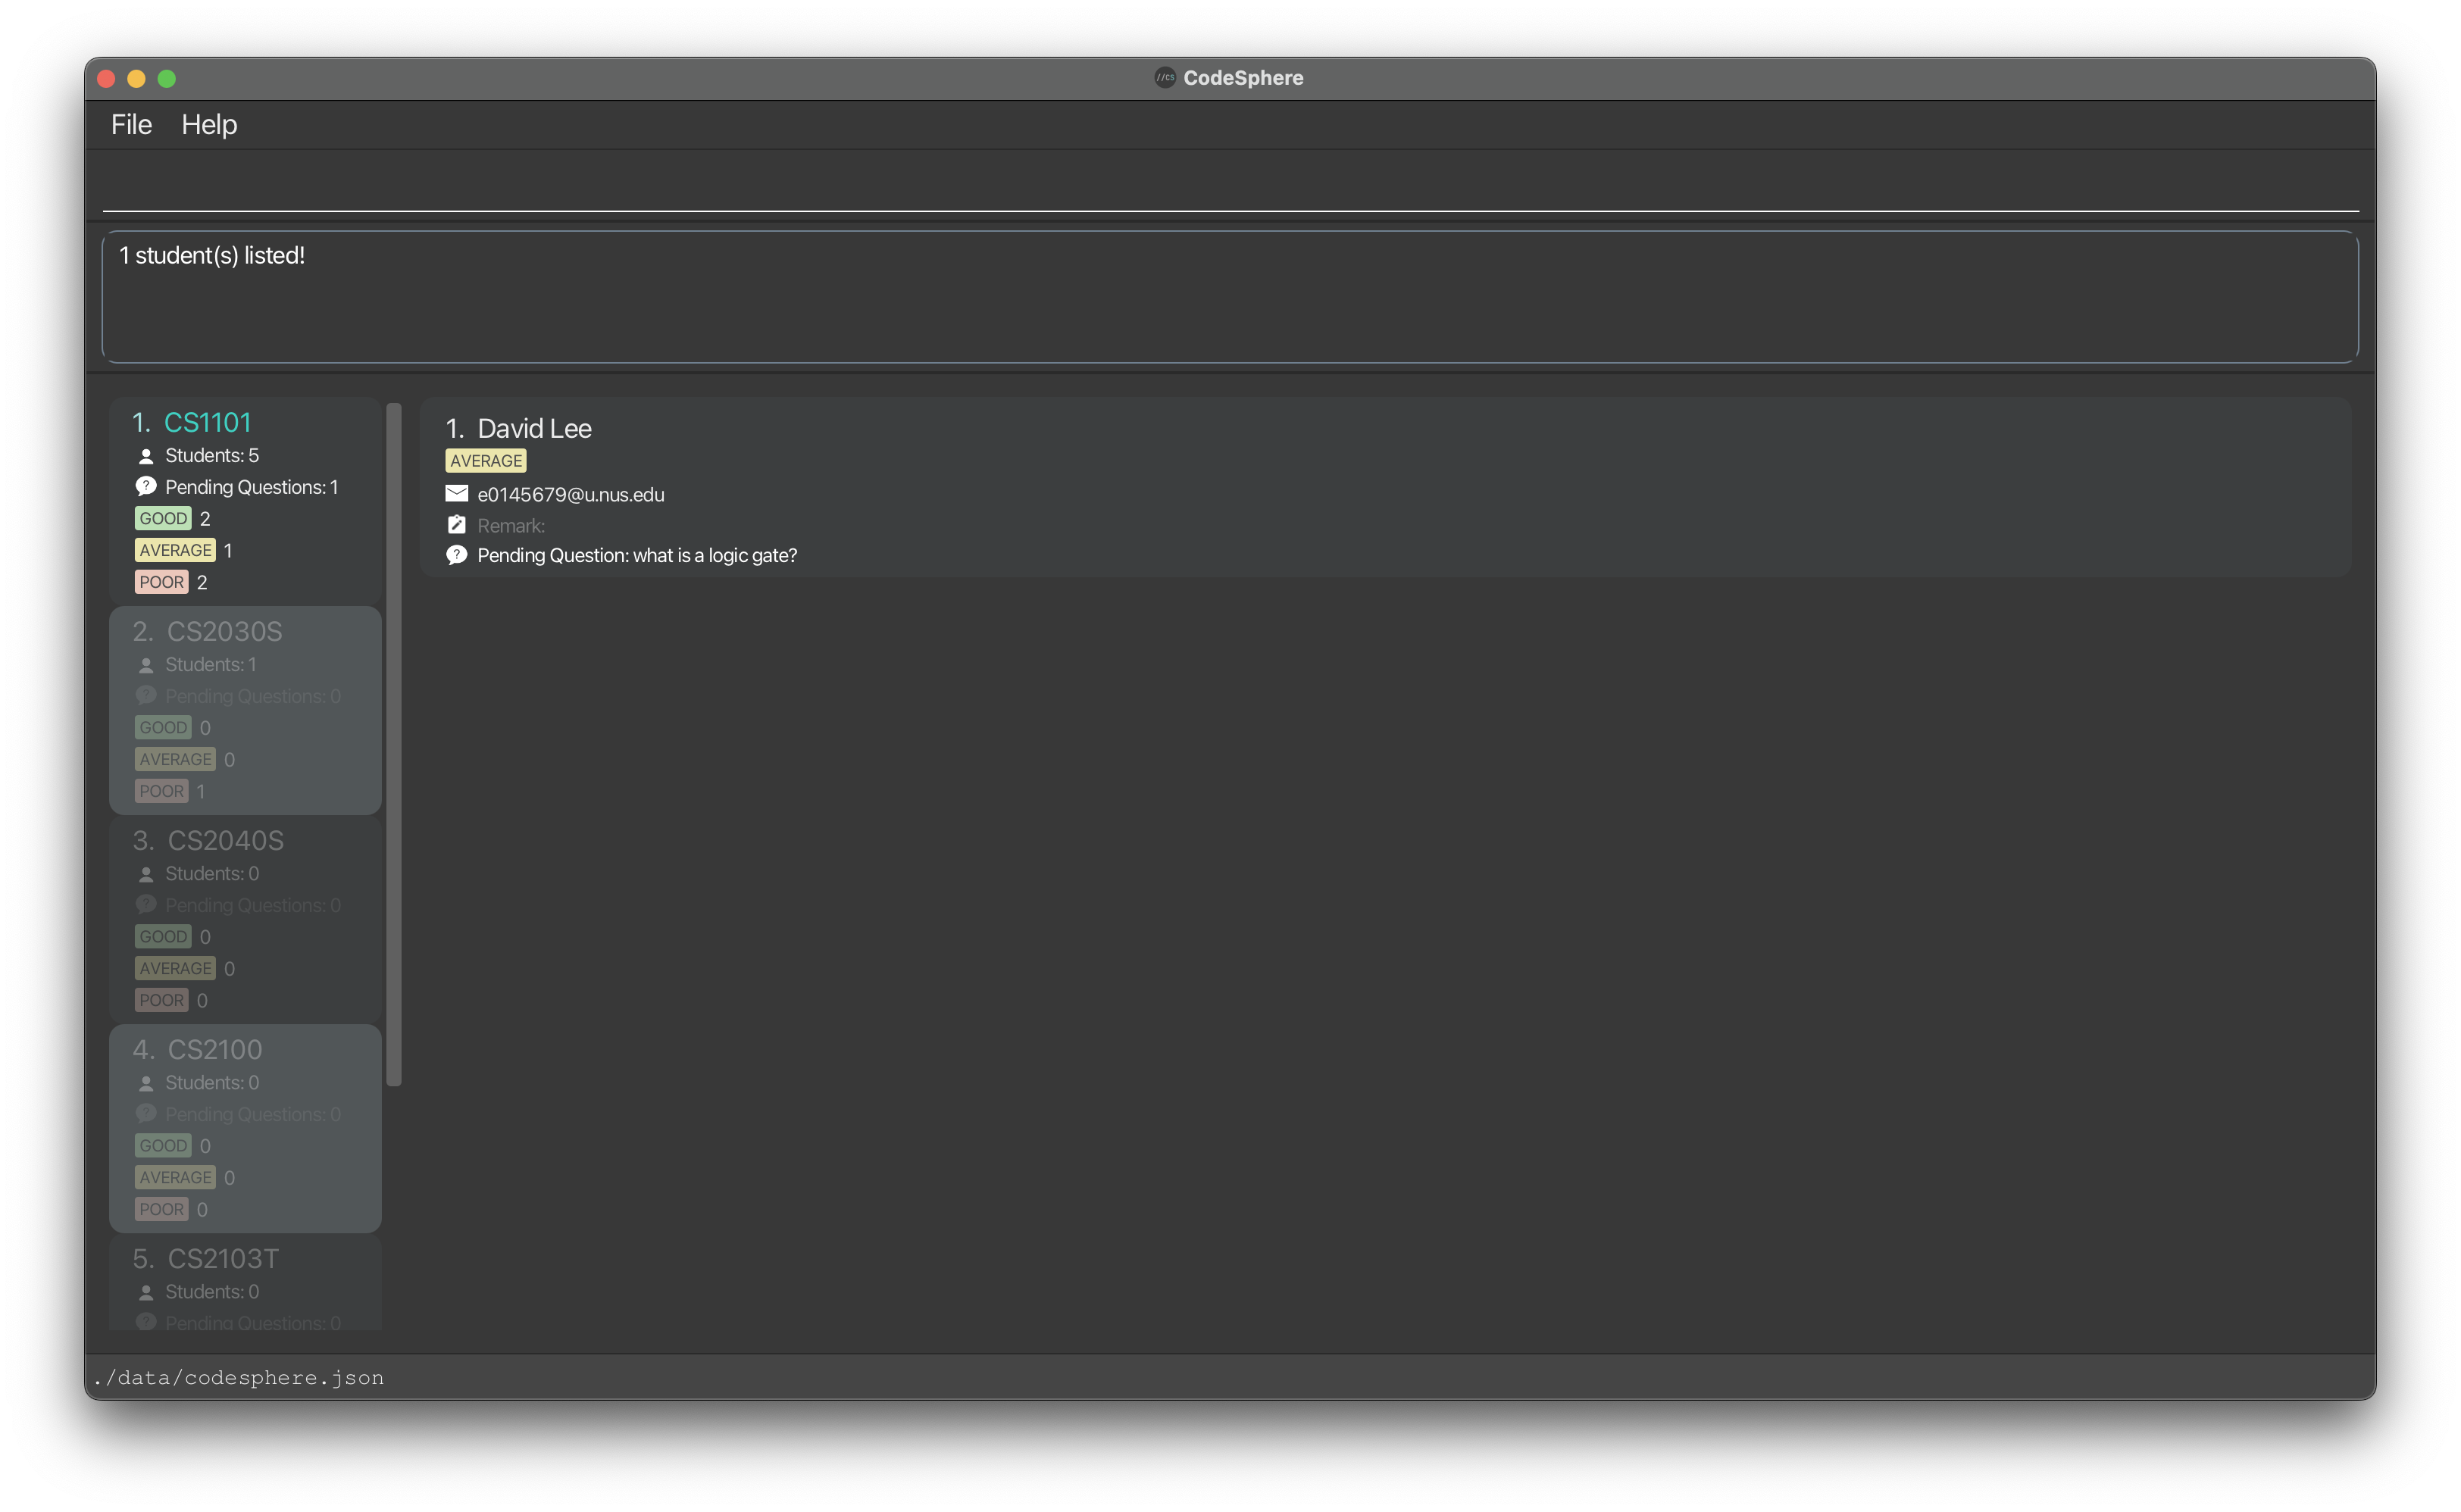
List all pending questions : list
Lists all students in the selected course with non-empty pending question fields.
Format: list pq/
-
listcommand only can only be used for listing of pending questions. - Nothing should be specified after
pq/. -
list pq/returns the following result: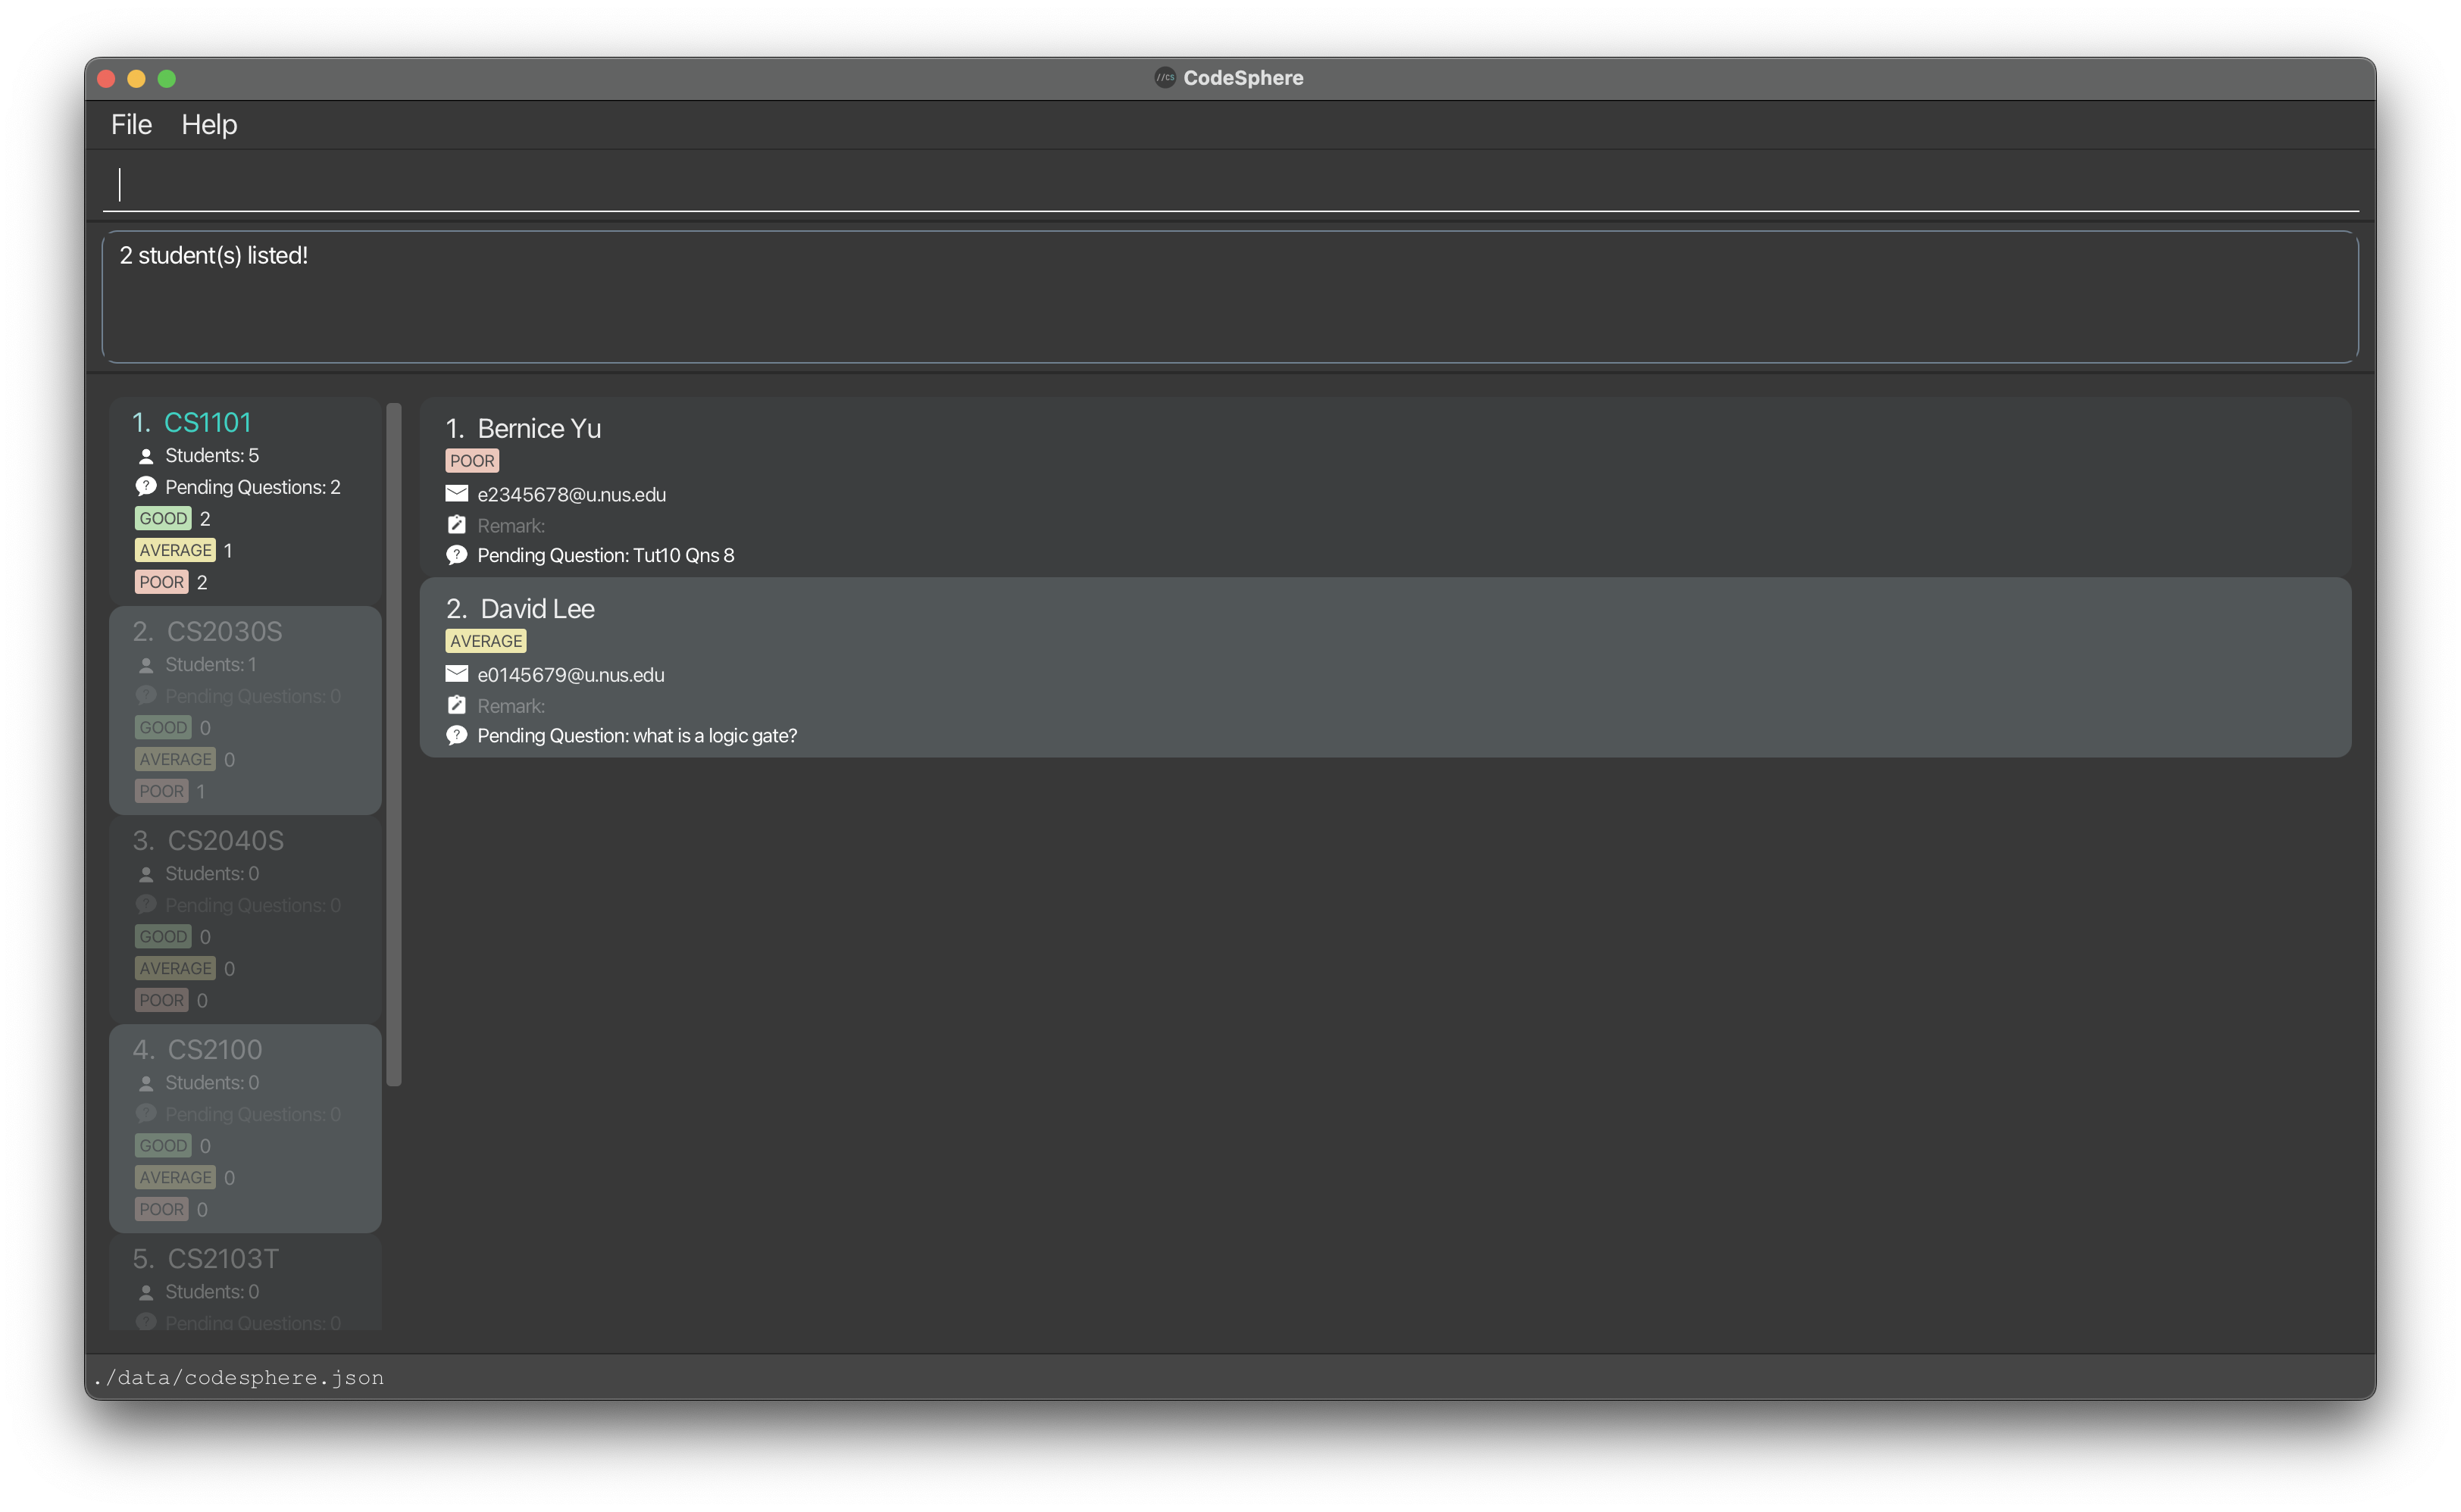
Adding a remark for a student : remark
Adds a remark to the specified student from the list of students in the selected course.
Format: remark INDEX r/REMARK
-
INDEX: Refers to the index number shown in the displayed student list. It must be a positive integer (1, 2, 3, …), and it should fall within the range of students currently displayed such that it corresponds to a valid student. - The inputs for
REMARKwill be added to theREMARKfield for the student at the specifiedINDEX. - Note that the inputs for
REMARKcannot be empty. - Note that the adding of a
REMARKis not cumulative. If the currentREMARKfield is not empty, using theremarkcommand again will overwrite what is in the currentREMARKfield.
Example:
-
remark 2 r/needs more helpadds a remark to the student at index 2 of the displayed students list saying needs more help. -
remark 1 r/late submissionreturns the following result: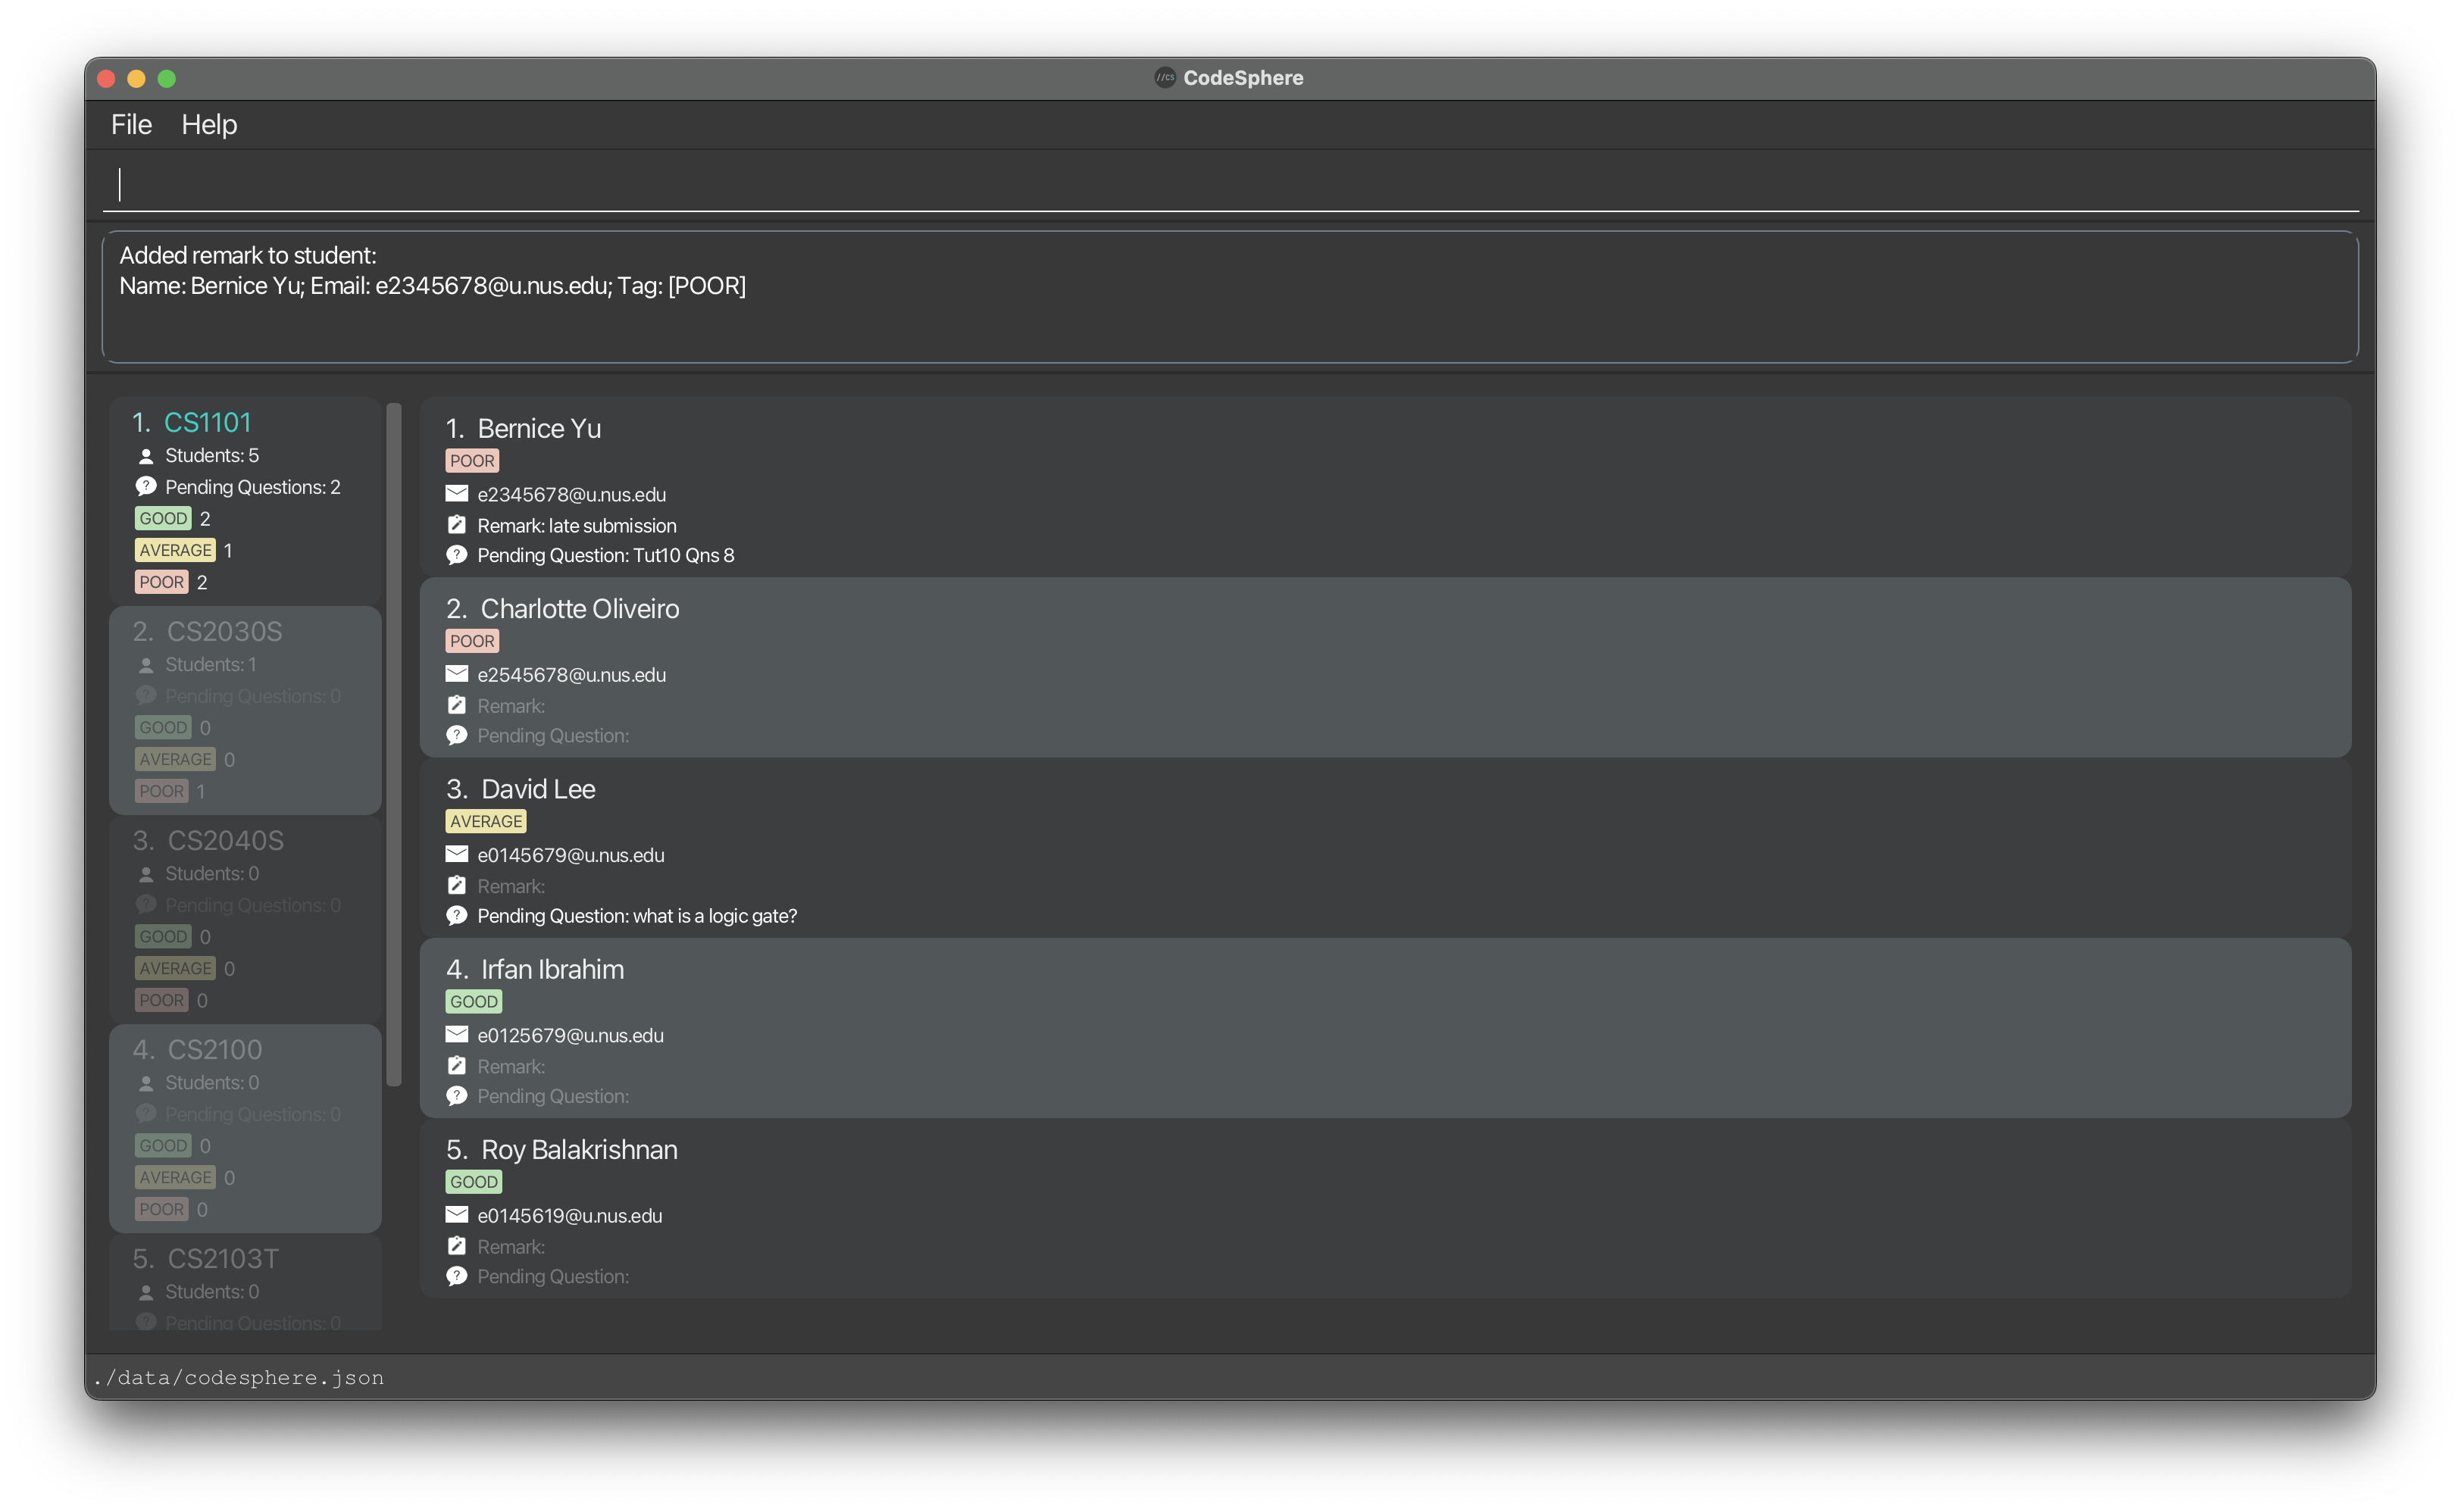
Adding a pending question for a student : pq
Adds a pending question to the specified student from the list of students in the selected course.
Format: pq INDEX pq/PENDING_QUESTION
-
INDEX: Refers to the index number shown in the displayed student list. It must be a positive integer (1, 2, 3, …), and it should fall within the range of students currently displayed such that it corresponds to a valid student. - The inputs for
PENDING_QUESTIONwill be added to thePENDING_QUESTIONfield for the student at the specifiedINDEX. - Note that the inputs for
PENDING_QUESTIONcannot be empty. - Note that the adding of a
PENDING_QUESTIONis not cumulative. If the currentPENDING_QUESTIONfield is not empty, using thepqcommand again will overwrite what is in the currentPENDING_QUESTIONfield.
Example:
-
pq 2 pq/What is a logic gate?adds a pending question to the student at index 2 of the displayed student, with the question “What is a logic gate?”. This indicates a need to follow-up with the student. -
pq 1 pq/Tut 10 Qns 8returns the following result: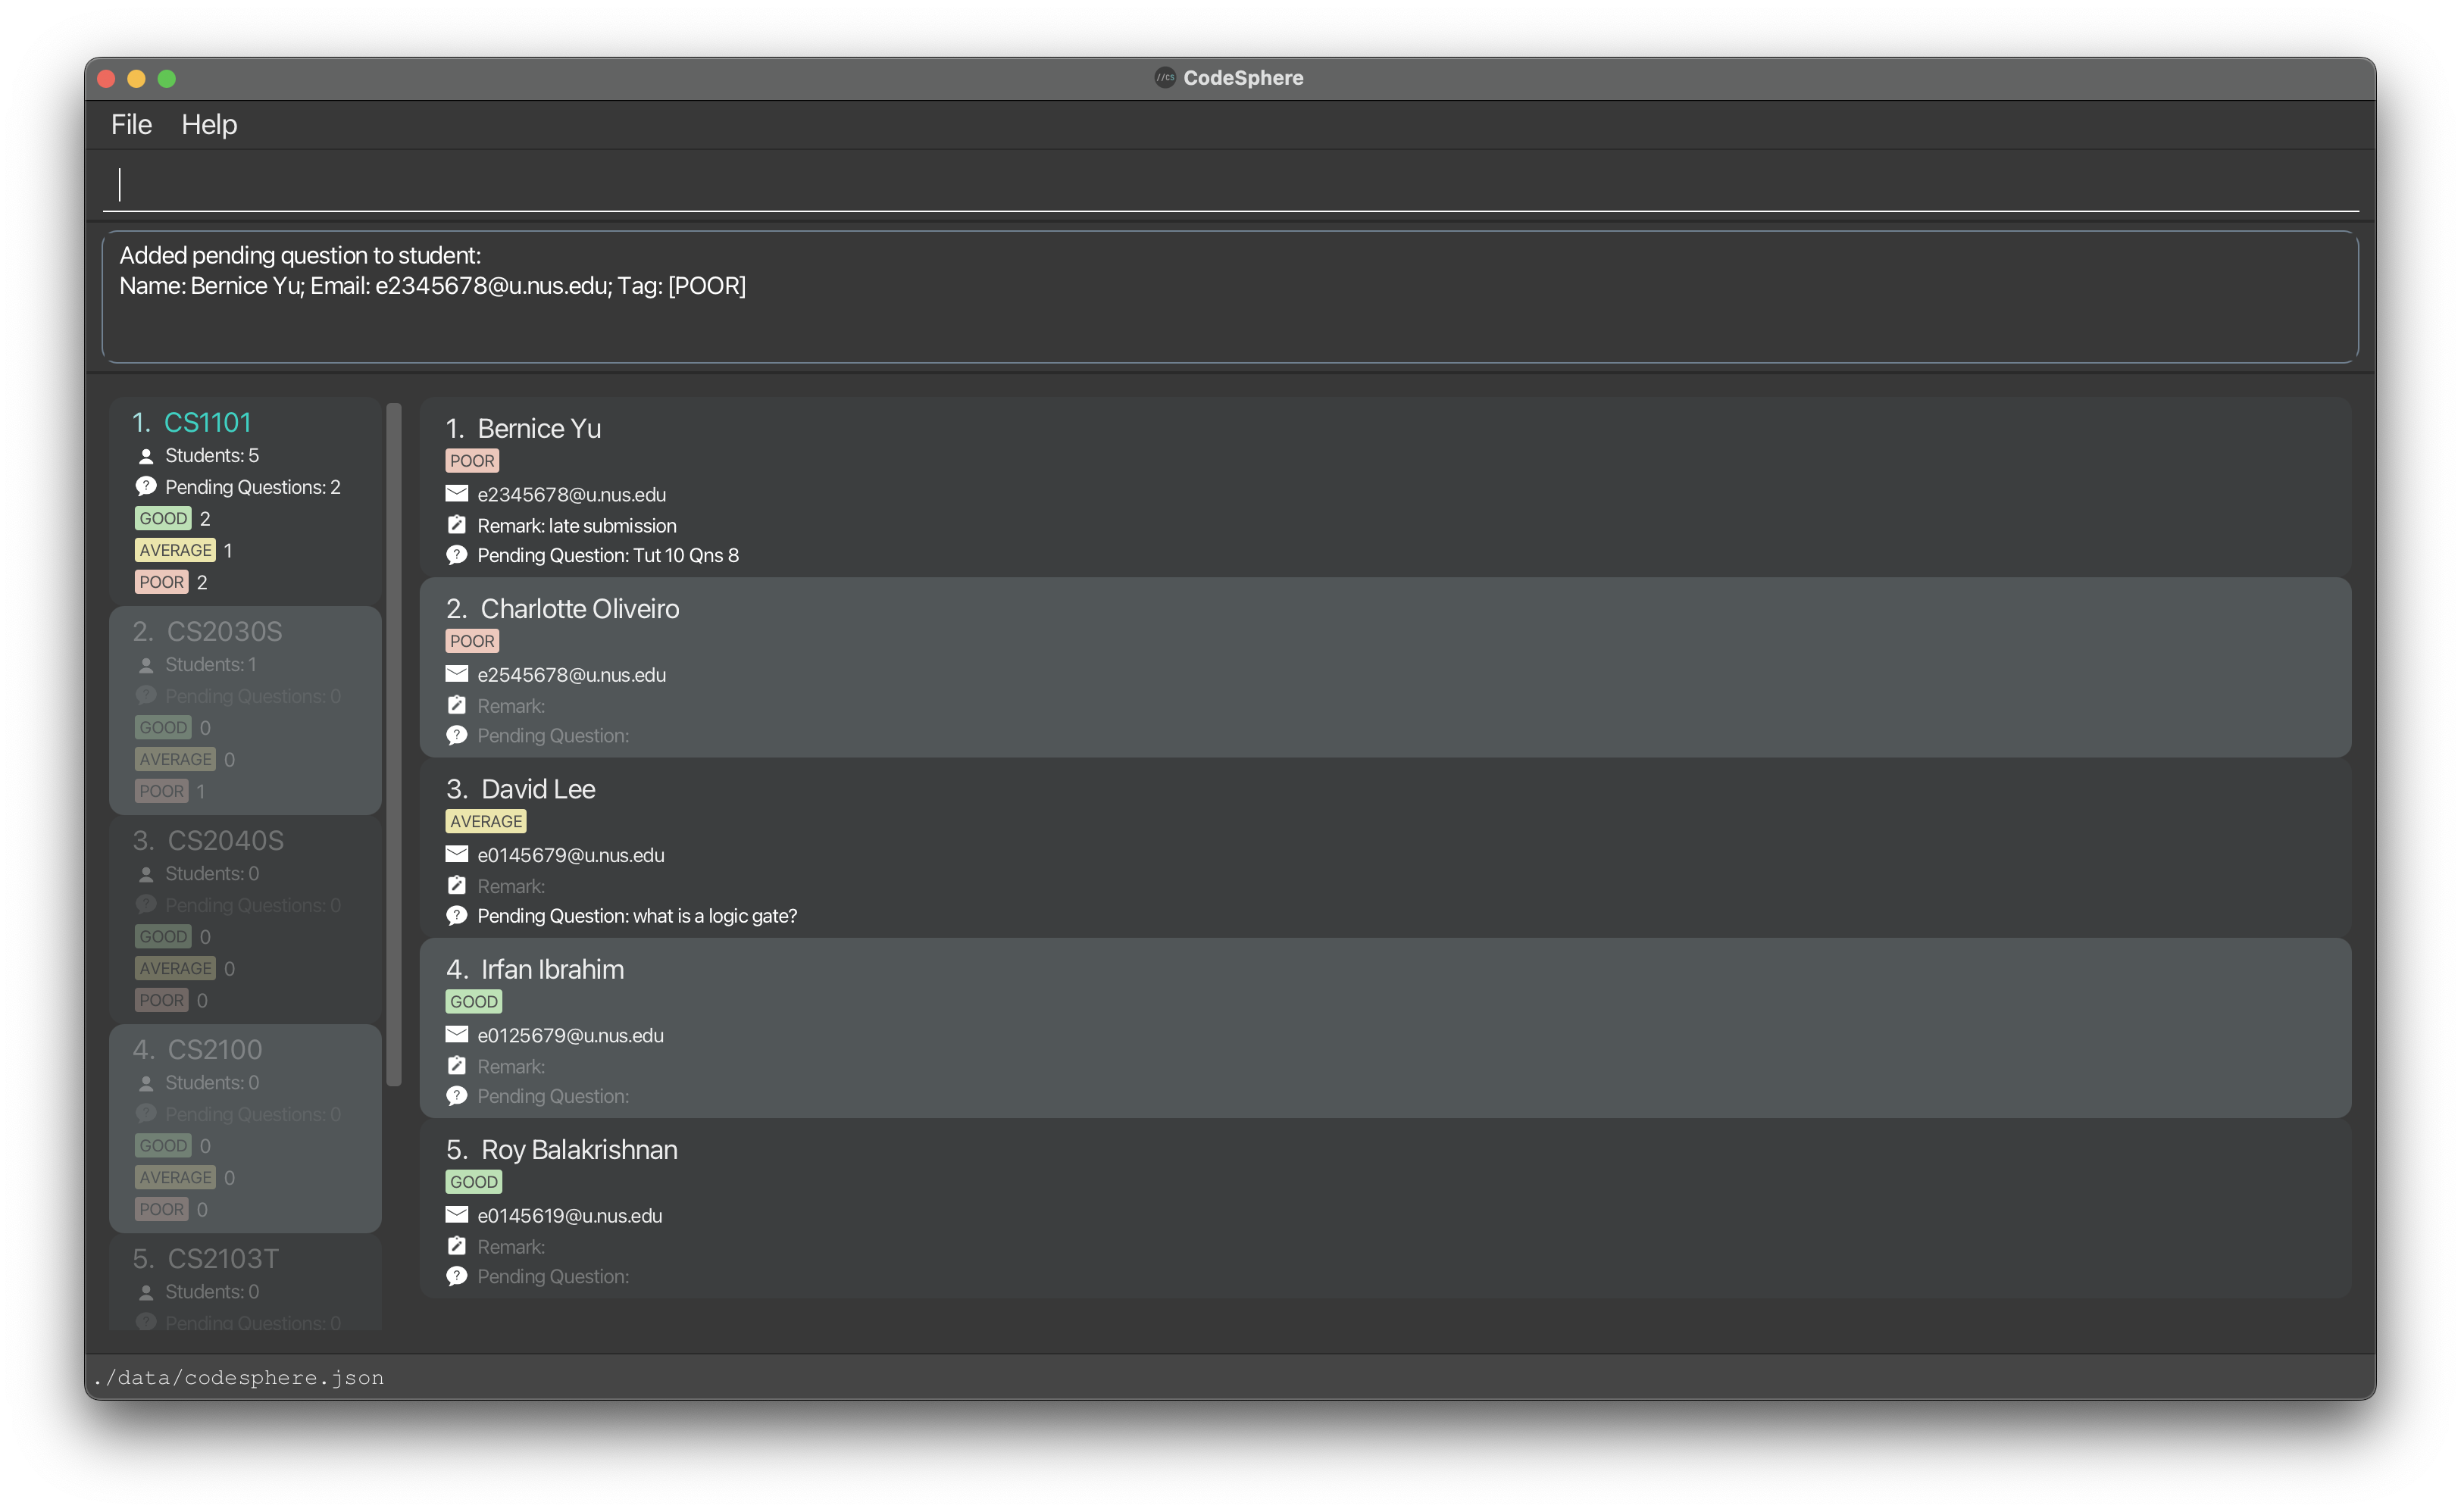
Removing a remark/pending question of a student : remove
Removes a remark or pending question from the specified student in the selected course.
Format: remove INDEX [r/] [pq/]
-
INDEX: Refers to the index number shown in the displayed student list. It must be a positive integer (1, 2, 3, …), and it should fall within the range of students currently displayed such that it corresponds to a valid student. - The fields after
INDEXare optional, as indicated by square brackets [ ]. But at least one of the optional fields must be provided. -
removeclears the field(s) specified for the student at the specifiedINDEX. - Note that nothing should be specified after
r/orpq/.
Examples:
-
remove 2 pq/Removes a pending question of the student at index 2 of the displayed students list. -
remove 2 r/Removes a remark of the student at index 2 of the displayed students list. -
remove 1 pq/ r/returns the following result: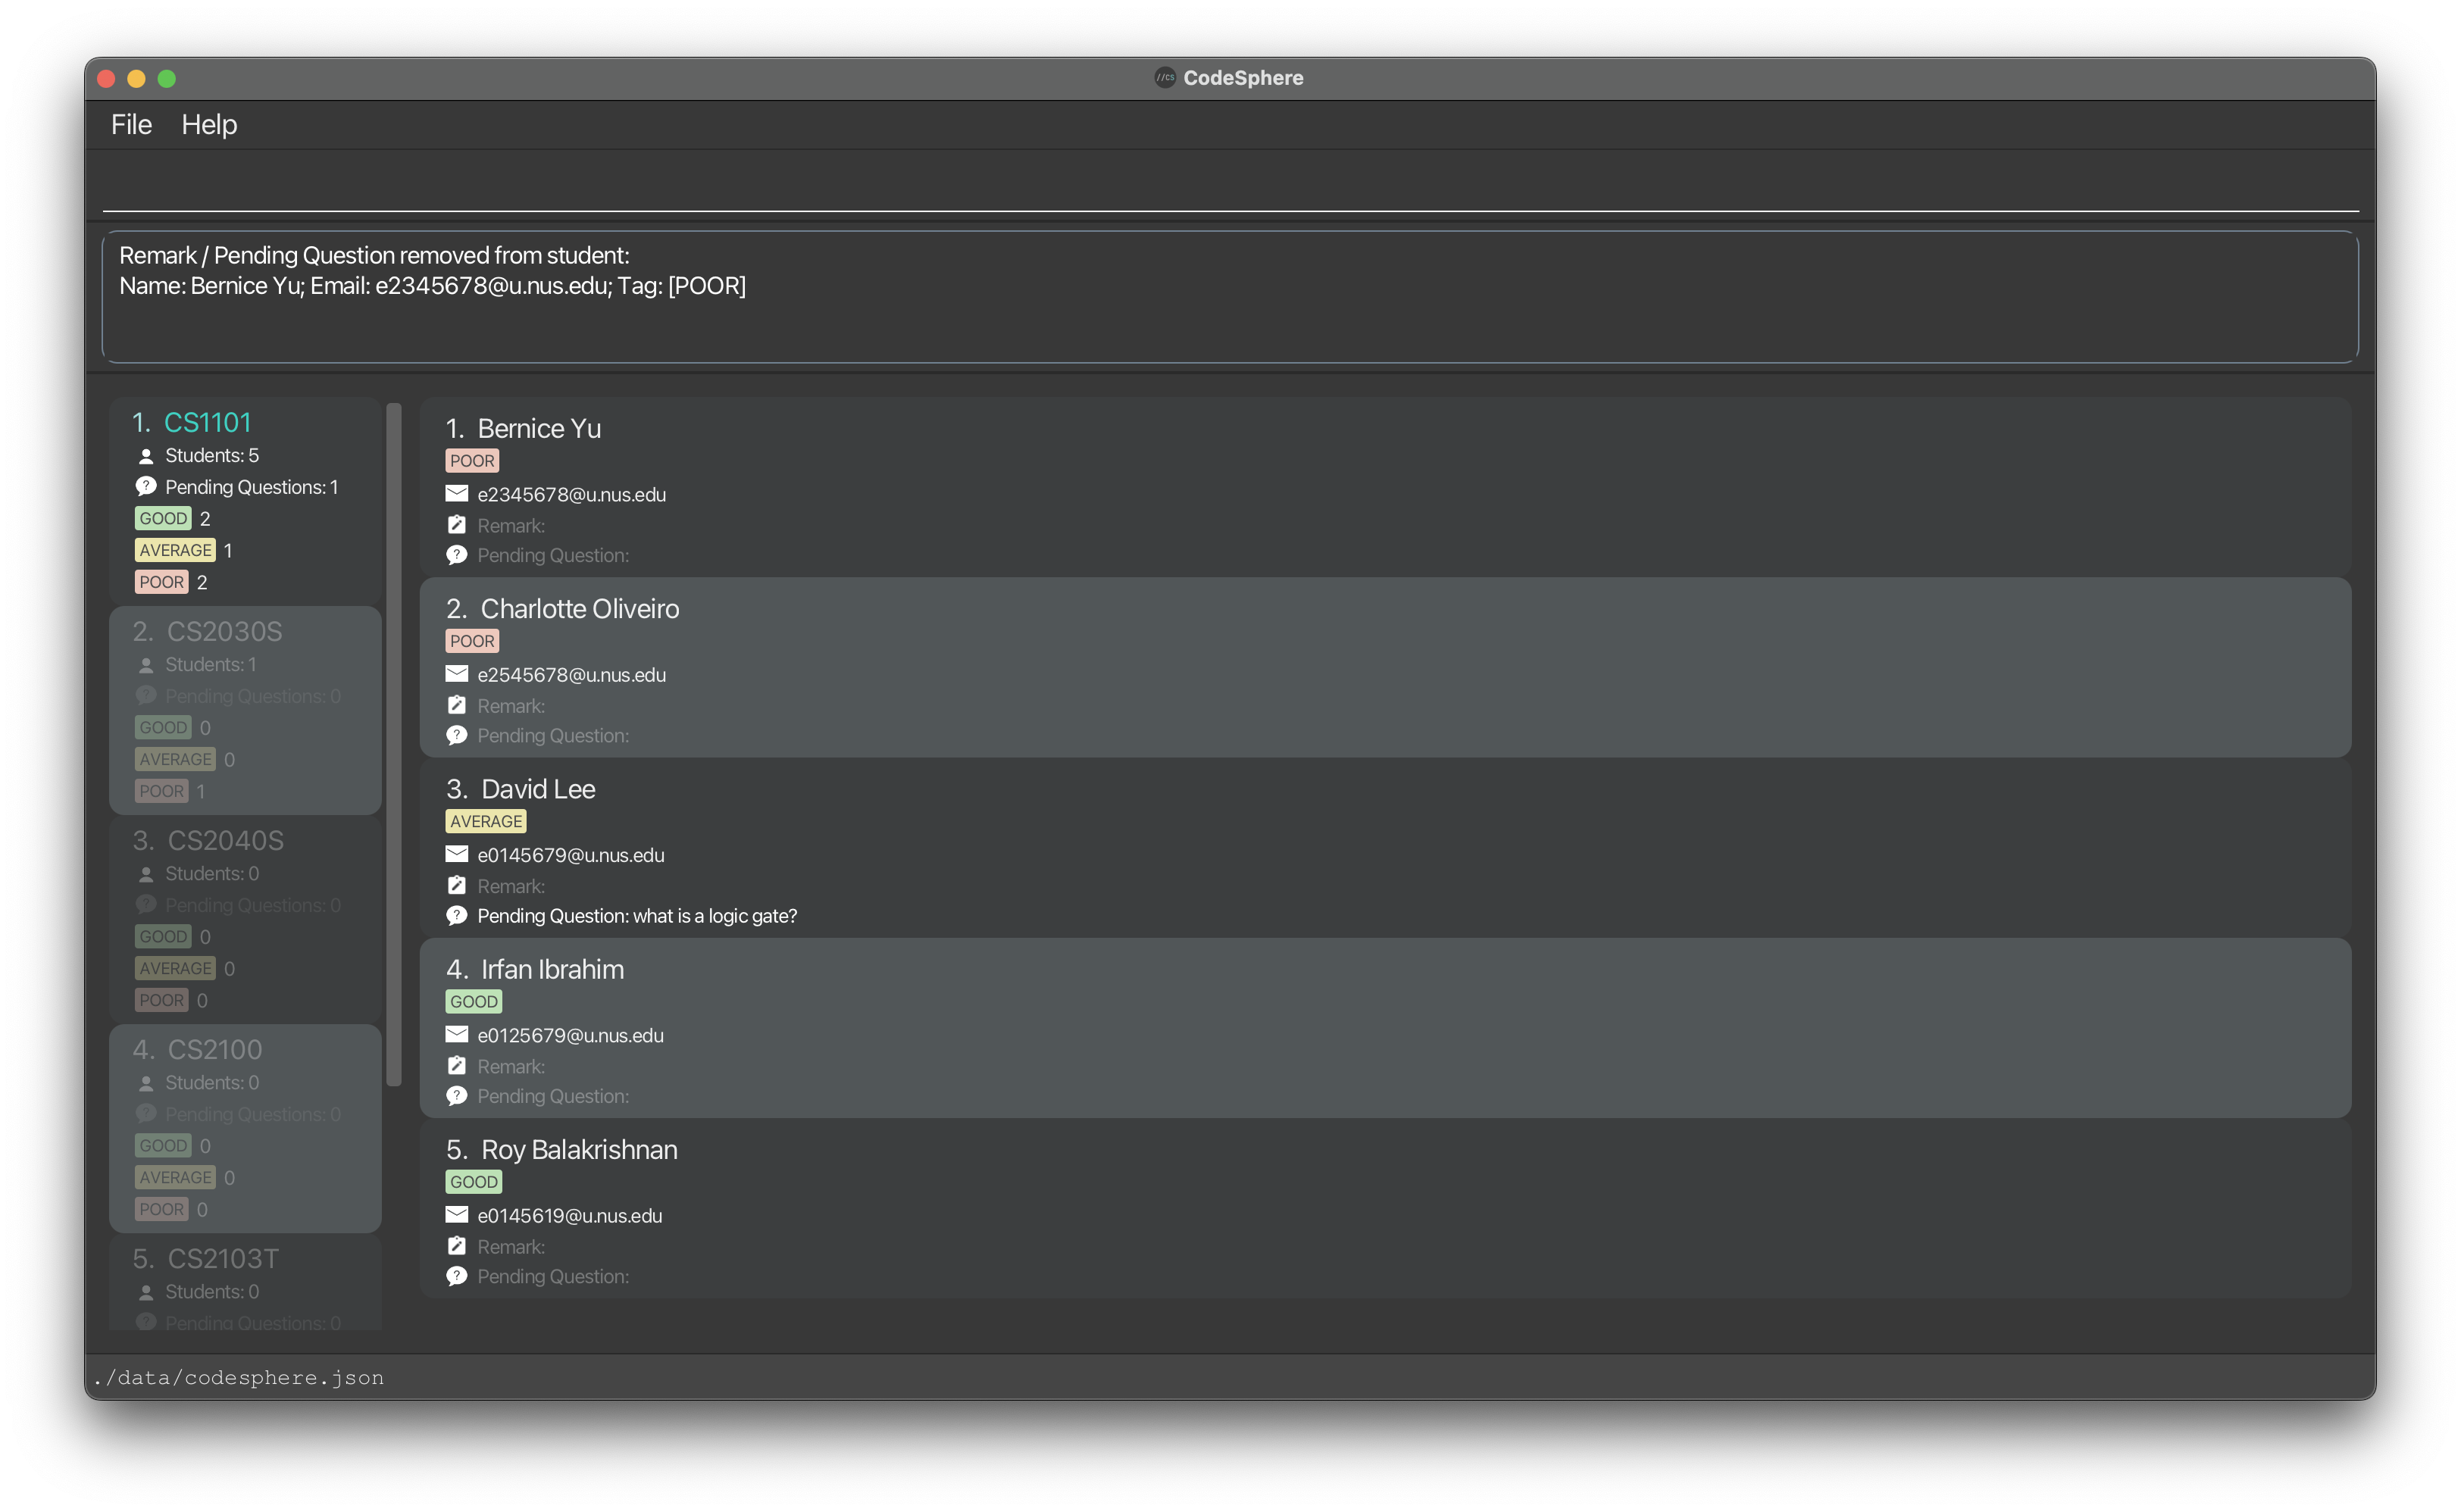
Returning to the home page : home
Returns to the home page that shows the list of courses.
Format: home
-
homereturns the following result: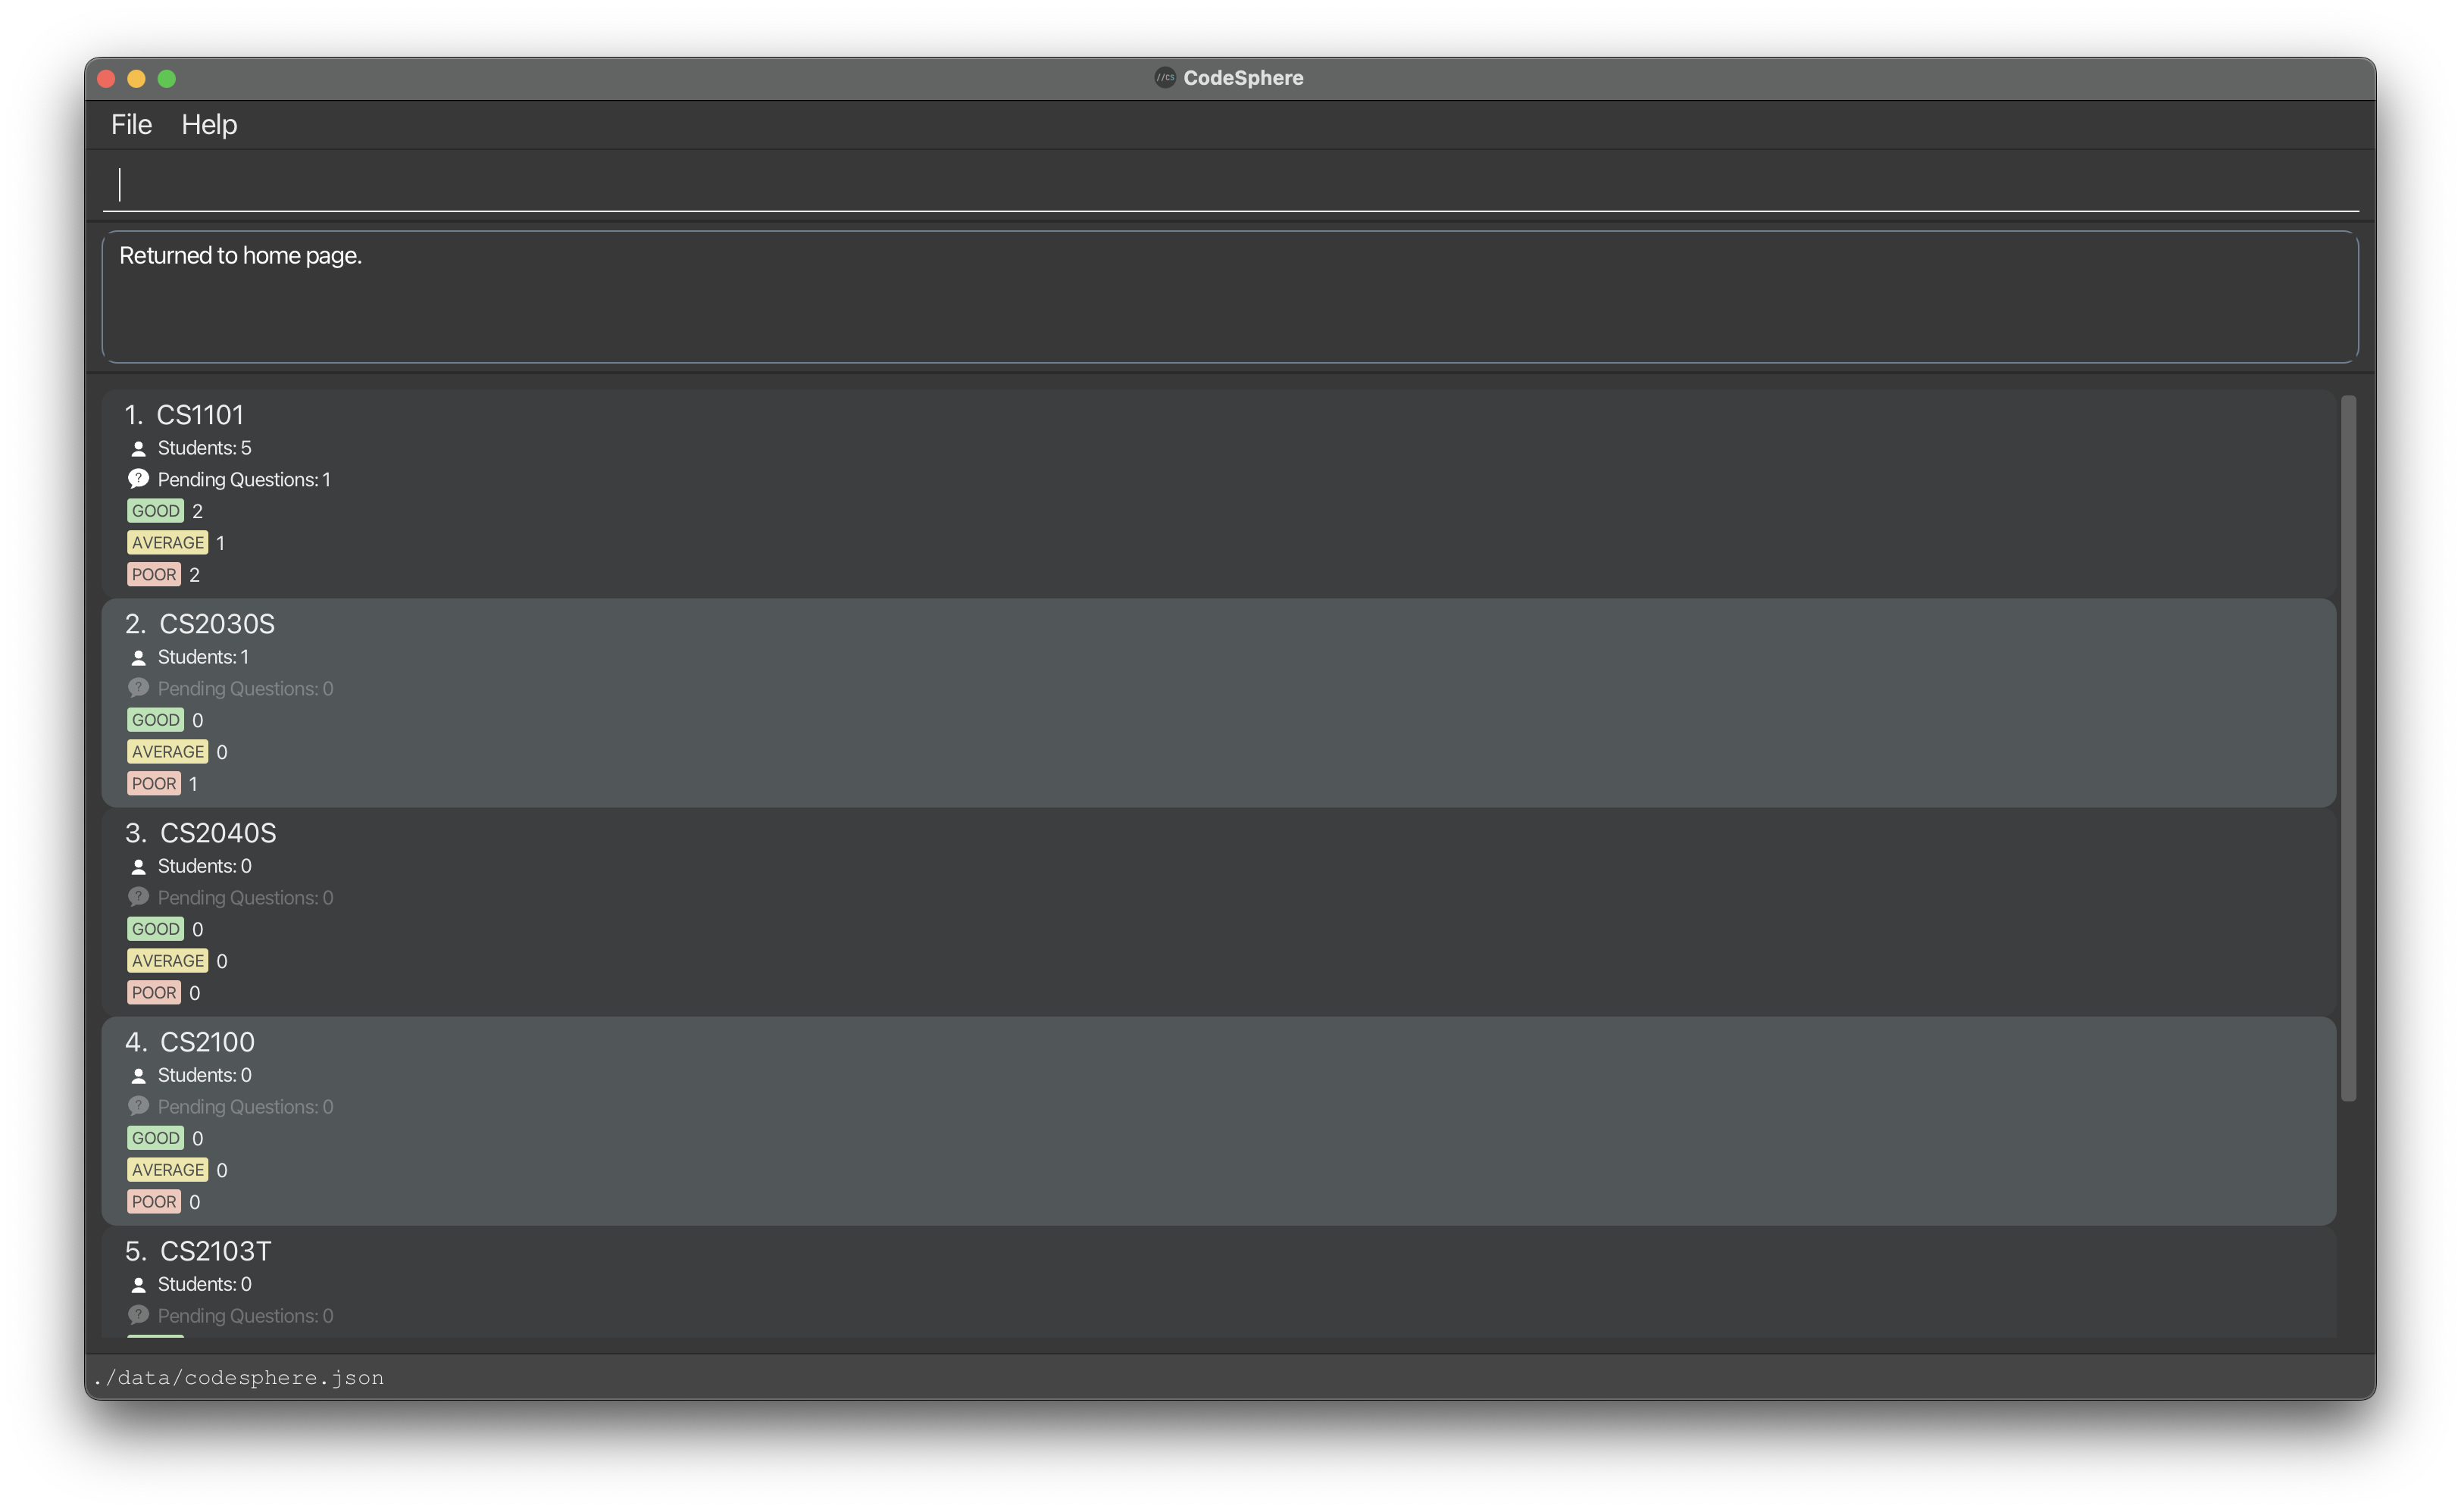
Miscellaneous
Saving the data
CodeSphere data is saved in the hard disk automatically after any command that changes the data is made. There is no need to save manually.
Editing the data file
CodeSphere data is saved automatically as a JSON file [JAR file location]/data/codesphere.json.
Advanced users are welcome to update data directly by editing that data file.
FAQ
Q: How do I transfer my data to another Computer?
A: Install the app in the other computer and overwrite the empty data file it creates with the file that contains the data of your previous CodeSphere home folder.
Known Issues
- When using multiple screens, if you move the application to a secondary screen, and later switch to using only the primary screen, the GUI will open off-screen. The remedy is to delete the preferences.json file created by the application before running the application again.
Command Summary
Home Page
| Action | Format, Examples |
|---|---|
| Help | help |
| Add Course |
add c/COURSENAMEe.g. add c/CS1101S
|
| Edit Course |
edit INDEX c/NEW_COURSE_NAMEe.g. edit 1 c/CS1231S
|
| Delete Course |
delete INDEX e.g. delete 1
|
| Clear All Courses | clear |
| Select Course |
select INDEX e.g. select 1
|
| Find Course |
find KEYWORD e.g. find CS
|
| Reset Course List | reset |
| Exit | exit |
Course Page
| Action | Format, Examples | |
|---|---|---|
| Help | help |
|
| Add Student |
add n/NAME e/EMAIL t/TAGe.g. add n/Susan Tan e/e0123456@u.nus.edu t/GOOD
|
|
| Edit Student |
edit INDEX [n/NAME] [e/EMAIL] [t/TAG]e.g. edit 1 n/JOHN
|
|
| Delete Student |
delete INDEX e.g. delete 1
|
|
| Clear All Students | clear |
|
| Reset Student List | reset |
|
| Sort Students |
sort s/SORT_CRITERIA e.g. sort s/name
|
|
| Find Students |
find [n/NAME] [e/EMAIL] [t/TAG] [pq/PENDING_QUESTION] [r/REMARK] e.g. find n/John
|
|
| List Students with Pending Questions | list pq/ |
|
| Add Remark |
remark INDEX r/REMARKe.g. remark 1 r/needs more help
|
|
| Add Pending Question |
pq INDEX r/PENDING_QUESTIONe.g. pq 1 pq/What is a logic gate?
|
|
| Remove Remark/ Pending Question |
remove INDEX [r/] [pq/] e.g. remove 2 r/
|
|
| Home | home |
|
| Exit | exit |
Glossary
| Term/Keyword | Definition |
|---|---|
| Command Line Interface (CLI) | An interface that allows you to interact with our program by inputting lines of text called command-lines. |
| Graphical User Interface (GUI) | An interface that displays information to you and allows you to interact with visual elements. |
| Prefix | Characters preceding details you input on the command line. Eg. n/ for name and e/ for email. |
| Course | A registered course under NUS. |